 Get Halloween 15% for Limited Time on Lifetime & Bundle Deal


The Backend Order Addon lets you register attendees and issue event tickets from inside your WordPress dashboard instead of the public checkout. You pick the event, choose a ticket type, fill in the attendee’s details and confirm the order — all without leaving the admin area. This guide walks through installing the addon on top of WooCommerce Event Manager, booking an event from the backend step by step, and handling the situations that come up in day-to-day admin work, such as phone bookings, walk-ins and group registrations.
You will need WooCommerce Event Manager already installed and activated, an event with at least one ticket type created, and the addon package ready to upload. The addon is a paid extension available from Mage People.
- Why Book Events From the WordPress Dashboard?
- Before You Install: What You Need
- How to Install the Backend Order Addon
- Booking an Event From the Backend
- Deciding on Payment and Order Status
- Common Questions and Troubleshooting
- Tips for Running a Busy Box Office
- How This Addon Fits Your Event Stack
- Wrapping Up
Why Book Events From the WordPress Dashboard?
Most event ordering happens on the front end: a visitor picks a ticket, pays and receives an order. The backend panel covers the cases where that flow does not fit. A customer calls the box office, an attendee arrives at the venue and wants to pay at the desk, or a company books several seats for its team and prefers one invoice.
In those scenarios, someone on your staff is taking the booking on the attendee’s behalf. Doing that through the public checkout is awkward — you would have to impersonate the buyer, work around payment gateways, and often create a guest account you do not want.
The Backend Order Addon removes that friction. It gives administrators and staff a dedicated screen for creating an order manually, so the booking appears in your WordPress records the same way an online order would, and the attendee still gets a ticket.
- Phone and in-person sales handled by staff in a couple of minutes.
- Group and corporate bookings recorded as one order with multiple attendees.
- Complimentary or comped tickets issued without a payment page.
- Assisted registrations for people who cannot complete the online form themselves.
It is a back-office tool, not a replacement for the front-end booking flow. Your public ticket pages keep working exactly as before; the addon simply adds a second route into the same order system.
Before You Install: What You Need
A short checklist saves the usual round of troubleshooting later.
- WooCommerce Event Manager installed and activated. The addon extends this plugin and does nothing on its own.
- At least one published event with a ticket type and a price. The backend panel reads from your existing events, so there is nothing to book if none exist yet.
- The addon file downloaded from your Mage People account, usually a ZIP archive.
- An administrator or staff role with permission to manage orders.
- A staging copy or a recent backup, so you can test the workflow before your team starts using it on real bookings.
If you have not built your first event and ticket yet, work through that first. The complete WooCommerce event booking setup guide covers event creation, ticket types and the front-end flow from start to finish. Once your events exist, come back here for the admin side.
How to Install the Backend Order Addon
The addon installs like any other WordPress plugin package. You upload the ZIP file rather than searching the plugin directory, because paid extensions are not distributed through WordPress.org.
- Log in to your WordPress dashboard.
- Go to Plugins > Add New Plugin.
- Click Upload Plugin at the top of the screen.
- Choose the Backend Order Addon ZIP file from your computer and click Install Now.
- When WordPress confirms the install, click Activate.
After activation, a new Book an Event menu item appears under the event section of your dashboard sidebar. If it does not appear, confirm that WooCommerce Event Manager is active and that your account has the right capabilities — a role that can manage shop orders usually sees the menu.
Do not deactivate WooCommerce Event Manager while the addon is active. The panel depends on the parent plugin’s event and ticket data, and orders created without it will not link to the right products.
Booking an Event From the Backend
This is the part most people come for, so here is the full sequence. Have the attendee’s name, email address and ticket request ready before you start — the panel will ask for them.
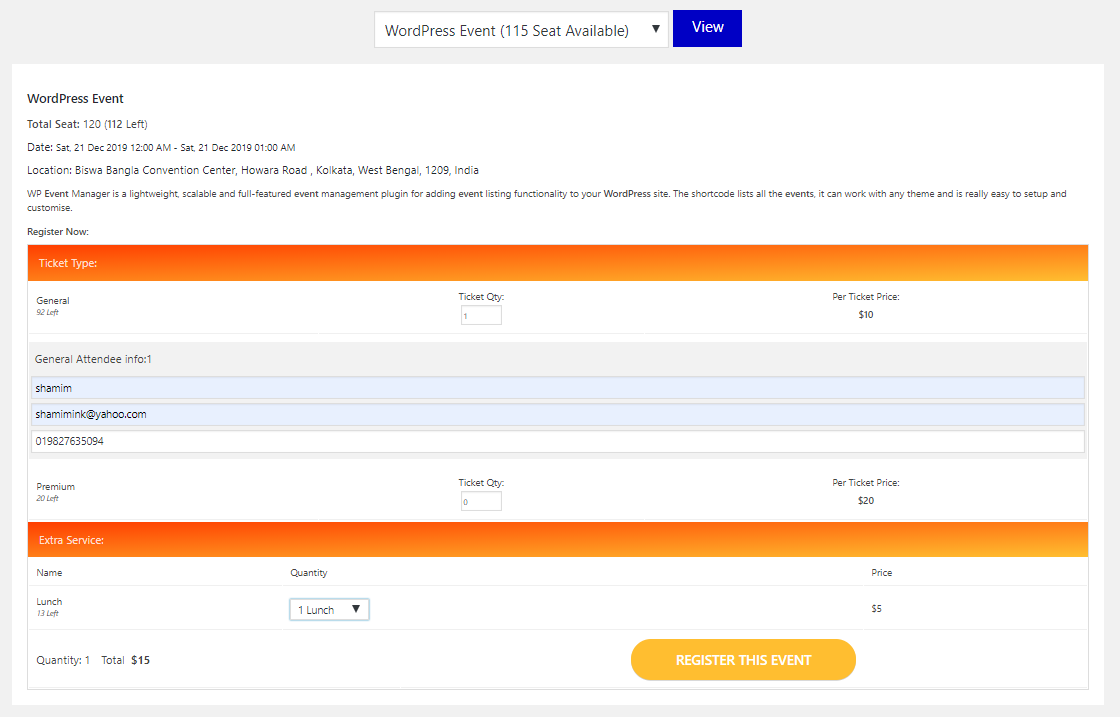
Open Book an Event from the dashboard menu. You will see a selector for choosing which event to book.
- Choose the event. Use the dropdown list to select the event you are booking tickets for. Published events with active tickets appear in the list.
- Load its tickets. Click View to open the ticket selection and attendee details form for that event.
- Pick the ticket type. Select the ticket tier and quantity the attendee wants.
- Enter attendee information. Fill in the fields the event collects — typically name, email, phone and any custom attendee fields configured on the event.
- Confirm the booking. Click the register button to create the order.

When the order is created, a download button appears at the top of the page. Click it to download the PDF ticket for the attendee.
From there you can print the ticket at the desk, email it to the attendee, or hand it over at check-in. Either way, the booking now exists in your WordPress order list, so it counts toward your sales totals and appears in the same reporting you use for online orders.
The addon is a paid extension. Check current pricing on the WooCommerce Event Book an Event from Dashboard product page before you plan a budget, and confirm the license covers the number of sites you intend to run it on.
What Happens to the Order After You Register It
A manual booking is still an order. It is stored with the other orders in your WooCommerce records, which means a few things follow automatically:
- The attendee is attached to the order, so your attendee list for that event stays complete.
- The ticket count is reduced or recorded against the event, depending on how your ticket stock is set up.
- Order status and payment status behave the way they do for any order, so you can mark a desk payment as paid or leave a comped ticket with no charge.
That consistency matters more than it sounds. If half your bookings live in one system and half in a spreadsheet, per-event attendance figures are never trustworthy. Booking through the dashboard keeps one source of truth.
Deciding on Payment and Order Status
Staff-created orders rarely go through a card gateway. In practice you will be marking most of them as manual or offline payments, or recording a zero-value order for a complimentary seat. Agree on a small set of conventions with your team so the records stay readable:
- Desk and cash payments — record the payment method as offline and mark the order paid once cash is received.
- Comped tickets — create the order at zero value so the seat is still reserved and the attendee still receives a ticket.
- Corporate invoices — keep the order pending until the invoice clears, then update the status.
If your event uses deposits, the money you record on a backend order should follow the same rules as your online deposits. The fixed and percentage deposit configuration guide explains how deposit settings work in WooCommerce, which is useful when a phone booking only pays part of the ticket price up front.
Common Questions and Troubleshooting
The “Book an Event” menu item is missing
Check that WooCommerce Event Manager is active and that the addon is activated, not just installed. Then review your user role — an account without permission to manage orders will not see the menu.
The event I want does not appear in the dropdown
Confirm the event is published, that it has at least one ticket type, and that the booking window or sales period has not closed. Draft events and events with no sellable tickets are excluded.
The attendee did not receive an email
Backend orders follow your site’s transactional email settings. Check your sending configuration and spam settings, and confirm the attendee’s address was entered correctly. If you want reminders before the event, the guide to automating event confirmation emails and reminders shows how to set them up.
Can I book more tickets than the form allows?
The panel is subject to the same ticket limits as the front end. If you cap purchases per order or per attendee, those rules apply to backend bookings too. You can adjust the limits themselves with the Min-Max Quantity Limiting Addon, which is covered step by step in its own guide.
Do I need this addon if all my sales are online?
Not strictly. It earns its place when staff take bookings on someone else’s behalf. Purely online events with no phone or desk traffic can work well without it.
Tips for Running a Busy Box Office
A few habits keep the admin workflow smooth once bookings start coming in.
- Create one order per buyer. Group bookings are tempting to split, but a single order per attendee gives each person their own ticket and email.
- Name events clearly. The dropdown only shows event titles, so include the date or venue in the title if you run repeats.
- Book before doors open. During peak arrival times, register walk-ins in batches between check-in rushes rather than one at a time.
- Keep a print station. If you download and print PDF tickets on site, keep a browser session logged in at the desk so downloads do not stall.
- Reconcile daily. Compare cash taken at the desk with the offline-paid orders for that day; discrepancies are much easier to trace on the spot.
For events where guests book without creating an account at all, it is worth understanding how the front end handles that. The guide to guest bookings for WordPress events without a login explains the customer-facing side, while the backend panel covers the staff-side entry.
How This Addon Fits Your Event Stack
WooCommerce Event Manager handles events, tickets and front-end sales. Extensions layer on specific capabilities: seating plans, QR code check-in, quantity rules, calendars. The Backend Order Addon is one of the admin-facing ones — it does not change what attendees see, it changes what your staff can do.
That makes it a good fit for a venue, a training provider or a box office that already sells online and wants the phone and door traffic in the same records. If you are still assembling the rest of your addons, the roundup of must-have WordPress events addons shows which capabilities are worth adding and in what order. For a broader look at how addons extend a WordPress booking system in general, see the overview of how addons extend your WordPress booking system.
Wrapping Up
The Backend Order Addon is a small, focused extension with one job: let you book event tickets from the WordPress dashboard when a booking does not arrive through the public checkout. Install it, activate WooCommerce Event Manager alongside it, and you get a Book an Event screen where staff select the event, choose tickets, enter attendee details and issue a PDF ticket in minutes.
Set a team convention for offline payments and comp tickets while you are configuring it, and your dashboard order list becomes the single, reliable record of every seat sold — online, over the phone or at the door. Check current pricing on the Backend Order Addon product page and confirm compatibility with your version of WooCommerce Event Manager before you roll it out to staff.
