 Get BlackFriday 25% for Limited Time on Lifetime & 35% for Bundle Deal


- Why Build a Yoga Booking System on WordPress?
- What You Need Before You Start
- What Is WpBookingly?
- Step 1: Installing and Activating WpBookingly
- Step 2: Configuring Your Yoga Services/Classes
- Step 3: Setting Up Your Yoga Class Schedule
- Step 4: Integrating Payment Gateways
- Step 5: Embedding the Booking Form on Your WordPress Site
- Step 6: Customising the Booking Experience
- Trial Classes, Deposits and No-Shows
- After Launch: Running the System Week to Week
- Final Checklist Before You Open Bookings
- Start With One Class, Then Scale
- Frequently Asked Questions
Why Build a Yoga Booking System on WordPress?
If you run a yoga studio, you already know the pattern: a student messages you on Instagram at 11pm asking whether there is space in Saturday’s vinyasa class, you answer at 7am, and by then they have signed up somewhere else. Or worse, a class fills to 15 and a 16th student turns up because the spreadsheet was two days out of date.
A yoga class booking system built on WordPress with WpBookingly solves both problems at once. Students see live availability, pay online, and get an automatic confirmation and reminder. You see who is coming to every session, who has paid, and which classes are actually filling.
This guide walks through the whole build in six steps, from installing the plugin to embedding a booking form students can use on a phone. It also covers the decisions that trip studio owners up: trial versus paid classes, deposits, tricky clauses in cancellation policies, and what to do when a popular class sells out.
What You Need Before You Start
You can build this system in an afternoon, but a little preparation means you publish it once instead of fixing it for a month. Gather the following first.
- A WordPress site with an SSL certificate. You cannot take card payments on a page that browsers flag as “not secure,” and students will abandon checkout.
- WooCommerce installed and active. WpBookingly uses WooCommerce as its payment layer, so any gateway that works with WooCommerce (Stripe, PayPal, and the rest) works here.
- Your class catalogue written down. Class names, durations, capacity, price, and which teacher runs each session.
- A clear cancellation policy. Decide your window (for example, 12 hours before class), whether you give credit or refunds, and whether a no-show is charged.
- A decision on how you want to sell. Pay-per-class, class packs, monthly memberships, or a mix. This affects how you create your services.
If you are still comparing plugins and want a broader view of what to test before committing, our pre-install checklist for booking plugins covers the points that matter beyond the feature list.
What Is WpBookingly?
WpBookingly is a service booking plugin for WordPress. You create services (a yoga class is a service), attach schedules and staff to them, and sell bookings through WooCommerce. It powers other service businesses too, which is why the same installation that runs a yoga timetable can also run a salon booking system in WordPress.
For a yoga studio specifically, it handles the parts that generic appointment plugins tend to miss: multiple instructors, recurring class times, capacity per session, and automated emails.
Features That Matter for a Yoga Studio
- Service creation with capacity. Each class has its own duration, price and student limit, so a 15-mat studio never oversells.
- Recurring schedules. A Tuesday 7pm restorative class runs every week without re-entering it.
- Instructor assignment. Assign teachers to classes and let the system prevent double-booking the same person.
- WooCommerce payments. Card payments, deposits, and order records that live in the same place as your WooCommerce invoices.
- Automated notifications. Confirmation on booking, reminder before class, and a cancellation notice when a student drops out.
- Form customisation. Add fields such as “injuries or conditions” or “new to yoga?” so the teacher knows what they are walking into.
The free version is enough to launch a small timetable. Recurring schedules and instructor setup are part of WpBookingly Pro, so plan for that if you are running more than a single teacher’s timetable. Check the product page for current pricing and included add-ons rather than relying on a number quoted in a review.
Step 1: Installing and Activating WpBookingly
Start in the WordPress dashboard.
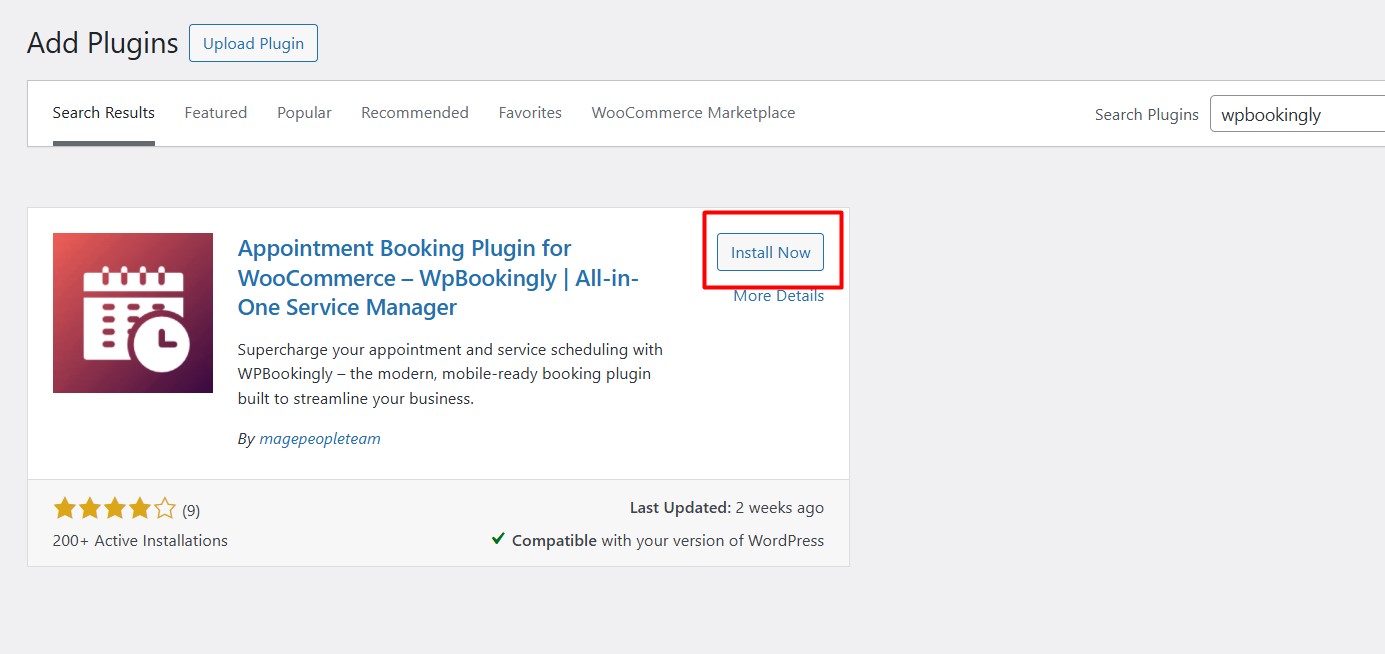
- Go to Plugins > Add New and search for “WpBookingly.”
- Click Install Now, then Activate.
- If WooCommerce is not already installed, install and activate it first — WpBookingly relies on it for checkout and payments.
- Work through the WooCommerce setup wizard so currency, store address and tax settings are correct before you publish any classes.
Five minutes of work, and you have the foundation of your booking system.
Step 2: Configuring Your Yoga Services/Classes
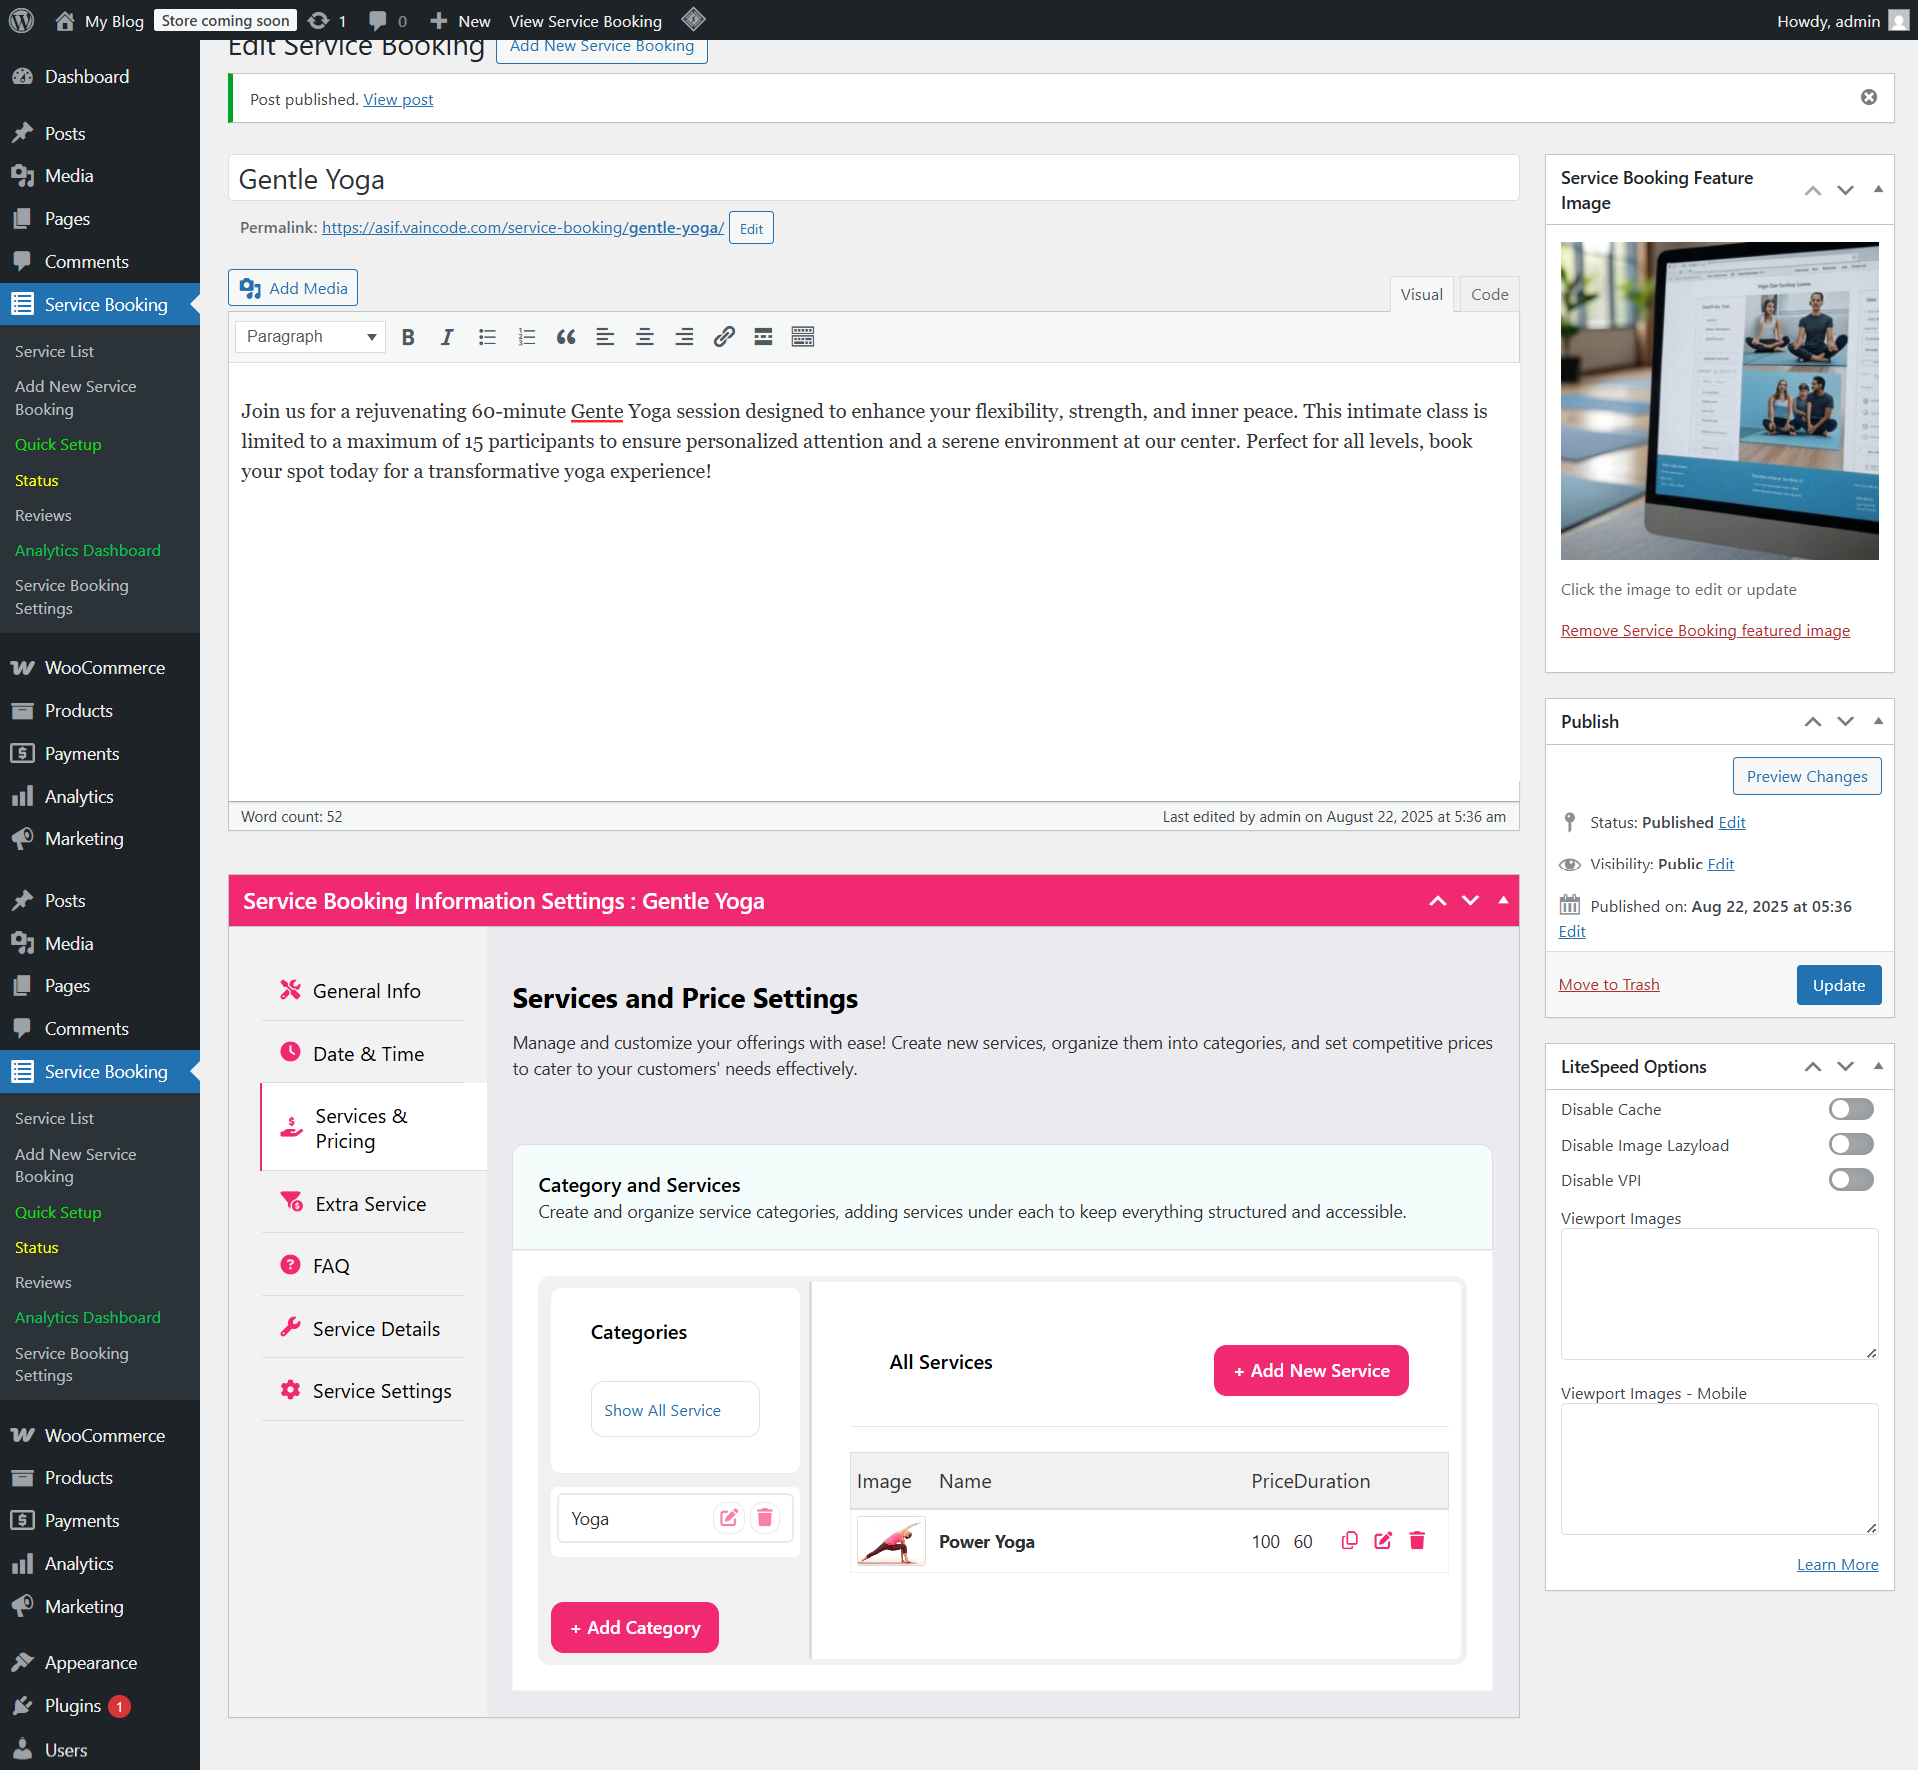
Next, translate your timetable into services. Each distinct class type becomes a service in the plugin.
- Go to Service Booking Manager > Add New Service.
- Name the class exactly as students say it — “Gentle Yoga,” “Power Flow,” “Restorative” — rather than internal codes nobody searches for.
- Set duration (most drop-in classes are 60 or 75 minutes), capacity (your mat count, not your room count), and price.
- Add a short description of who the class suits. This doubles as page copy that helps with search visibility.
- Assign instructors if you have more than one teacher.
Good descriptions against bad ones look like this:
| Weak description | Better description |
|---|---|
| “Yoga class, 60 min.” | “Slow-paced hatha for beginners and returners. Mat and blocks provided. 60 minutes, max 12 students.” |
| “Advanced session.” | “Power vinyasa for students with at least six months of practice. Inversions introduced with alternatives offered.” |
Step 3: Setting Up Your Yoga Class Schedule
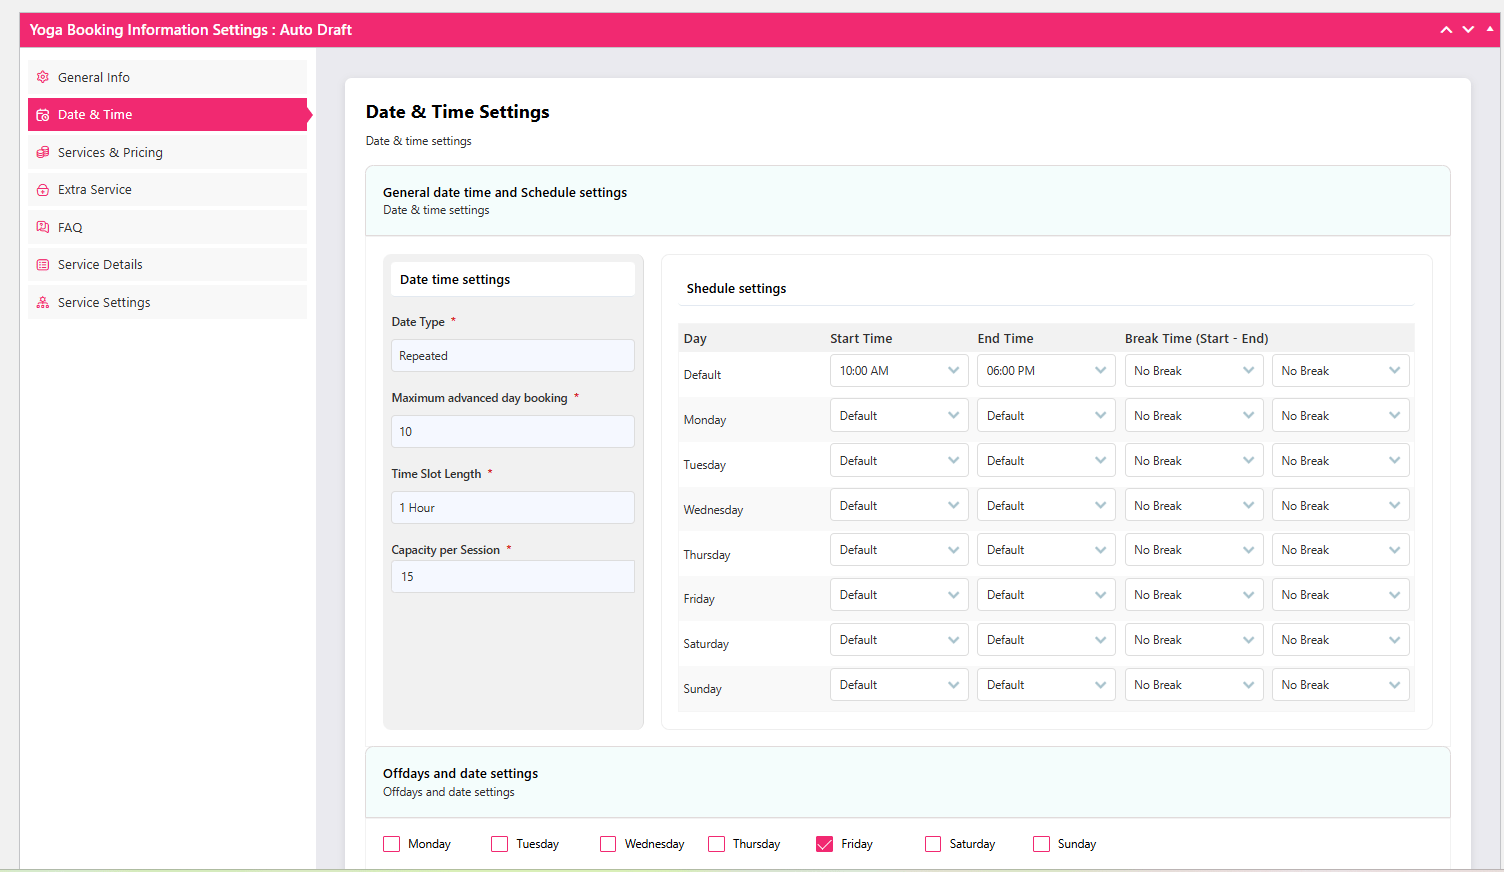
Now give those services real dates and times.
- Go to Service Booking Manager > Schedules.
- Create recurring sessions — the Tuesday 7pm restorative, for example — so they repeat weekly without manual entry.
- Add one-off sessions separately: workshops, full-moon meditations, teacher-training intensives. Keep these out of the recurring rule so they do not accidentally repeat.
- Check instructor availability so two classes are not assigned to the same teacher at the same time.
- If you teach online, set your time zone deliberately. Students booking from other regions should see the correct local time.
With recurring schedules in place, a month of classes takes under an hour to publish.
Practical Scheduling Rules That Prevent Support Emails
- Leave a booking cut-off. Close online booking one to two hours before class starts. It gives you an accurate headcount and stops late bookings you cannot prepare for.
- Block time for changeovers. If your studio hosts back-to-back classes, add 15 minutes between them for cleaning and mat setup.
- Do not publish a whole season at once. A rolling four-week window keeps students booking ahead without creating a wall of empty dates they scroll past.
Step 4: Integrating Payment Gateways
Payments are handled through WooCommerce, which means you are not limited to one processor.
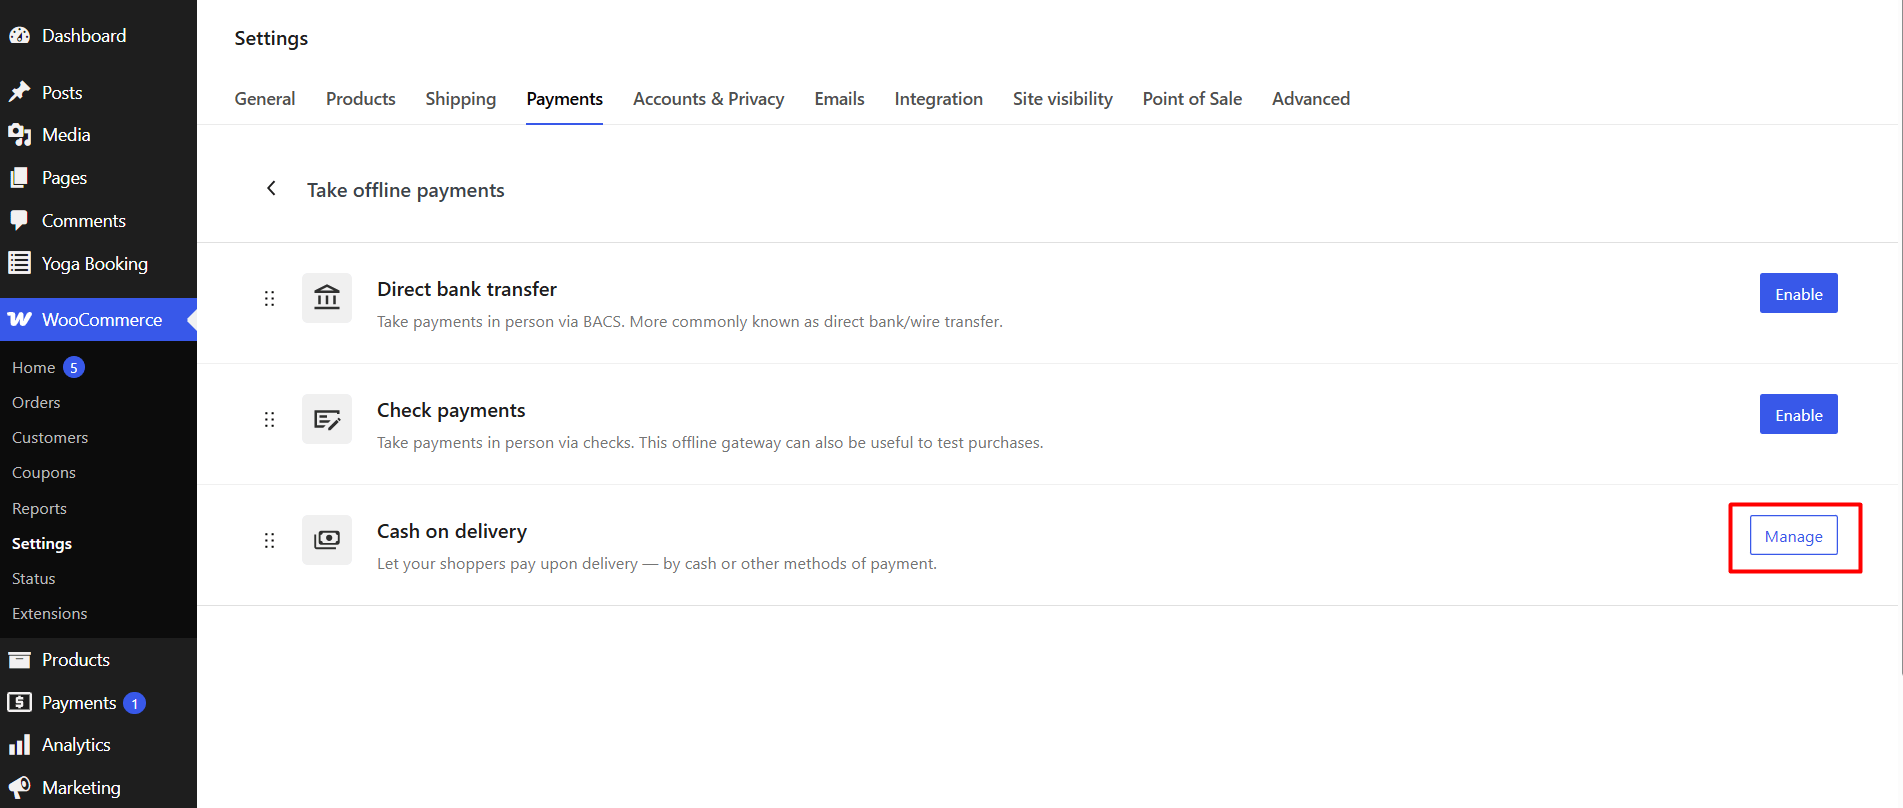
- Go to WooCommerce > Settings > Payments and enable the gateways you want. Enable at least two — a card option and a wallet or local method — because students pay differently.
- Connect your gateway in test mode first, place a booking, complete payment, and confirm the order appears in WooCommerce and the booking shows as paid in WpBookingly.
- Decide whether you take full payment at booking or a deposit. Deposits lower the barrier to booking but add administrative work if a student cancels. If you want to understand deposit mechanics in more depth, our guide to core booking system elements in WordPress explains how the pieces fit together.
- Write your cancellation policy into the WooCommerce checkout terms so it is visible before a student pays, not buried in a FAQ.
- Switch the gateway from test mode to live only after the test booking has been refunded or cancelled cleanly.
Two gateway configurations deserve a warning. First, do not enable a currency your gateway does not support — the checkout will fail silently at the worst moment. Second, if you offer free trial classes, model them as a zero-price service rather than a 100% discount coupon, so your booking records stay accurate.
Step 5: Embedding the Booking Form on Your WordPress Site
Now connect the system to a page students actually land on.
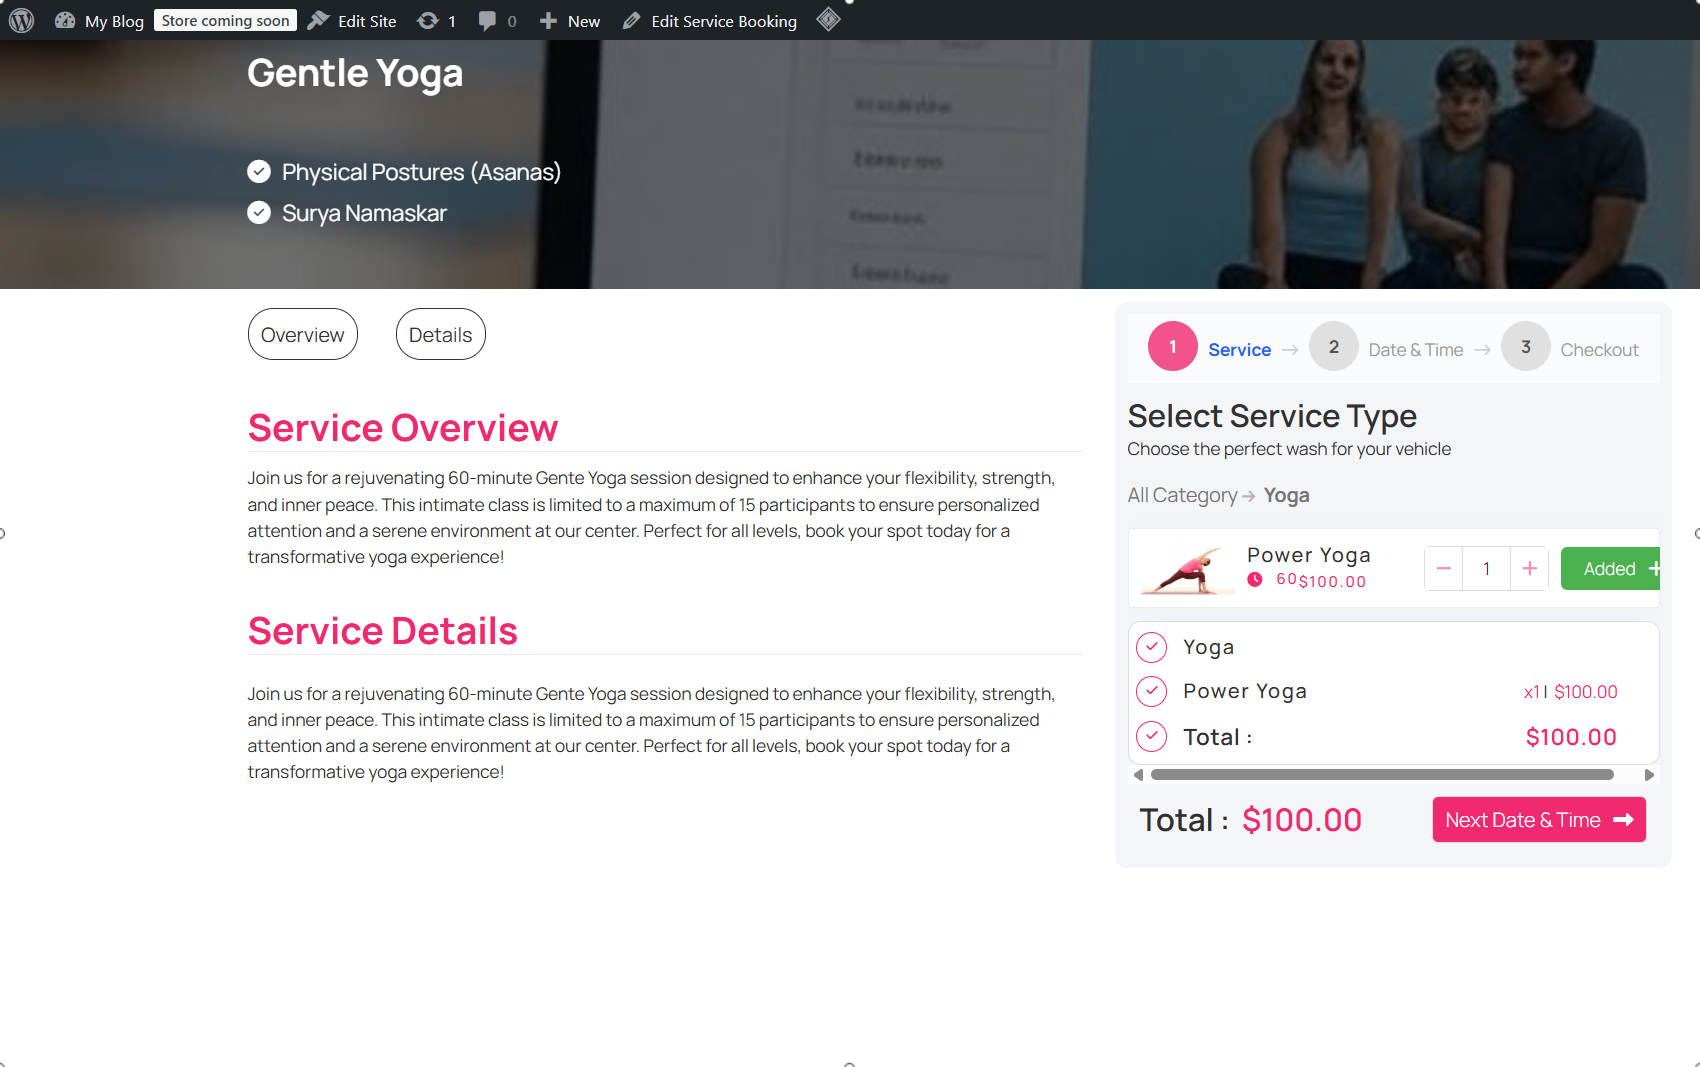
- Copy the WpBookingly shortcode from the plugin settings, or use the Gutenberg block.
- Create a new page called “Book a Class” (or “Timetable”).
- Paste the shortcode or drag in the block.
- Add a short introduction above the form explaining how booking works and when confirmation arrives.
- Publish, then test the full journey on a phone — not just on your desktop.
Test these specific things on mobile: can a student pick a date without pinch-zooming, does the payment form fit the screen, and does the confirmation email arrive within a minute or two. If a student has to work to book, they will message you instead.
Step 6: Customising the Booking Experience
This is where a functional system becomes a system students trust.
- Email templates. Rewrite the default confirmation in your studio’s voice. State the class, date, time, teacher, what to bring, and the cancellation window. Rewrite the reminder the same way.
- Custom form fields. Add optional “injuries or conditions” and “how did you hear about us?” fields. Make them optional — required fields reduce completed bookings.
- Branding. Apply your colours and logo to the booking form and confirmation emails so it looks like your studio, not a plugin.
- Booking policy. Display the cancellation and no-show terms on the booking page itself, not only at checkout.
- Accessibility. Provide a phone number for students who cannot book online. It is also the fastest fallback path if a form breaks on a bank holiday weekend.
Trial Classes, Deposits and No-Shows
These three decisions affect your revenue more than any plugin setting, so make them deliberately.
| Scenario | Approach | Trade-off to accept |
|---|---|---|
| Free intro class | Zero-price service with capacity limits | No-shows run high; confirm by email and consider a small deposit |
| Popular evening class | Full payment at booking or a small deposit | Fewer abandoned bookings, slightly more refund admin |
| Workshops and events | Deposit with balance due before the date | Extra follow-up needed if balance reminders are manual |
| Class packs | Sell as a WooCommerce product, book sessions individually | Requires a clear system for tracking remaining credits |
On no-shows: a reminder email 24 hours before class reduces them more reliably than a stricter policy. The policy protects your margin; the reminder protects your attendance.
When a Class Sells Out
Full classes are the moment your system earns its keep. Publish a clear waitlist process — whether that is a manual list you email when someone cancels, or a waitlist function in your setup — and tell students what to expect. Silent full classes are the most common reason a student gives up on a studio and does not come back.
If you plan to expand into workshops, retreats and multi-session events, our guide to the seminar booking setup in WordPress covers the event-side workflow.
After Launch: Running the System Week to Week
Once the site is live, the work shifts from building to operating. A 20-minute weekly routine keeps everything accurate.
- Roll the schedule forward. Publish the next week of sessions so booking never runs dry.
- Check attendance against capacity. A class that never fills is a candidate for rescheduling or merging; a class that always sells out is a candidate for a second session.
- Reconcile bookings and payments weekly. Compare bookings marked as paid in WpBookingly with orders in WooCommerce so refunds and comps do not drift.
- Update the booking page copy. Refresh class descriptions as your offering changes; stale descriptions confuse regulars and hurt the page’s usefulness.
- Review reminder timing. If no-shows rise, move your reminder closer to the class time.
Final Checklist Before You Open Bookings
- WooCommerce configured with the correct currency and tax settings.
- At least two payment gateways tested in live mode with a refund.
- Class descriptions that state level, duration and what to bring.
- Recurring schedules published for the next four weeks.
- Booking cut-off and changeover buffers applied.
- Confirmation and reminder emails rewritten in your studio’s voice.
- Cancellation and no-show policy visible on the booking page and at checkout.
- The full booking journey tested end to end on a phone.
Start With One Class, Then Scale
You do not need to publish your entire timetable on day one. Put one class type live, run it for two weeks, watch where students hesitate, and fix that before adding the rest. The booking system is not the achievement — a schedule that fills is.
When you are ready to build, start with WpBookingly for your WordPress site and check current pricing and version details on the product page. And if you are choosing between a self-hosted system and a monthly SaaS subscription, our comparison of a yoga booking app for studios explains how the running costs differ before you commit.
Frequently Asked Questions
Is WpBookingly suitable for a small home studio?
Yes. The free version covers service creation, capacity and WooCommerce checkout, which is enough for a single-teacher timetable. Recurring schedules and instructor management, however, are Pro features, so a studio running a fixed weekly timetable should budget for Pro from the start.
Do I need WooCommerce to take payments?
Yes. WpBookingly works with WooCommerce as its payment and order layer. Without WooCommerce you can still record bookings, but you lose card payments and the order records that make reconciliation straightforward.
Can several instructors share one booking system?
Yes. You can assign instructors to classes and schedules so each teacher sees their own sessions and the system prevents the same person being double-booked.
How do I handle recurring weekly classes?
Set them up as recurring schedules in the Schedules section rather than creating each date individually. This is the single biggest time-saver for a studio with a fixed timetable.
What happens when a student cancels?
That depends on the policy you write. Decide the window, whether you issue a refund or a credit, and whether a no-show is charged, then state it clearly on the booking page. The plugin handles the record; the policy is your decision.
Can I sell class packs or memberships instead of single classes?
Yes, and it is usually worth doing for regulars. The cleanest approach is to sell the pack as a WooCommerce product and book individual sessions through your timetable, with a clear process for tracking remaining credits.
