Do you run a theatre or willing to create a system of your own? If yes, then this reading is going to be the solution for your business needs.
Roll out the red carpet and dim the lights, as we’re going to revolutionize the way your theatre operates.
With the theatre Ticketing & Reservation System, audiences don’t have to stand in long queues. They can secure their tickets with just a few clicks. Feeling intrigued?
All this magic is possible with the theatre event or Seat Reservation Management Addon Package Plugin from Mage People.
It’s a winning combination that’ll let you manage everything from event listings and showtimes to seat selection, ticketing, and even QR code generation for a seamless customer experience.
So, grab your popcorn and join us on this journey to digital ticketing, where convenience meets the silver screen
Step By Step Guide To Build theatre Ticketing & Reservation System
In this guide to building a theatre Ticketing & Reservation system, we’ll utilize the Event Manager Pro plugin, Recurring Events Addon, and QR Code Addon. But Why?
Event Manager Pro: This plugin sets up your ticketing system. It helps create detailed event listings for event showtimes, with descriptions, trailers, and cast info.
Recurring Events Addon: events often have multiple showings. This addon handles recurring events effortlessly. Just set up event details once, and it generates showtimes for your chosen days or weeks.
WooCommerce Event QR Code Addon: This addon links ticketing with WooCommerce, a WordPress e-commerce plugin. It lets customers buy tickets online and gives them secure QR codes for entry to the theatre.
With a packaged plugin of such tools, you can create a hassle-free and efficient theatre ticketing & reservation system, which will delight your customers and boost your business.
Let’s get into the step-by-step procedure! Shall we?
Step 1: Install And Activate Plugins And Add-Ons
Before you begin anything, you must install and activate the required plugin, and two add-ons. To do that, log in to your Dashboard with the right credentials.
Event Manager Pro:
We’ll start things with the WooCommerce Event Manager Pro- WpEvently plugin. To do that, you have to navigate your mouse pointer to the plugins section from the Dashboard.
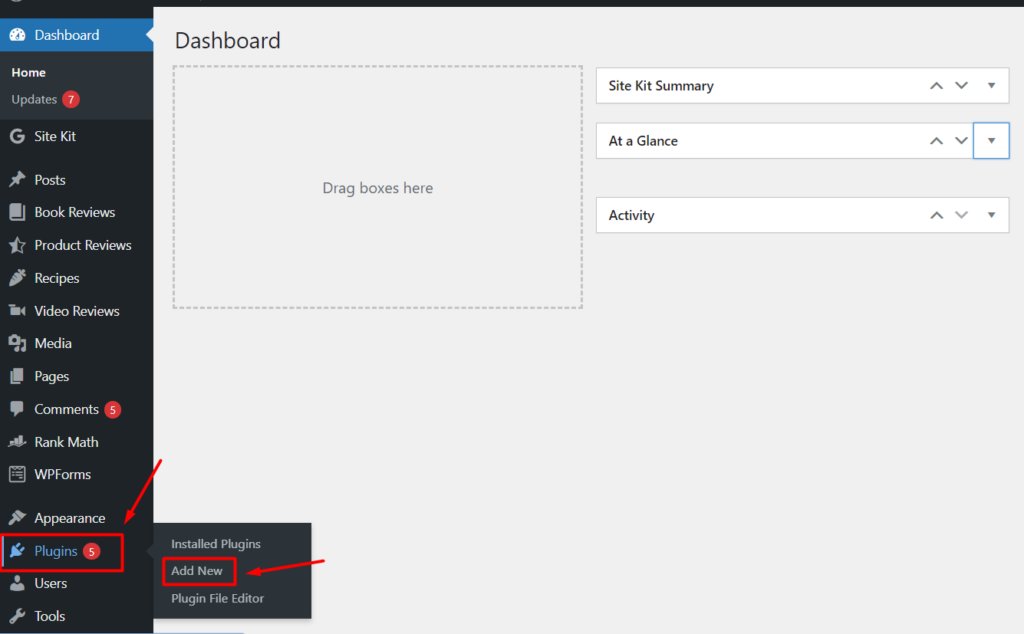
Afterwards, click on “Add New” to proceed further. Type “WpEvently” in the search bar and click Enter.
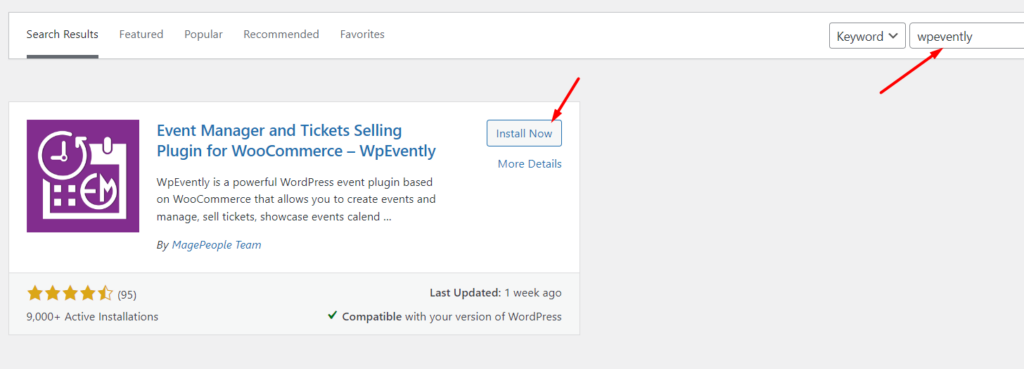
In the first place, you’ll see the plugin. Click “Install Now” to install it in your WordPress site. Let it install and then, as you guess it, click on “Activate.” You’ll be redirected to a new page.

As a prerequisite, you have to install and activate the “WooCommerce” plugin to let the WP Evently plugin smoothly run on your website.
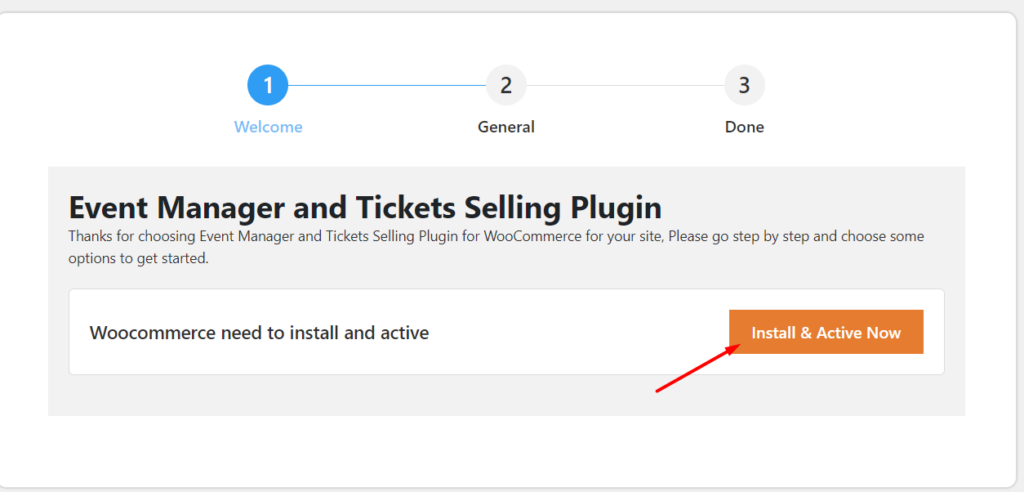
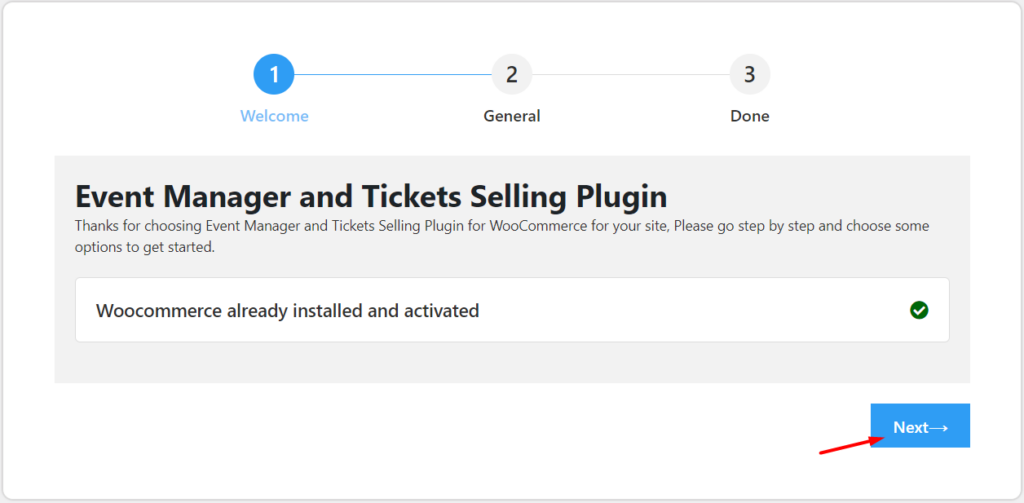
Click on “Install and Activate” and the process will be done within seconds. To configure the settings click “Next” to move from the Welcome page to the General Settings page.
In the General settings page, choose events label, event slug, expiry date & time of events, email form name, and email address.
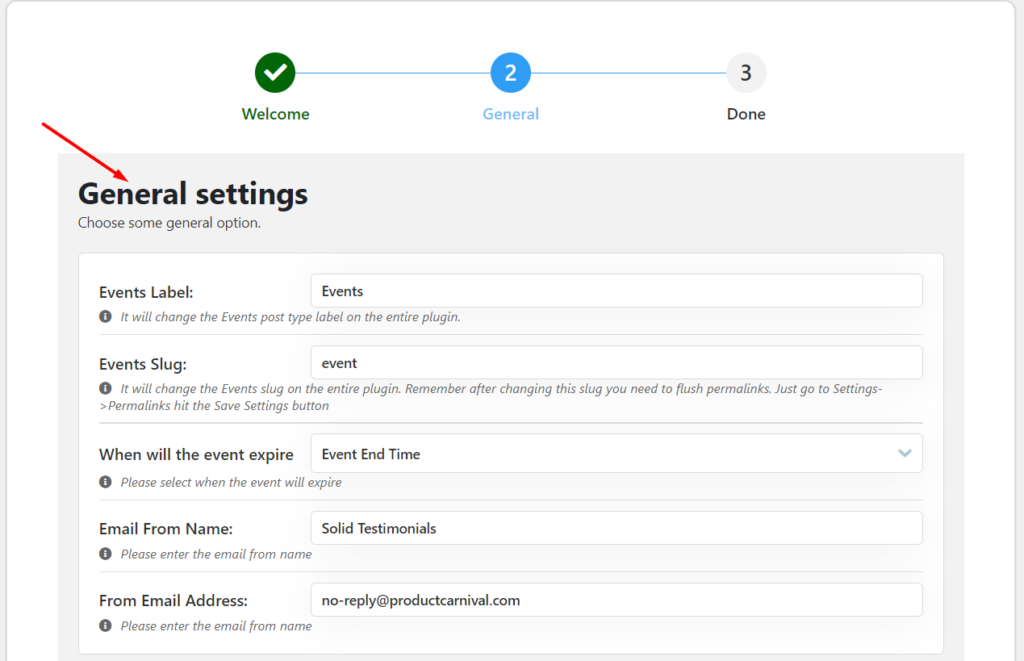
Click “Next” after you’ve fulfilled the slots. You’re almost finished with the settings part.
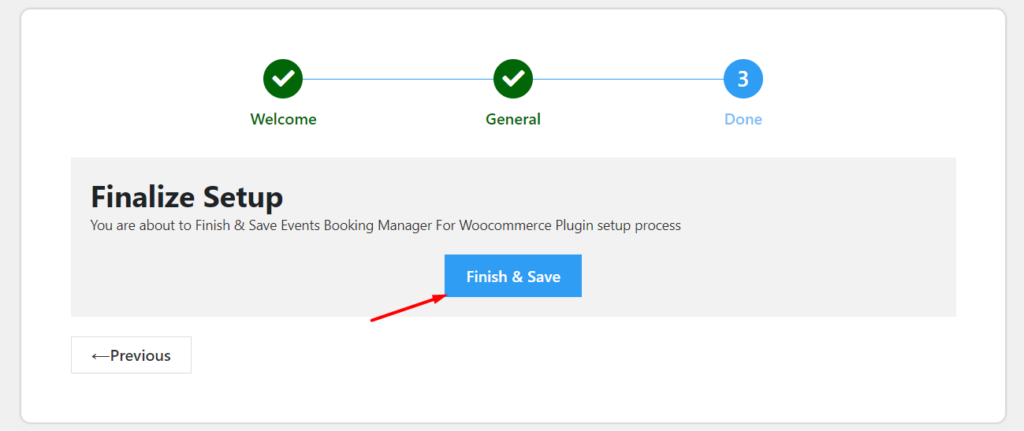
Click “Finish & Save” to preserve the settings. Now, let’s install and activate the rest of the two Add-ons.
QR Code Addon:
After you’ve installed and activated the WooCommerce Event Manager Plugin, it’s time to move to the add-ons. And we’ll begin with the QR Code Addon.
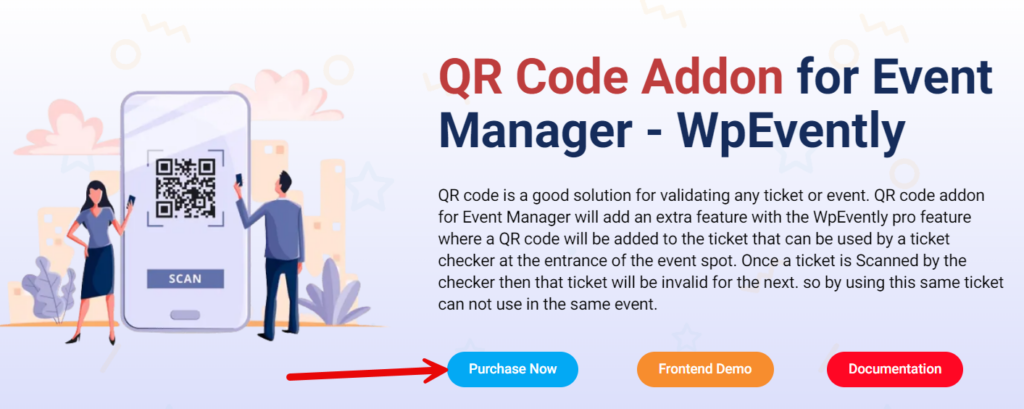
First of all, you have to download, install, and activate the WooCommerce QR code addon from here.

After activating it, click on “events” and go to “QR Code Settings.” Enable QR codes, and select the user roles.

Navigate to the “Events Attendees” option and click on “Download Ticket” to generate QR codes with tickets.

We are done with the setup of the QR code addon. With the addon, you can easily integrate QR Codes in PDF format on your theatre tickets for effortless booking.
Recurring Events Addon:
Now, it’s time to install and activate the Recurring Events Add-on. Before you do this, you must purchase the addon and download it.
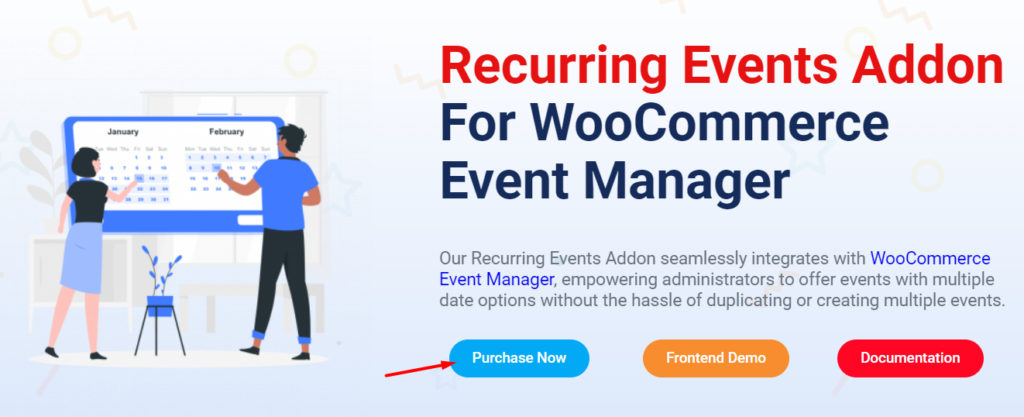
To purchase, or download the Recurring Events Addon, visit this page and click on the “Purchase Now” button. Make sure you download it before installation

Click on the “Upload Plugin” button from the Plugins section of your WP Dashboard. Then, Click on “Choose File” and select the downloaded ZIP file from your computer.

Next, click “Open” and the downloaded ZIP file will be displayed, and the installation option will arrive. Then, select the “Install Now” option to let it install on your WordPress site.
Wait for a few seconds, and it will be installed. Following, you have to click on the “Activate Plugin” option to activate the addon.

After 2 to 3 seconds, the plugin will be activated. Phew! We have installed and activated all the plugins and add-ons. Now, we are good to go!
Step 2: Create a New Category And Organizer
Since we’re using the Event Manager Pro plugin, we’ll initiate the theatre ticket reservation System with a new event.

Before we add a new event, we must create a new organizer and category for the event. To do that, head over to the “Events” menu, and click on the “Organizer” option.

Type in the Organizer Name, Slug, and Parent Organizer. You can also add a small description with the detailed location or address info.

After putting in all the required info, click the “Add New Organizer” option to finalize it. Next, we’ll add a new category. So, click on “Category” under the “Events” section from your Dashboard.

Well, add the category name, slug, parent category, and a short description (not mandatory). At last, click on the “Add New Category” to save the new one.

Well, add the category name, slug, parent category, and a short description (not mandatory). At last, click on the “Add New Category” to save the new one.
Step 3: Add New Event
To add a new event, navigate your mouse pointer to the “Events” drop-down menu and click on the “Add New Event” option.

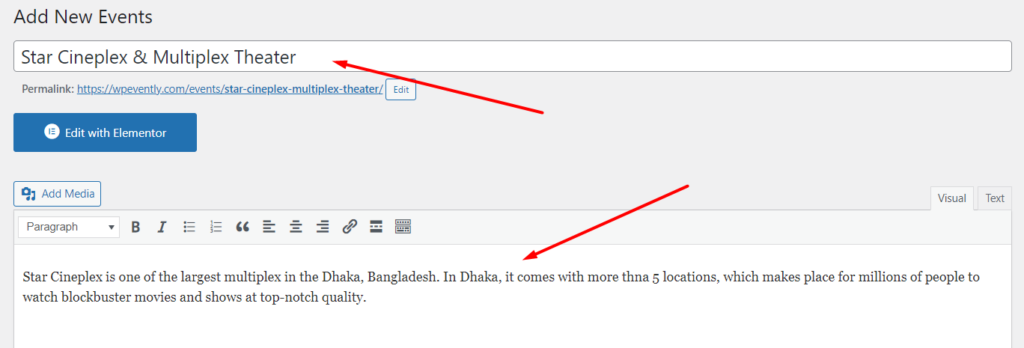
In the new events page, type in the title/event name first. Then, provide a short description if you prefer to add any details.
Scroll down and head over to the “Event’s Information: Auto Draft” section, where we’ll start by adding the location or venue address.
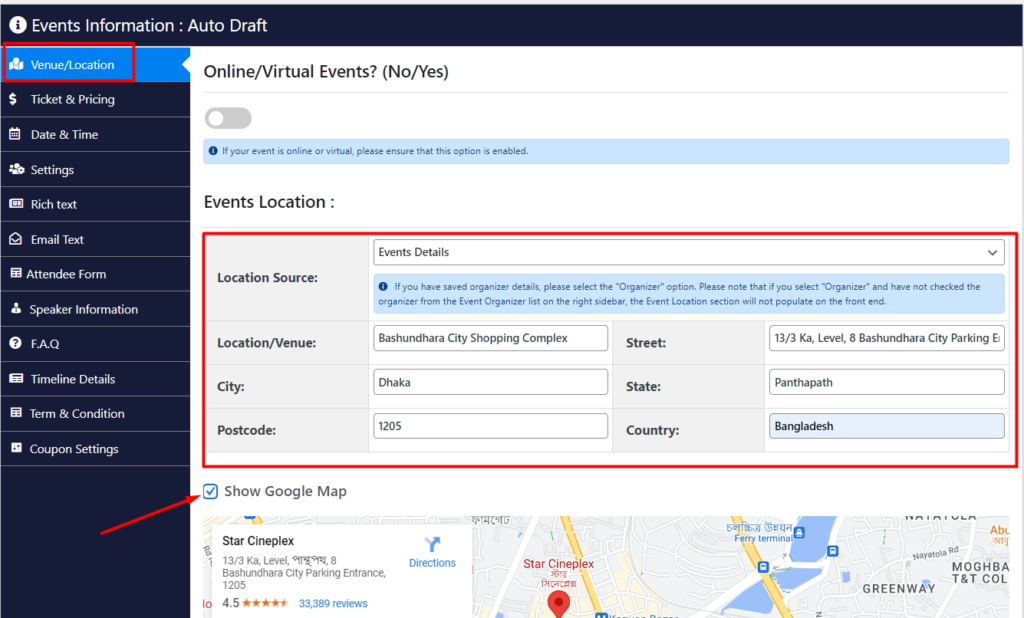
In the Venue/Location section, first, you can use the organizer address if you wish, or you can manually put the location address with a map view for a more accurate overview.
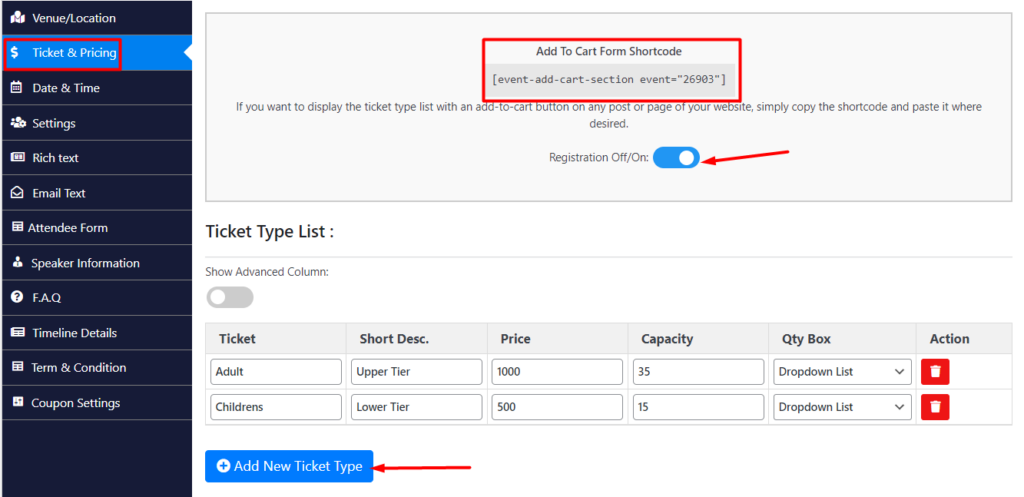
Move to the “Ticket & Pricing” section, where you’ll get a shortcode to add the tickets and pricing option anywhere. Click on the “Add New Ticket Type” to add a new ticket with price and capacity.
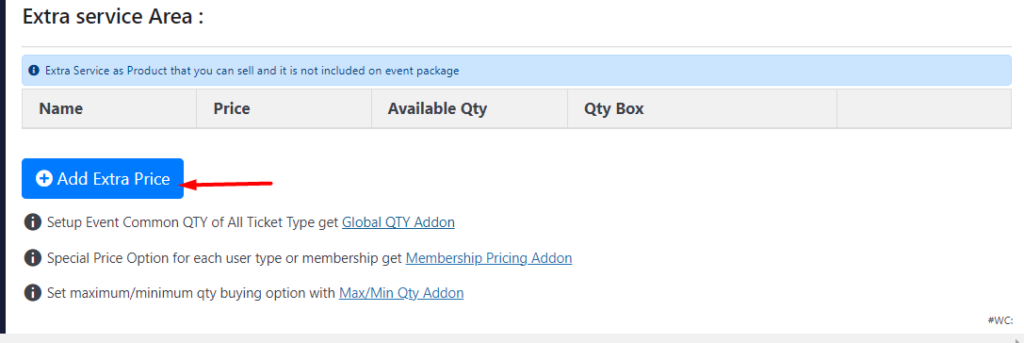
There is also an “Extra Service Area” section available underneath the “ticket & pricing” section where you can provide products to sell which are excluded from the ticket price.
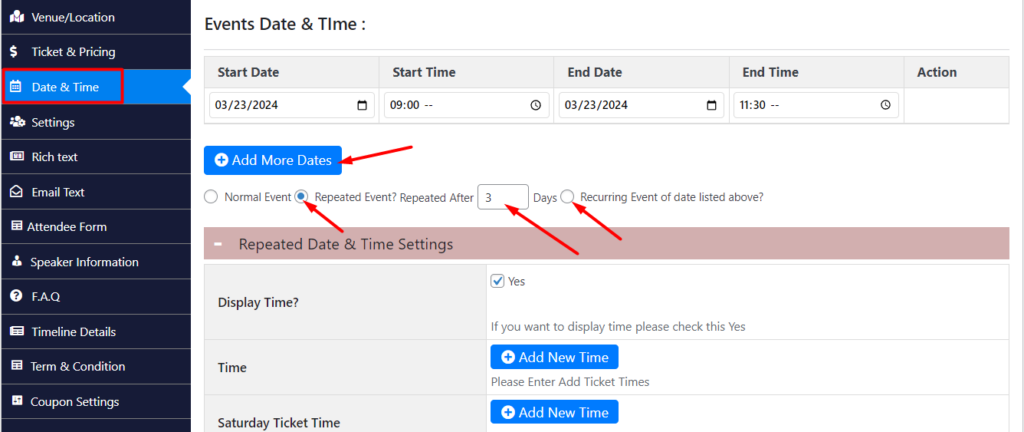
In the Date & Time section, you can add the event time and date with extended details. Since we’re building a theatre ticketing system, we’ll choose the repeated event option.
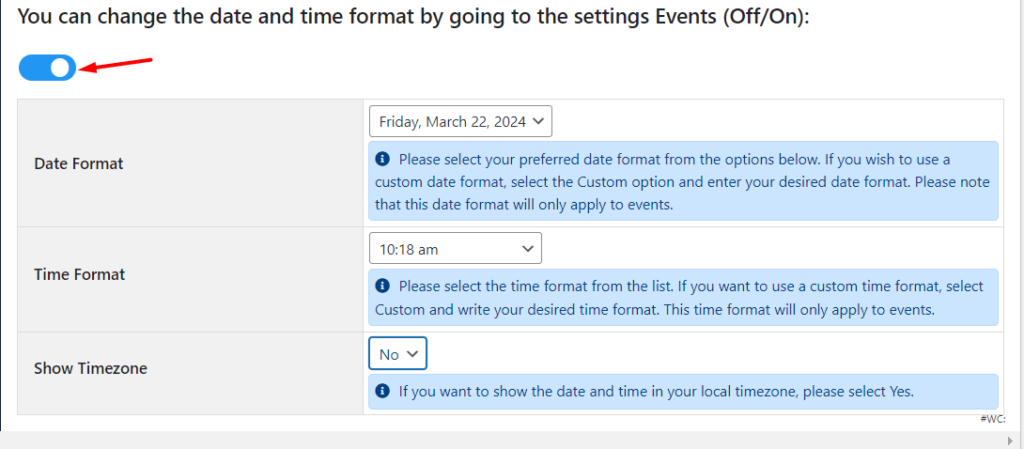
Below, you’ll get a prolonged section for “Repeated Date & Time Settings” for recurring shows/events. You can also change the time format with the on/off button, here.
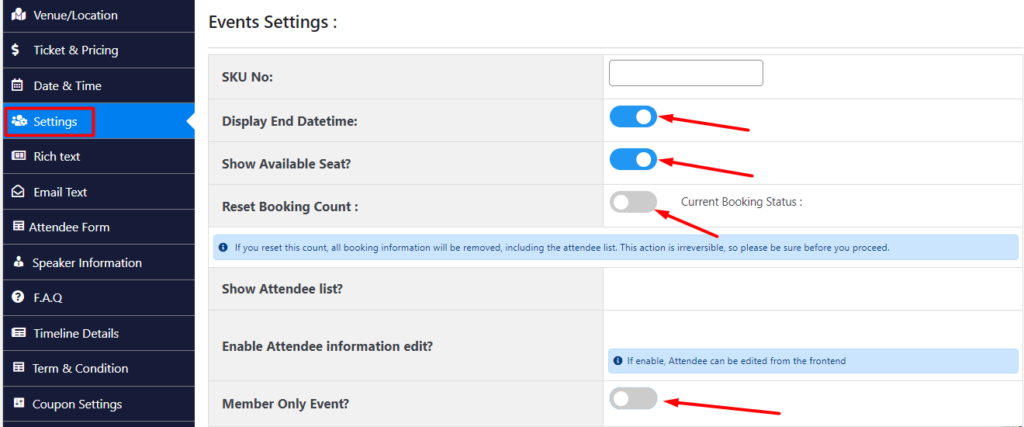
In the next section “Settings” you can modify the event settings, such as SKU No, displaying end date, time, available seat, attendee list, and much more.
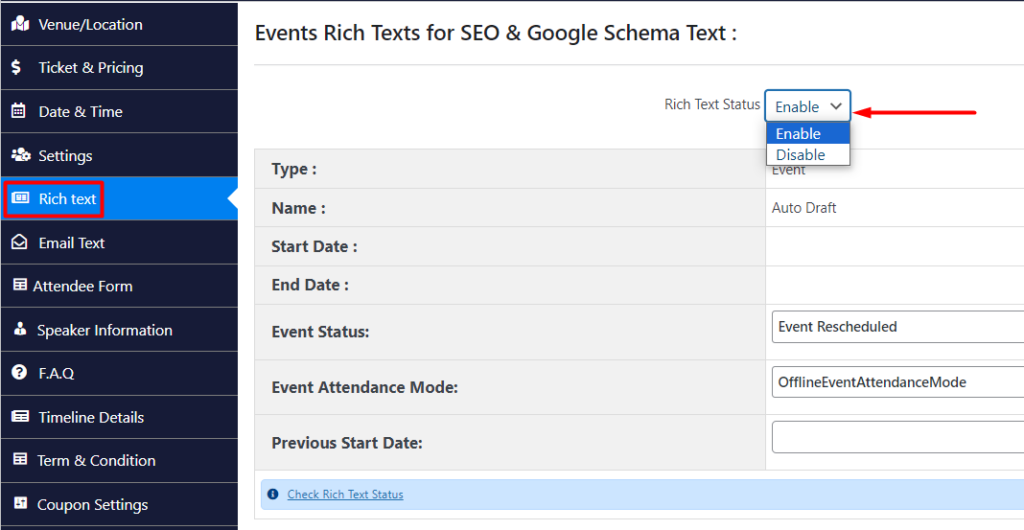
After that, we have the “Rich Text” section, which you can use for SEO & Google Schema. In the “Email Text” section, you can write emails to send to your patrons.
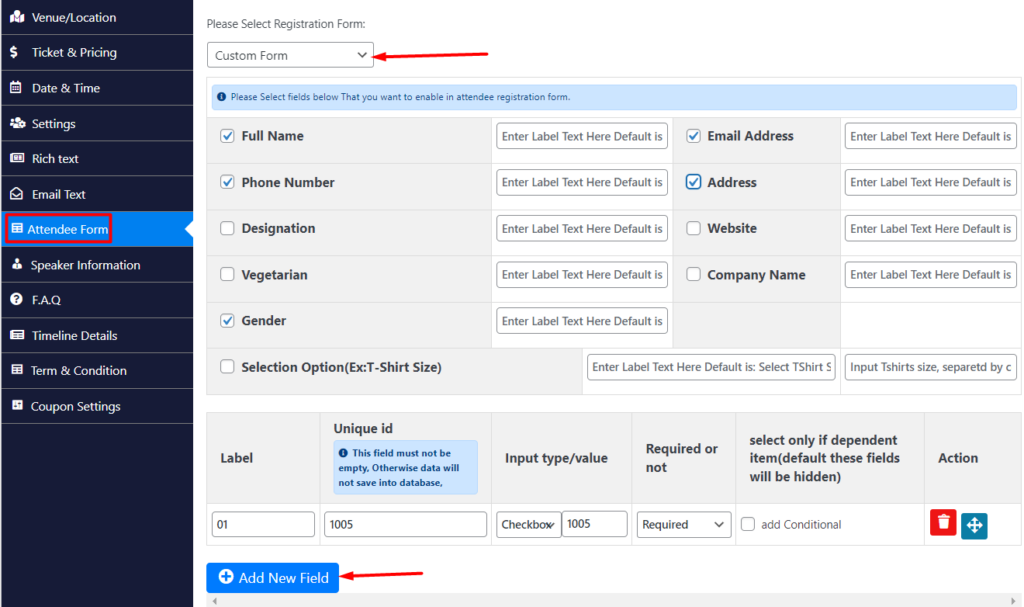
In the “Attendee Form” section you’ll add the required fields for your event attendees to fill up before registering for the event or show. You can also choose custom or premade forms.
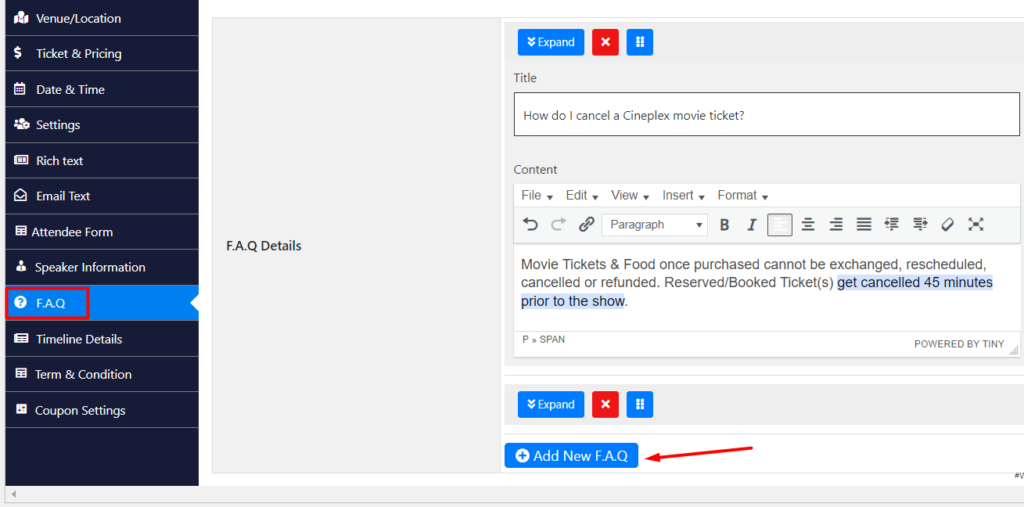
Since we’re creating a theatre booking system, we’ll skip the “Speaker Info” section. In the following section, you can add FAQs to help your clients with more details about your event.
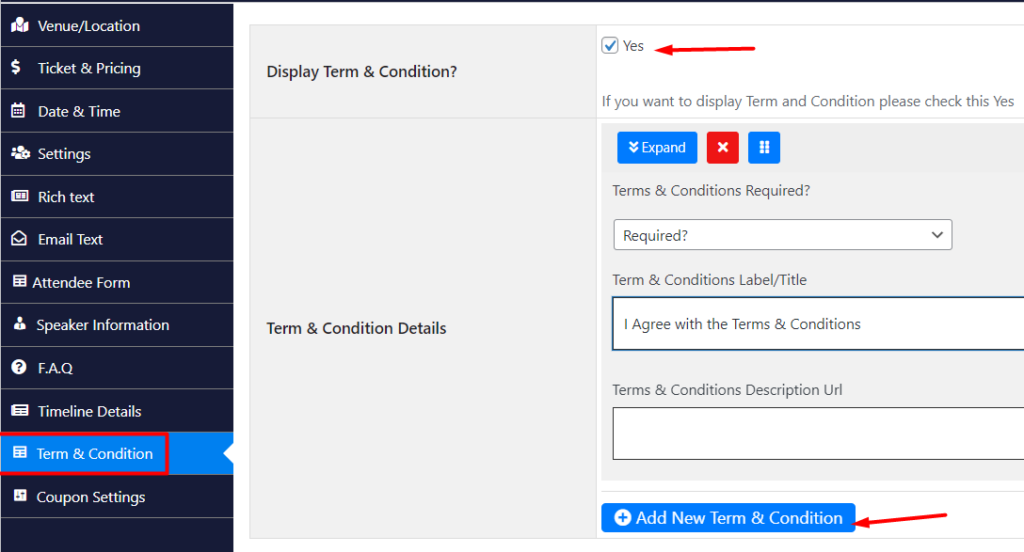
Then comes the “Term & Condition” section. If you want to display terms & conditions you can modify this section. For new terms & conditions, click the “Add New Term & Condition” button.

You can add coupons or discounts under the “Coupon Settings” section. It comes with an extended list of details for user engagement.

Following, choose the event category and the events organizer you’ve created. If you want you can also add new sub-categories or organizers.

Then, set a featured image for your event. Click on the “Set Featured Image” option and upload an image from your computer.
Step 4: Preview & Publish It
Finally, we are ready to publish and create a new event for the theatre ticket booking system. To do that, click on the “preview” option and check the overall info of the event.

If you’re satisfied with everything, you can now publish it. Just click on the “Publish” button and your event is now live. Here’s what your new theatre ticketing system looks like in live view:
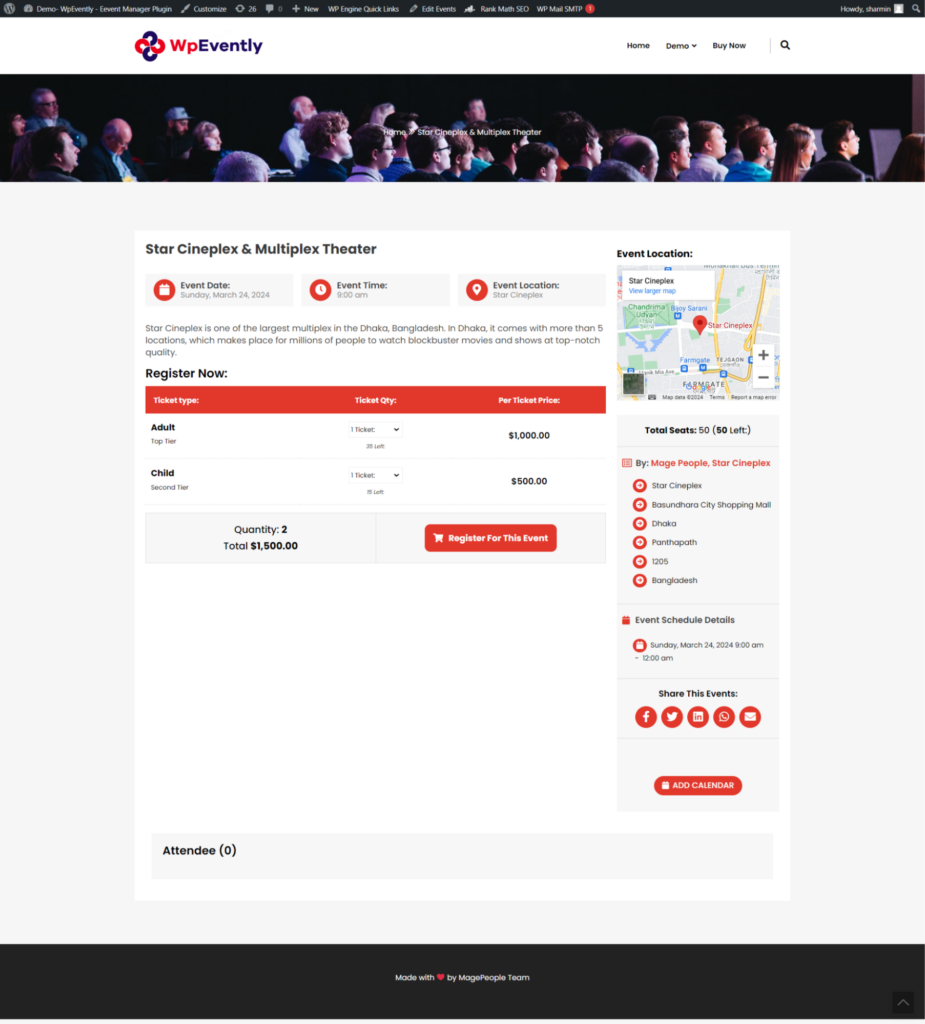
We are all done and dusted with the new theatre ticketing & reservation system. It’s that easy to build a theatre ticketing system with WooCommerce Event Manager Pro – WpEvently.
Want to build a similar theatre ticketing & reservation system for your theatre business, and enhance the user experience for your patrons?
Conclusion
Enhance customer satisfaction and streamline your theatre & theatre business with the theatre event or Any Seat Reservation Management Addon Package Plugin for your WordPress site.
We hope this step-by-step guide helped you comprehend the whole process effortlessly. This plugin package comes with powerful features to make a seamless booking experience easy.
Whether you run a cineplex, multiplex, or a single show, embrace an online theatre ticketing plugin and watch your business thrive in the digital age.
With WooCommerce plugin solutions from MagePeople, it’s never been easier to provide the convenience your patrons desire from you.


