 Get Halloween 15% for Limited Time on Lifetime & Bundle Deal

An online cinema ticket booking system lets moviegoers pick a showtime, choose exact seats and pay before they leave home. The fastest, most affordable way to build one is WordPress with an event booking plugin plus a seat-plan addon — no custom development, no per-ticket marketplace commission. This guide walks you through the whole setup, from installing plugins to publishing your first showtime, then covers the features that decide whether your box office actually runs smoothly.
What an Online Cinema Ticket Booking System Needs to Do
Cinemas are not generic events. A single film plays many times a day, in multiple halls, with tiered seat pricing. Before choosing tools, list the jobs the system must handle:
- Showtime scheduling: the same movie repeated at 11:00, 14:30 and 19:00 without creating a separate listing each time.
- Seat-level selection: a visual hall layout where customers click the exact seat, and booked seats lock instantly.
- Tiered pricing: balcony, premium and regular rows priced differently, plus child or student rates.
- Instant fulfilment: a ticket with a QR or barcode delivered by email, scannable at the entrance.
- Front-desk sales: the ability to book seats on behalf of walk-in customers from the dashboard.
- Occupancy reporting: which screenings sell out and which need promotion.
If any of these are missing, staff end up reconciling paper lists against online orders — which is exactly the problem the system was meant to remove. For a broader look at what booking software does beyond cinemas, see our overview of the advantages of an online booking system.
Why Build the Cinema Ticketing System on WordPress
WordPress already powers content, SEO and payment plugins, so adding ticketing keeps everything on one domain you control. Compared with a third-party ticketing marketplace, you keep the customer relationship, avoid per-ticket fees, and can cross-sell snacks, memberships or gift cards on the same checkout.
A working stack usually combines four pieces:
- WP Evently (Event Manager Pro) — the core plugin that stores events, showtimes, ticket types and attendee data.
- Recurring Events Addon — generates repeat screenings of the same film automatically.
- Seat Plan Addon — turns ticket selection into a clickable hall layout.
- QR Code Addon — attaches a scannable code to each ticket so door staff can verify entry fast.
- WooCommerce — handles checkout and payment gateways.
Because the core plugin is open source, developers can extend templates and hooks later if your cinema needs something unusual, such as loyalty pricing or a members-only presale.
Step-by-Step: Create an Online Cinema Ticket Booking System
Step 1: Install the Required Plugins
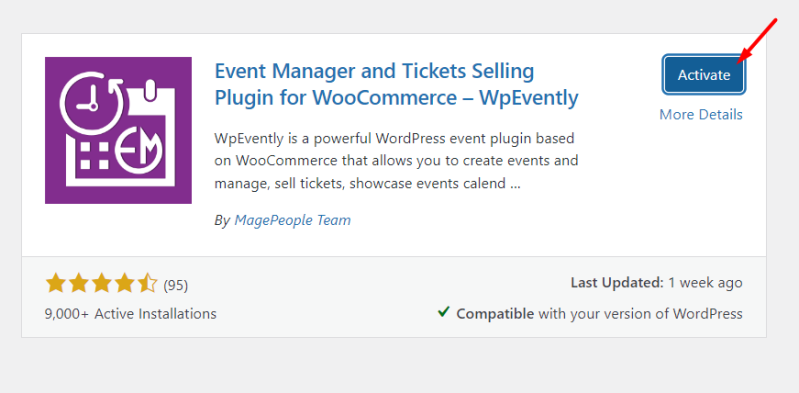
Start in your WordPress dashboard. Install the core booking plugin and each addon, then activate them in order so the addon menus appear correctly.
- Install and activate WP Evently / Event Manager Pro from the plugin screen, then complete its setup wizard.
- Install WooCommerce and connect at least one payment gateway so tickets can actually be purchased. Test it in sandbox mode first.
- Activate the Recurring Events Addon — you will use it for multiple daily screenings.
- Activate the Seat Plan Addon — this is what makes seat selection possible.
- Activate the QR Code Addon so each ticket carries a unique, verifiable code.
Step 2: Set Up Event Categories and Organizers
Categories and organizers keep a busy cinema calendar readable, both for customers browsing your site and for staff managing the back end.
- Categories group screenings by type — for example Action, Comedy, Animation, Documentary, or a separate “Kids Morning” category for discounted family shows.
- Organizers identify who runs the screening. If you operate more than one venue, create one organizer per hall or per brand; a single-screen cinema needs only one.
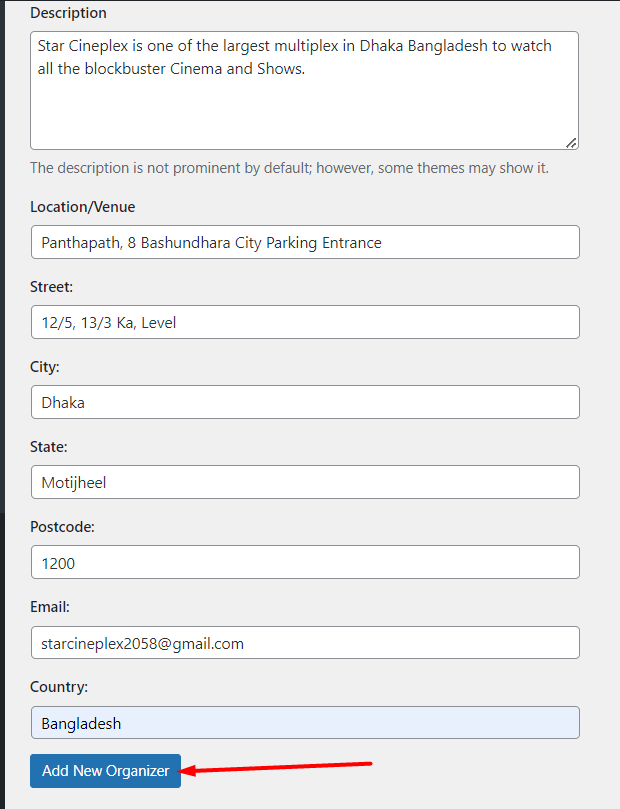
Deciding this structure now saves time later, because switching categories after dozens of screenings are live means re-tagging every event.
Step 3: Add Your First Movie Event and Showtimes
Create a new event and fill in the information a ticket buyer needs:
- Title and description: film name, certificate, runtime and language or subtitle options.
- Venue: add the hall address and attach a Google Maps location so customers can find the entrance and parking.
- Date and time: set the first screening, then use the recurring option to generate the rest of the day’s showtimes rather than duplicating the event.
- Ticket types and prices: create each tier as its own ticket — for example Regular, Premium and Balcony — with its own price and quantity.
- Images: poster art and, where possible, a still for the social preview card.
Keep ticket quantities per screening accurate. If a hall has 180 seats, do not publish 200 tickets and rely on the seat map to sort it out — the numbers should agree before you go live. Check current pricing for the plugin and addons on the vendor’s product pages before budgeting.
Step 4: Create a Dynamic Seat Plan
The seat plan is the part customers judge the whole system by. Use the Seat Plan addon to build a layout that mirrors your actual hall:
- Create a new seat plan and set the number of rows and seats per row to match the real auditorium.
- Adjust spacing and walkway gaps so the front, middle and back blocks read clearly on a phone screen.
- Assign colors or categories to seat types, then link each type to the matching ticket price.
- Mark unusable positions — pillars, aisle ends or broken seats — as unavailable rather than deleting them from the row.
- Save and preview the plan on the event page, then test booking two seats on the same row and one on a different row.
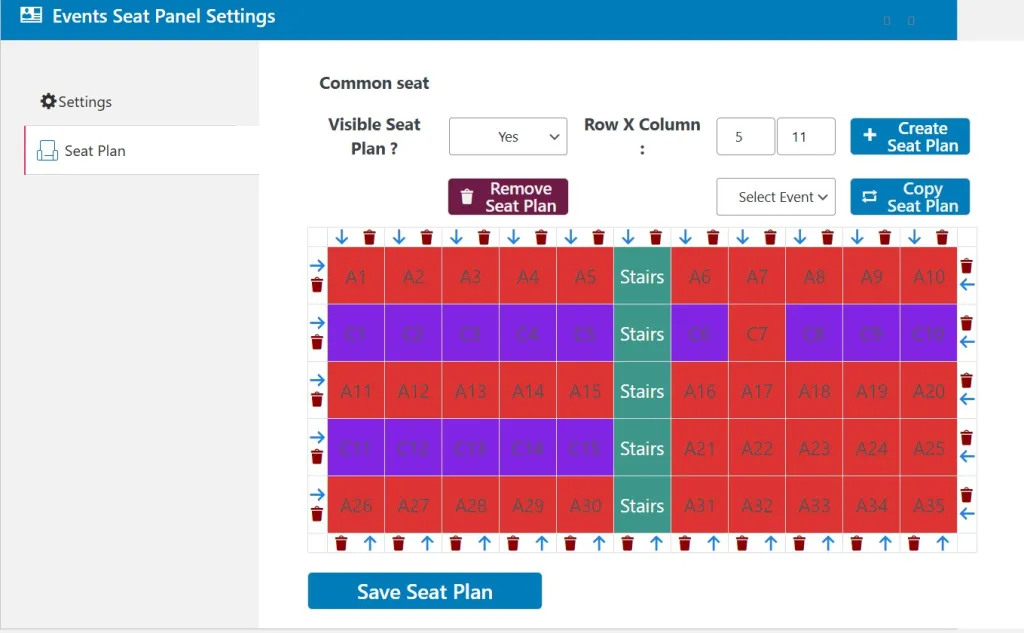
Always test on a small screen. Most cinema bookings happen on a phone minutes before a show, so a layout that only works on desktop will cost you sales.
Step 5: Preview, Test and Publish
Before publishing, run a full dry run:
- Buy a ticket yourself using a live payment method and confirm the order lands in the dashboard.
- Check that the confirmation email arrives with the ticket and QR code attached.
- Scan the QR code with the app or reader your door staff will use.
- Confirm that a booked seat becomes unavailable to the next customer.
- Test a refund or cancellation so you know the seat returns to the pool.
Only then hit Publish. For a deeper look at the same workflow applied to a general theatre programme with plays and live shows, see the step-by-step guide to creating an online theatre booking and reservation system — the seat and showtime logic carries over, but that guide covers multi-genre venues rather than daily cinema screenings.
Features Your Cinema Booking System Should Include
Selling and payments
- Checkout through WooCommerce, so you can enable the gateways your audience already uses — cards, wallets or local bank transfers.
- Supported gateways typically include PayPal, Stripe and major credit cards; availability depends on your region and WooCommerce extensions.
- Ability to sell snack combos, gift cards or memberships alongside the ticket on the same order.
Ticket and price management
- Unlimited ticket tiers per screening, each with its own price, quantity and sales window.
- Separate pricing for matinee versus evening shows, or weekday versus weekend.
- Backend booking so box-office staff can reserve seats for walk-in customers from the dashboard.
Delivery and entry
- Automatic ticket emails with a PDF attachment or QR code, sent the moment payment clears.
- Scannable codes at the entrance to prevent duplicate or fake tickets.
- Resend and reprint options for customers who lose their email.
Management and reporting
- A single attendee list per screening showing seats, contact details and payment status.
- Built-in analytics for occupancy, revenue per showtime and peak booking times.
- Google Maps integration on the event page so first-time visitors find the hall.
- Responsive front end, because a large share of bookings happen on mobile the same evening.
Practical Tips for Cinema Owners
- Publish showtimes a week ahead. Search traffic for a film peaks in the days before release; late listings push customers to aggregator sites you do not control.
- Price the front rows deliberately. A visible cheaper tier fills awkward seats and makes the premium rows look like better value.
- Staff the entrance for QR scanning. A ticket system only speeds up queues if the door process matches the online flow.
- Track no-shows. If a screening consistently oversells and then has empty seats, review your cancellation window rather than cutting inventory.
- Keep one page per film. Duplicate listings for the same movie split your SEO and confuse repeat visitors.
Conclusion
Creating an online cinema ticket booking system comes down to three things working together: accurate showtimes, a seat plan that matches your real hall, and a checkout that delivers a scannable ticket instantly. WordPress with an event booking plugin, a recurring events addon and a seat plan addon gives you all three without custom development, and leaves you owning the customer data and the sales channel.
Build the first screening as a test, run one full purchase and entry through the system, then roll out your full weekly schedule once the dry run passes.
