 Get BlackFriday 25% for Limited Time on Lifetime & 35% for Bundle Deal


Installing the Bahon theme takes about an hour on a clean WordPress site: upload the theme zip, activate it, install the plugins it depends on (WpBusTicketly, WooCommerce and Elementor), then import the demo content and configure your first route, seat plan and fare. This guide walks through each step in order, then covers the configuration and troubleshooting work that decides whether your bus booking site is actually ready for customers.
Bahon is a transport-focused WordPress theme built by the MagePeople team for bus, ferry and train operators. It is designed to sit on top of the same plugin stack the rest of this site covers, so the install is less about design and more about getting the booking engine wired up correctly from day one.
- What the Bahon Theme Is Built For
- Why Bahon Suits a Bus Booking Website
- What You Need Before You Start
- How to Install the Bahon Theme: Step by Step
- Post-Install Checklist Before You Go Live
- Common Installation Problems and Fixes
- Customising the Site After Installation
- Troubleshooting Questions
- Next Steps
What the Bahon Theme Is Built For
Bahon is a WordPress theme, not a booking system. The theme controls how your site looks; the booking logic comes from plugins. Bahon is built around WpBusTicketly for bus ticketing, with WooCommerce handling checkout and Elementor handling page layout. It is responsive, retina-ready and written to be translation-ready when paired with tools such as Loco Translate.
That division matters before you install anything. If your goal is a working ticket-selling site, the theme is roughly 20% of the project. The other 80% is route data, seat plans, fares, payment settings and email confirmations — all configured after activation.
Why Bahon Suits a Bus Booking Website
Most WordPress themes are general-purpose: they assume you are publishing blog posts or selling physical products. Bahon assumes you are selling seats on scheduled departures, which changes what needs to be on the page.
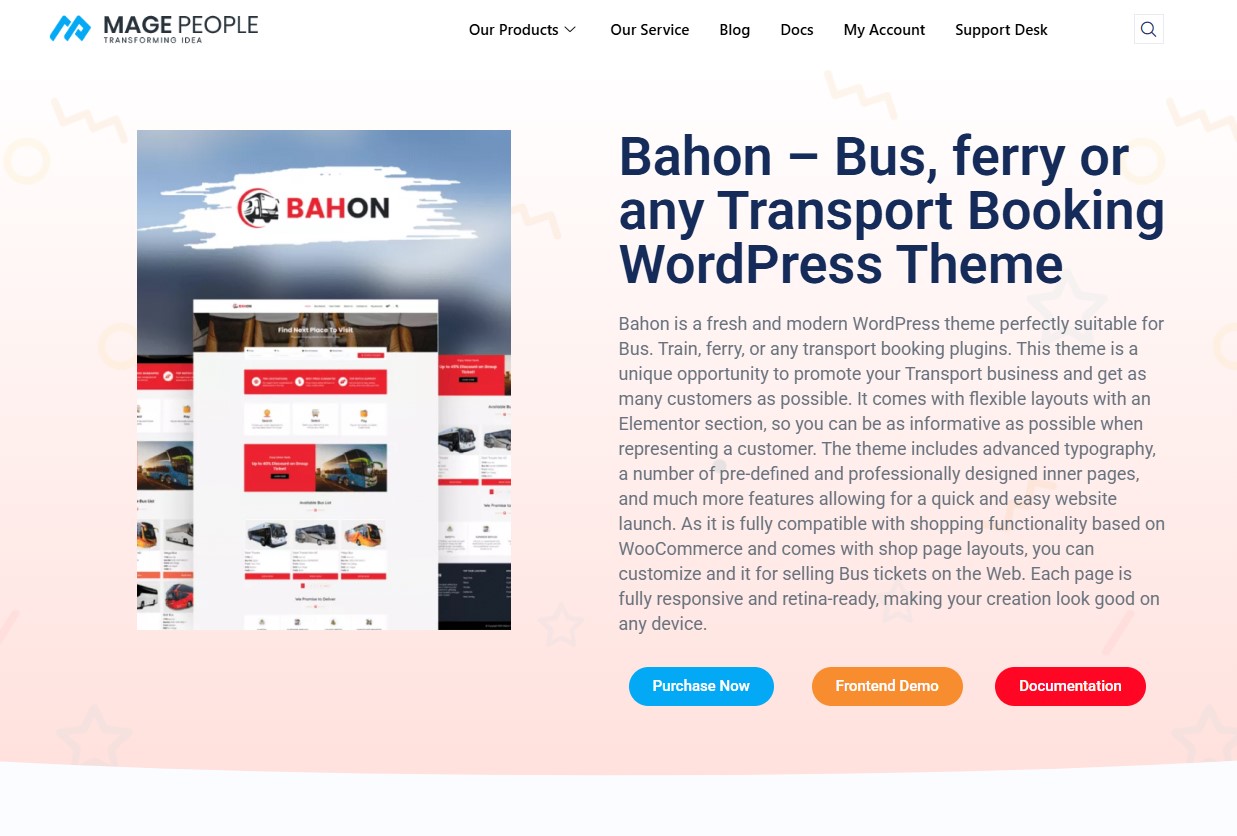
- Booking-first page structure. Search forms, route listings and schedule blocks are treated as primary content rather than something you have to build from scratch in a page builder.
- Mobile-first layout. Travellers overwhelmingly book from phones, often shortly before departure. A layout that keeps the search form and seat map usable on a small screen is a practical advantage, not a cosmetic one.
- Elementor-based customisation. You can adjust layouts without touching code, which is useful for seasonal campaigns, new route launches or promotional banners.
- Plugin compatibility as the design baseline. Because the theme is developed by the same team as WpBusTicketly, plugin templates and styles line up without custom CSS work.
- Clean, lightweight markup. A lighter theme gives your content a better chance in search results, though no theme guarantees rankings — page speed, content quality and technical health still do most of the work.
What You Need Before You Start
Gather these before touching the dashboard so you do not stall halfway through:
- WordPress hosting and a domain. Shared hosting is fine for a new site; pick a host that runs a current PHP version and offers free SSL, since ticket checkout must be served over HTTPS.
- A fresh WordPress install. Installing a theme on a site that already has content and plugins can produce demo-import conflicts. A clean install is easier to debug.
- The Bahon theme zip file. Note that WooCommerce themes ship as two items — the installable theme zip and a separate documentation or child-theme folder. Only the theme zip goes into WordPress.
- Admin access to your WordPress dashboard, and your hosting control panel in case you need to raise upload limits.
- Your business content: route list, departure times, seat layouts, fare structure and refund policy.
How to Install the Bahon Theme: Step by Step
The install sequence below is ordered deliberately. Installing plugins before the theme, or importing the demo before WooCommerce is active, is the most common cause of a half-broken setup.
1. Set Up Your WordPress Site
If you do not yet have a WordPress install, most hosts offer a one-click installer. With a host such as Bluehost, you buy a plan and domain, run the WordPress installation, then sign in at yourdomain.com/wp-admin.
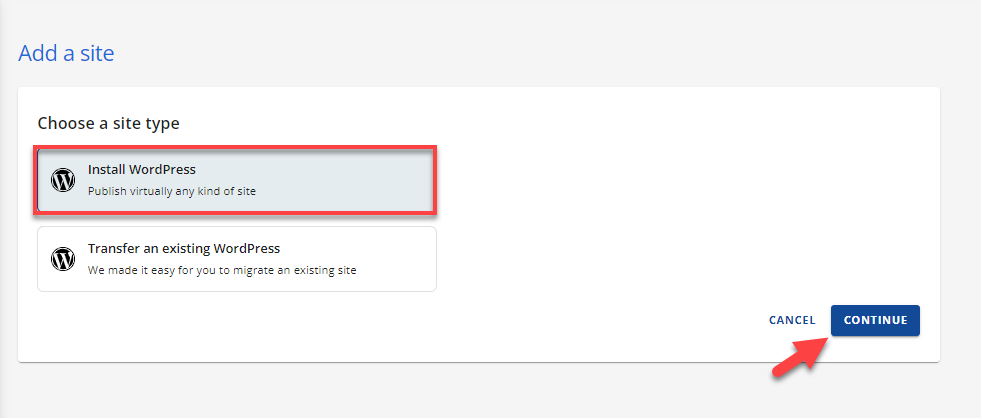
Once you are in the dashboard, do two quick checks before going further:
- Settings > Permalinks — set the structure to Post name. This gives you clean URLs like /routes/dhaka-chittagong/, which are easier to read and easier to share.
- Settings > General — confirm the site title, tagline and timezone. Timezone errors cause departure times to display incorrectly later, and it is much harder to fix once bookings exist.
2. Purchase and Download the Bahon Theme
Buy Bahon from MagePeople.com and download the theme package. Treat the purchase as a one-way decision: check that the theme and its plugin requirement match your business model before you buy, because the licence is a one-time payment and you should confirm the current refund terms with the vendor before purchasing rather than assuming.
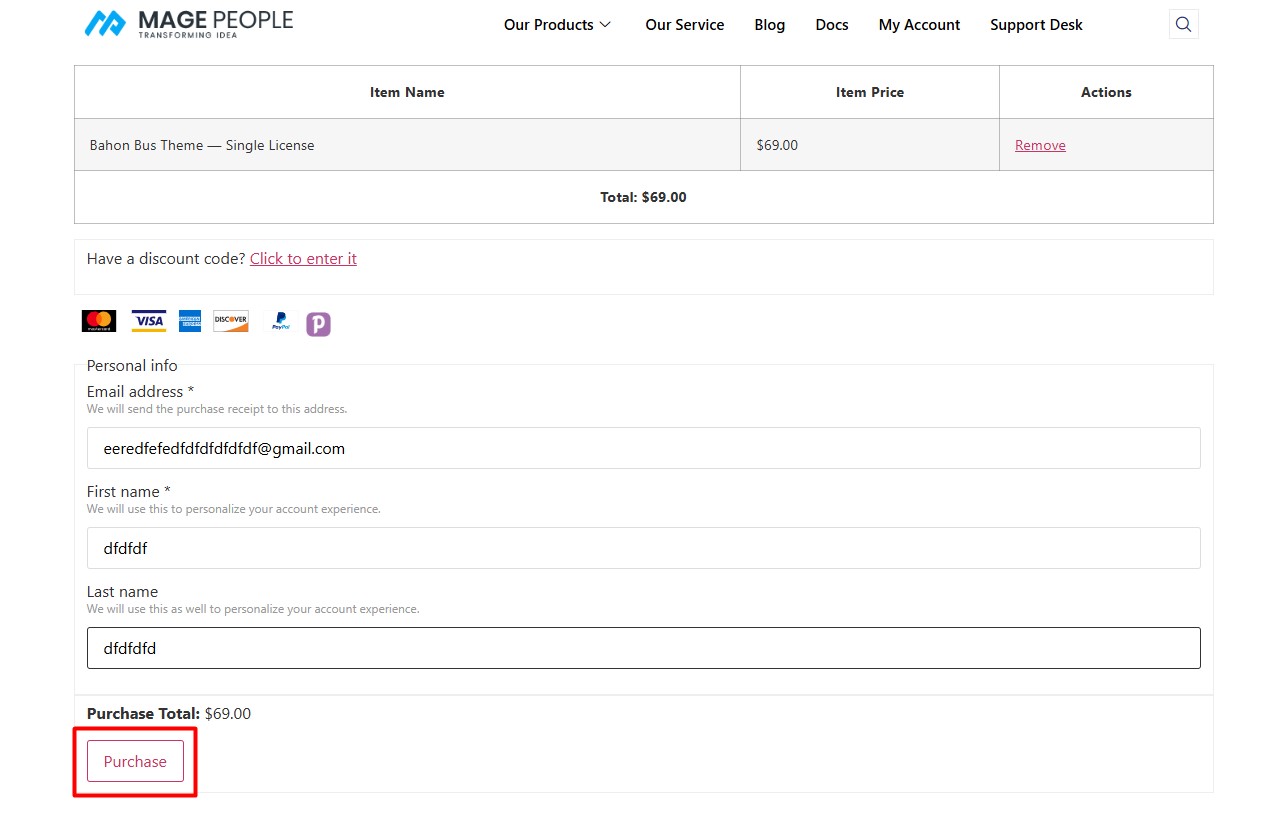
After downloading, unzip the package locally. You are looking for a .zip file containing the theme itself, plus the licence key and documentation. Keep the licence key somewhere safe — you will need it for theme updates.
3. Install the Theme
From the WordPress dashboard, open Appearance > Themes.
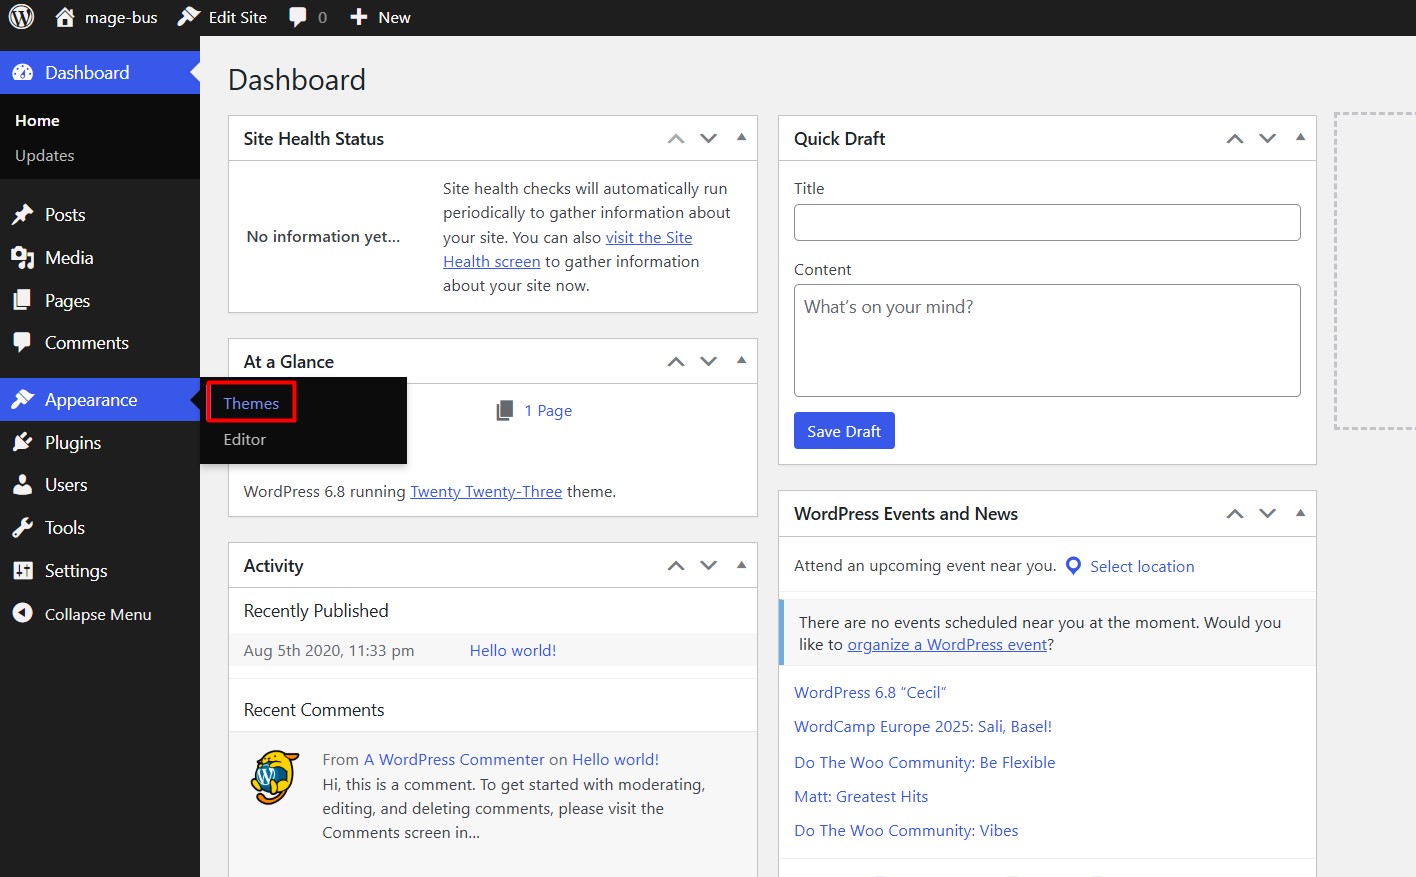
Click Add New Theme at the top of the screen.
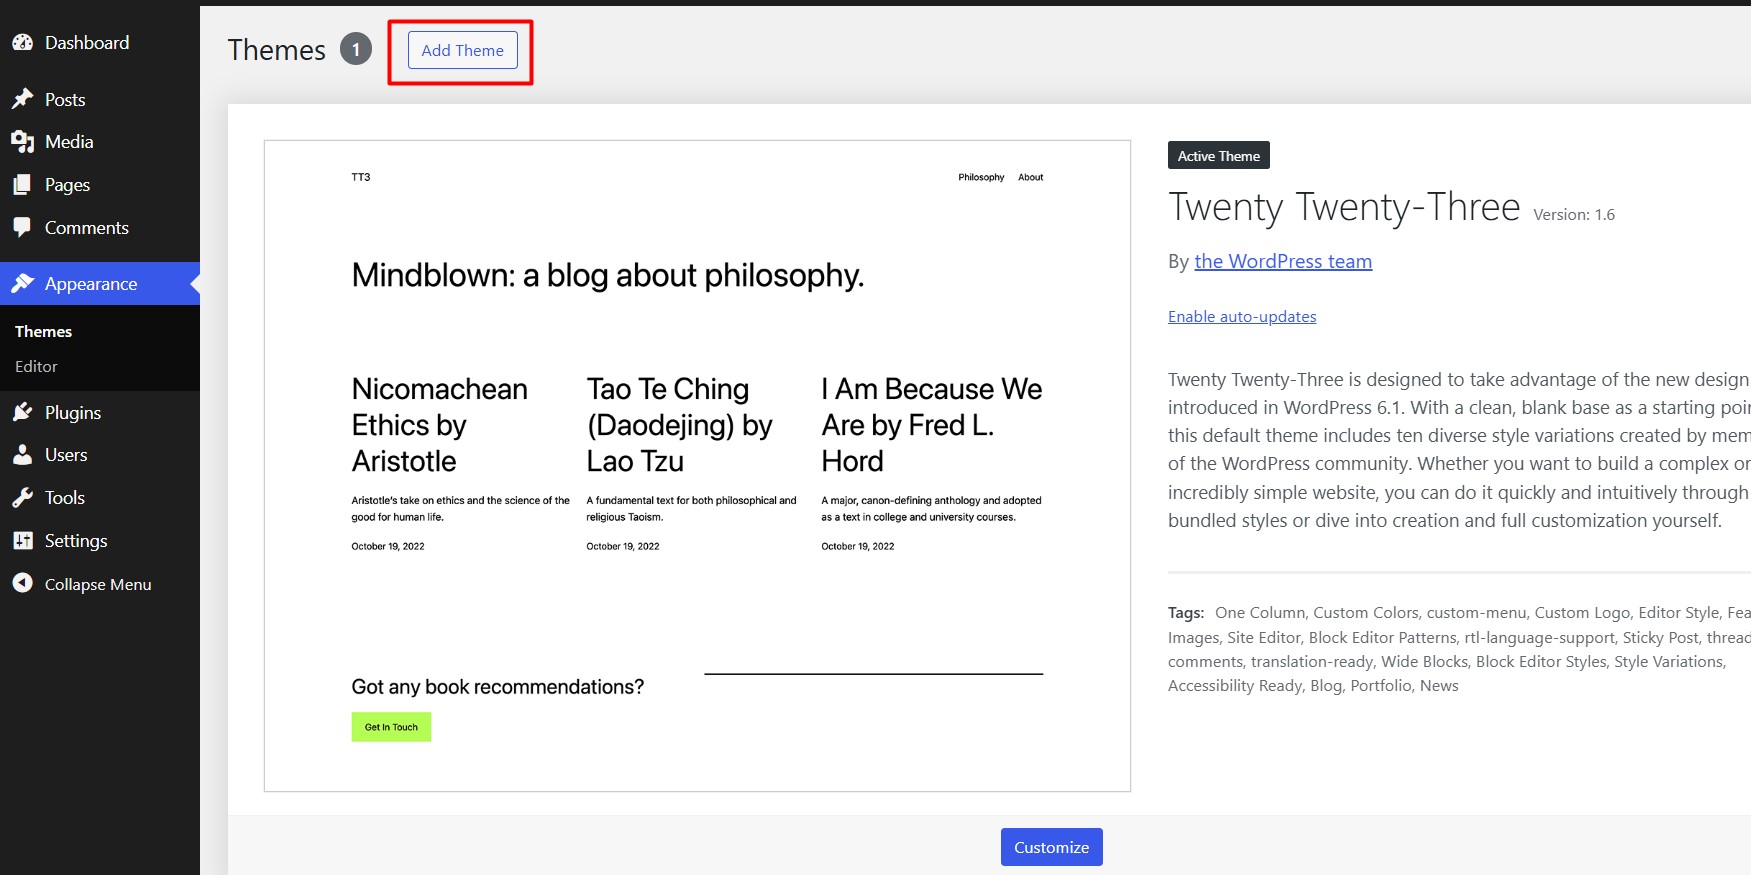
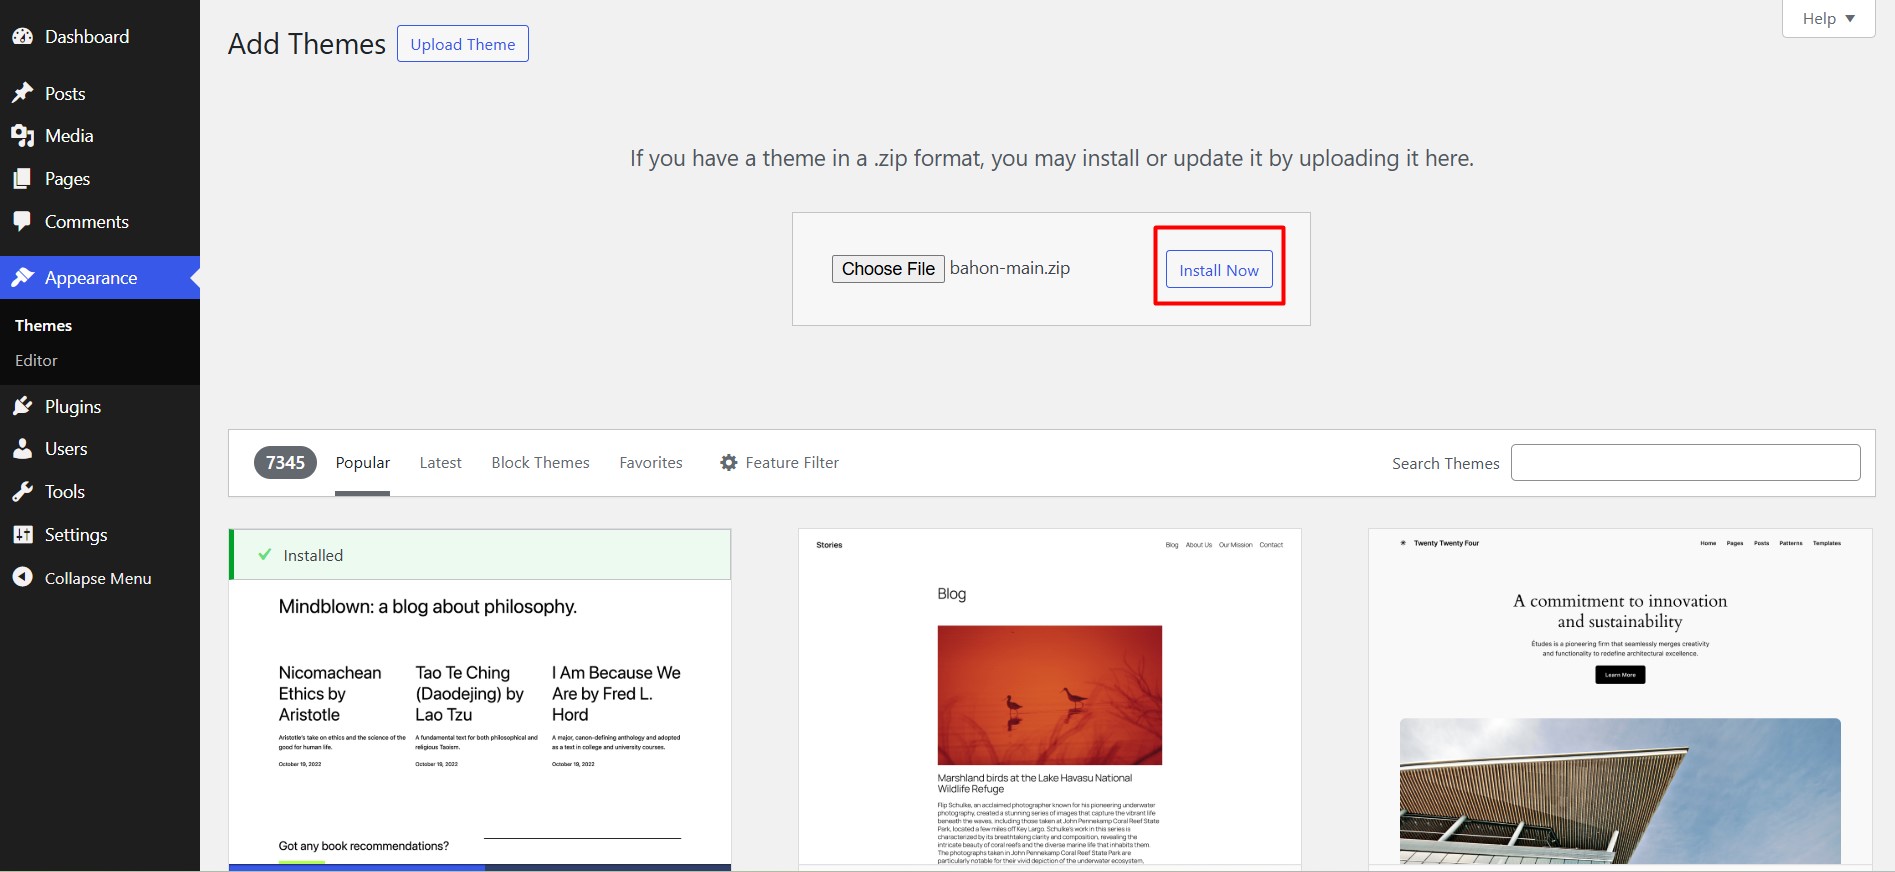
Choose Upload Theme, select the Bahon zip file you extracted, then click Install Now.
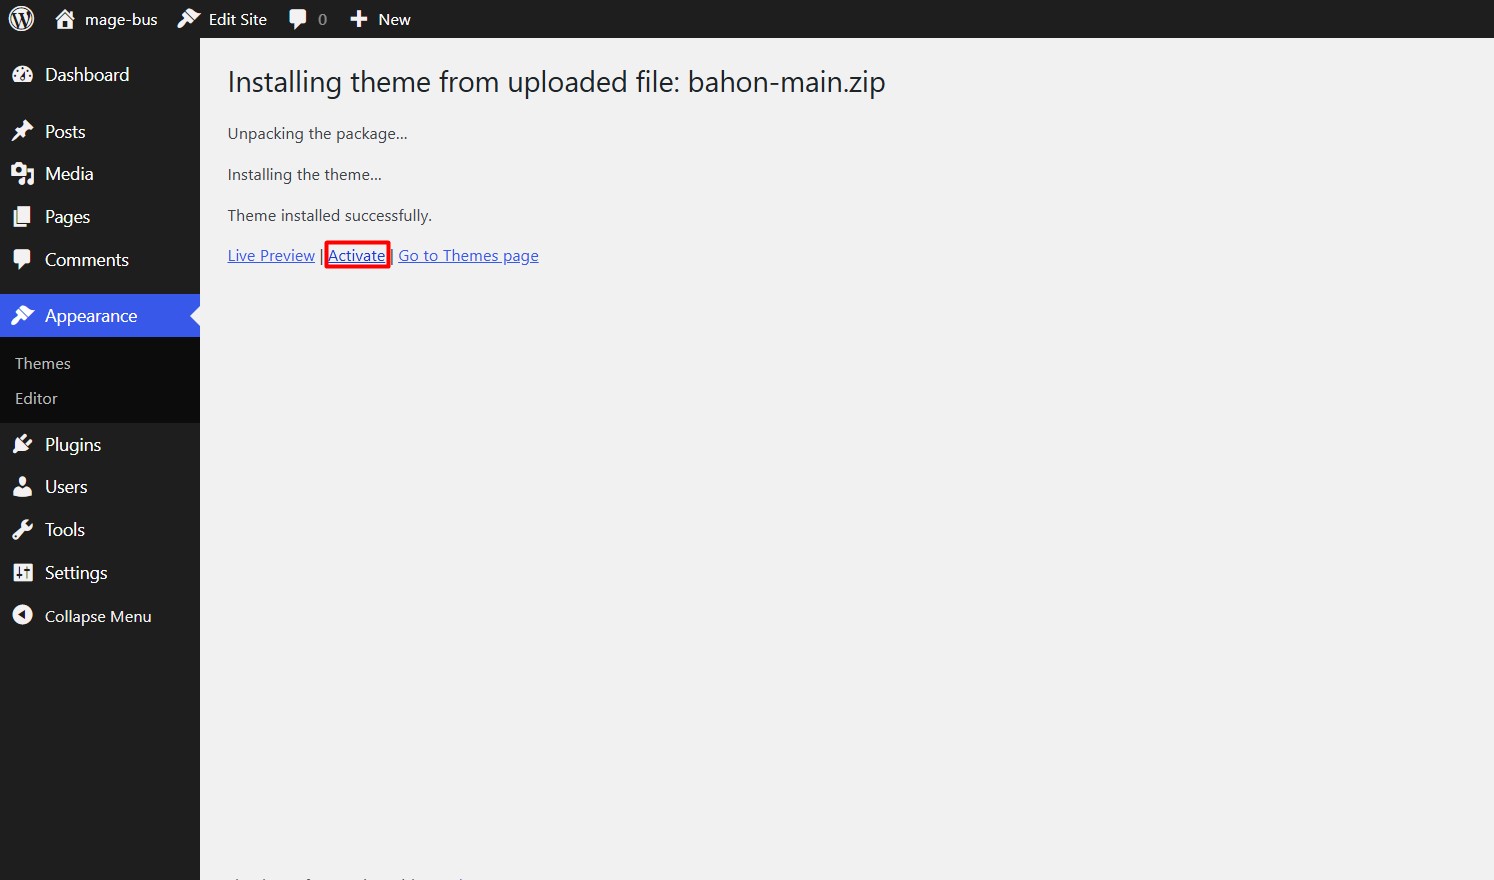
When WordPress confirms the installation, click Activate. Bahon is now the active theme.
If the upload fails: the most common cause is an upload size limit on your host. The error message will normally say the file exceeds upload_max_filesize. Either ask your host to raise the limit, or upload the unzipped theme folder to /wp-content/themes/ via FTP or your host’s file manager, which bypasses the PHP upload limit entirely.
4. Install the Required Plugins
After activation, Bahon prompts you to install the plugins it depends on. Install and activate all of them — a theme that depends on a plugin will render incomplete templates if the plugin is missing.
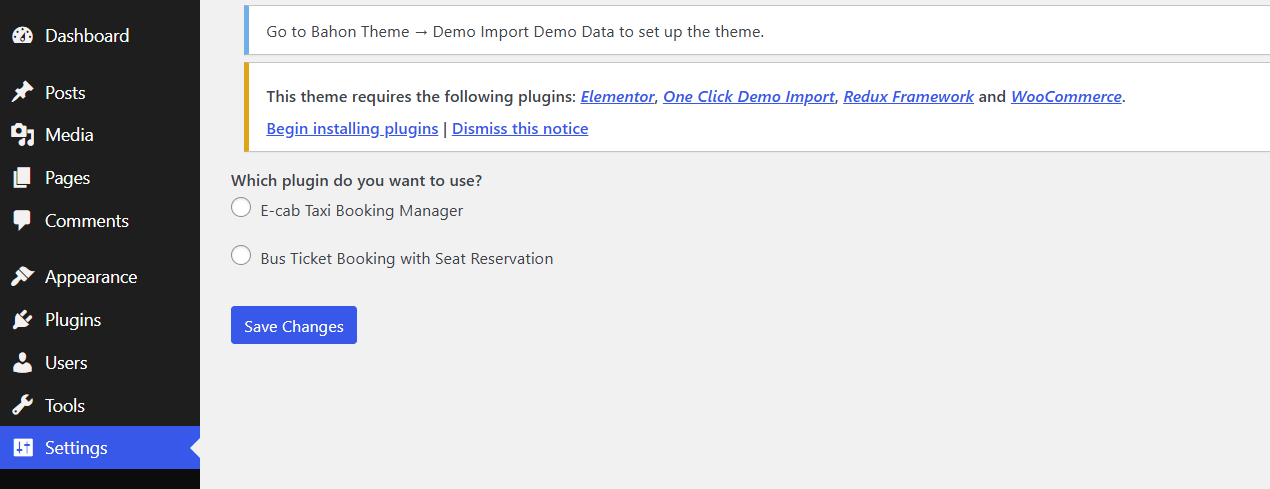
Here is what each one does, so you know which are essential and which are optional for your model:
| Plugin | Role in the setup | Required? |
|---|---|---|
| WpBusTicketly | Bus routes, schedules, seat plans, fares and ticket orders | Yes, for bus ticketing |
| WooCommerce | Cart, checkout, payment gateways and order records | Yes, if you sell tickets online |
| Elementor | Drag-and-drop page building for layouts and landing pages | Yes, if you want to customise layouts |
| eCab | Taxi booking, if you also run cab services | Only for mixed transport businesses |
Two things worth doing immediately after activation:
- Run the WooCommerce setup wizard and connect at least one payment gateway in test mode. Do not switch to live payments until you have completed a full test booking.
- Turn off plugin auto-updates for WpBusTicketly on a live site. A minor version change during peak booking hours is a poor trade for the marginal security benefit; update deliberately and test after.
The bus ticket booking plugin with seat reservation handles the reservation logic behind the seat map, so its settings deserve a careful read before you go live.
5. Import the Demo Content
The demo import is the fastest way to get a working layout. It pulls in sample pages, images, menus and theme settings so you can start from a complete site instead of an empty canvas.
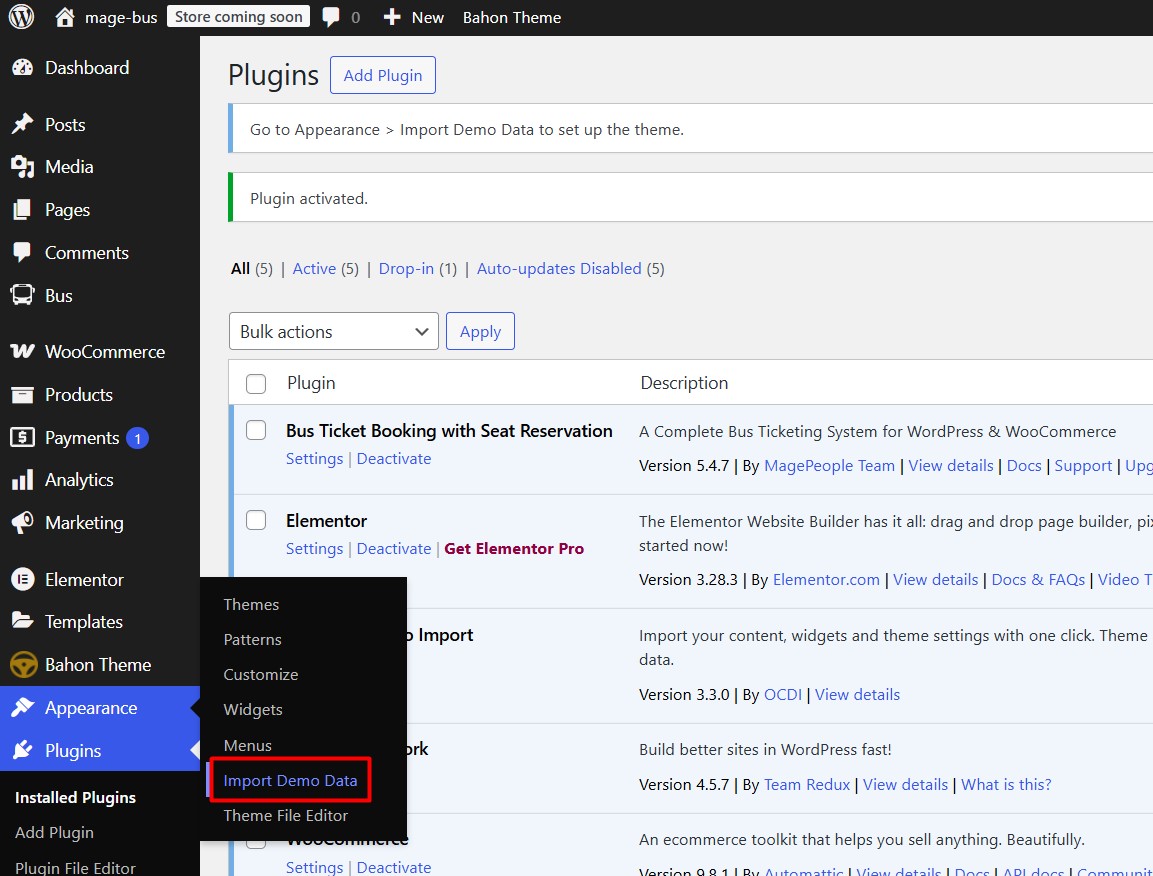
Go to Appearance > Import Demo Data and follow the prompts. Before you click import:
- Make sure WooCommerce is already active, otherwise the shop and checkout pages will not be created correctly.
- Increase the PHP memory limit to at least 256MB and execution time to 300 seconds if your host allows it — demo imports are resource-heavy and timeouts leave partial content behind.
- Keep the demo images or check the theme documentation for licensing before you publish, since stock photography in demo content may not be cleared for commercial use.
If the import option is missing or fails, build the key pages manually in Elementor: a homepage, a route search page, a ticket checkout page and a contact page. A manual build takes longer but produces a leaner site with no leftover demo pages to clean up.
The Bahon walkthrough video covers the import in more detail:
Bahon theme demo import walkthrough
6. Configure WpBusTicketly
This is where the site stops being a theme and starts being a booking business. Open the WpBusTicketly settings in the dashboard and work through the data in this order.
Routes first. Add each origin–destination pair with the stops along the way, plus distance or travel time if your fare rules depend on it.
Buses and seat plans after that. Enter each vehicle’s layout so the seat map matches the real coach. A seat map that does not match the physical bus is the single most common source of boarding disputes.
Schedules next. Map buses to departure times on each route. Remember the timezone check from Step 1 — it is now visible in the schedule you build.
Fares last. Set base price, per-stop variations, and any child or concession pricing. Decide your fare rules before you publish, because changing pricing on an active route means editing every affected schedule.
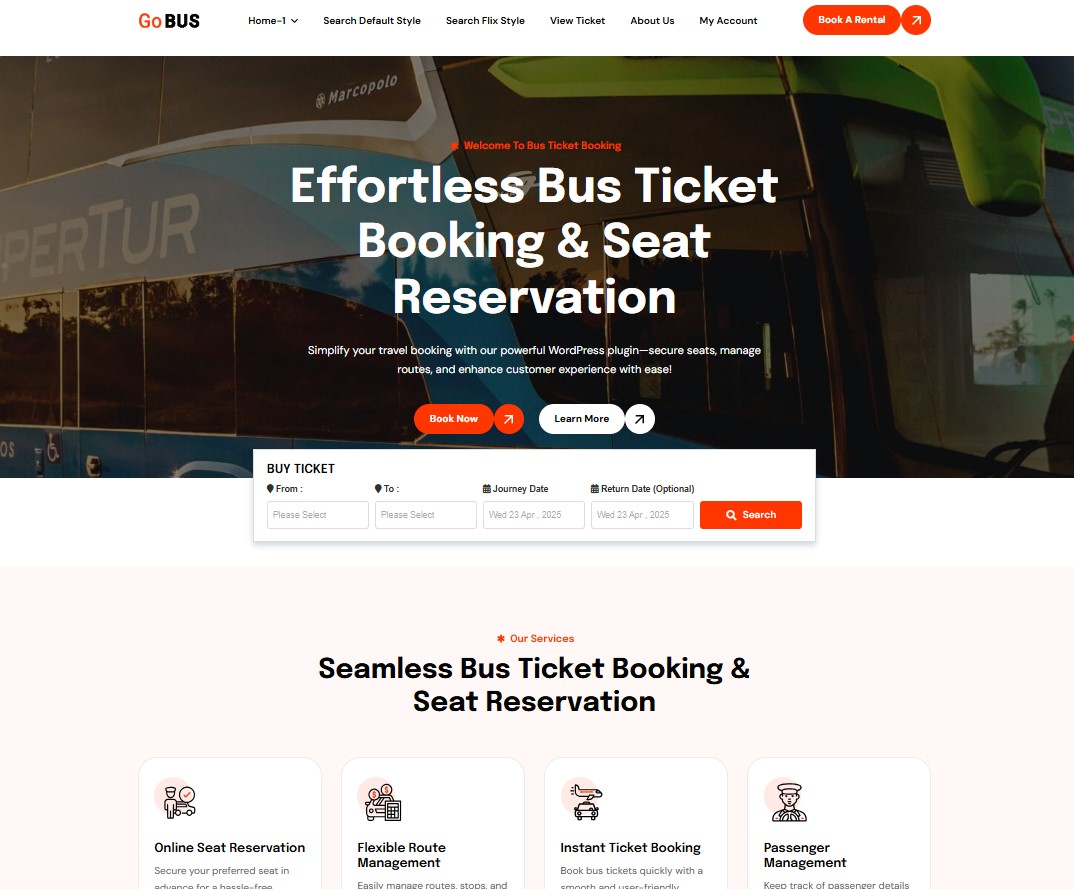
Then place the booking search form on your homepage or route page using the plugin’s shortcode, and place the seat reservation form on the schedule page. Publish, then make a real test booking yourself with a live payment method in sandbox mode, and confirm that the confirmation email, ticket and order record are all correct.
For a deeper walkthrough of route and bus configuration, see how to create a bus booking website with these plugins.
Post-Install Checklist Before You Go Live
Installation is not the finish line. Work through this list before you point customers at the site.
- Test the full booking flow on a phone, not just a desktop browser. Add a ticket to the cart, pay, receive the ticket, then cancel and check that the seat is released.
- Set up transactional emails. Ticket confirmation, cancellation notice and refund confirmation should all be templated and branded.
- Publish clear policy pages. Cancellation window, refund rules, boarding conditions and luggage terms — ambiguity here generates support tickets you cannot bill for.
- Add analytics and search indexing. Submit your sitemap, verify the site in Search Console, and confirm that route pages are indexable.
- Fix page speed. Compress the demo images, enable caching, and check the search form renders without a layout shift on mobile.
- Back up the site and schedule automatic backups, particularly before any plugin update.
- Secure the checkout. Confirm HTTPS across every page and restrict admin access with strong passwords and, ideally, two-factor authentication.
Common Installation Problems and Fixes
| Problem | Likely cause | Fix |
|---|---|---|
| “The link you followed has expired” on theme upload | Upload size limit reached | Raise upload_max_filesize with your host, or install the theme via FTP |
| Demo import hangs or stops halfway | PHP memory or execution time limit | Increase memory to 256MB and max execution time to 300 seconds, then re-run |
| Styles look broken after activation | Required plugin missing or inactive | Re-run the plugin install prompt and activate every dependency |
| Booking form shows but no seats appear | No bus or schedule assigned to the route | Complete route, bus, schedule and fare data in that order |
| Departure times display incorrectly | WordPress timezone mismatch | Correct the timezone in Settings > General before entering schedules |
Most reservation issues after launch are configuration rather than bugs. If bookings behave oddly — double-booked seats, fares not applying, tickets not arriving — see the bus reservation problems solved by WpBusTicketly for the usual culprits.
Customising the Site After Installation
Once the demo layout is in place, the work shifts from setup to content. Use Elementor to adjust section order, swap in your own photography and rewrite demo copy so it describes your actual network rather than a placeholder. Keep the booking form above the fold on mobile — travellers who cannot find the search box in the first screen rarely scroll to look for it.
Two refinements worth scheduling in the first month:
- Route pages as landing pages. Give each popular route its own page with real content: stops, travel time, amenities, boarding points and fare ranges. These pages do the informational work that a bare search form cannot.
- Multilingual support if you serve multiple language groups. Bahon is translation-ready and works with Loco Translate for translating interface strings.
Troubleshooting Questions
Can I use Bahon for transport types other than buses?
Yes. The theme also works for taxi, ferry and train services, particularly when combined with WooCommerce and, for cab operations, the eCab plugin. Bear in mind that “supports” means the theme will not fight your plugin — you still need to configure the relevant plugin’s routes and pricing.
Does Bahon work on mobile devices?
Yes, it is responsive and retina-ready. Test the booking flow on your own phone after launch; responsive design does not guarantee that a third-party booking form behaves well at every screen size.
Does the theme support multilingual sites?
Yes. It is translation-ready and compatible with tools such as Loco Translate, which is useful if your passengers search in more than one language.
What happens if I install Bahon over an existing theme?
Nothing breaks technically — switching themes is reversible — but your previous customisations stay with the old theme. Take a full backup first, and expect to re-check menus, widgets and any page layouts you built with the old theme’s builder.
Next Steps
The Bahon theme gives you a transport-appropriate front end and a clean path to a working ticket shop. The install itself is short: upload, activate, install dependencies, import the demo, then configure WpBusTicketly data in the order route → bus → schedule → fare. What determines whether the site sells tickets is everything after that — accurate seat maps, honest policies, a tested checkout and route content that answers the questions travellers actually search for.
If you are still comparing how the site should be assembled rather than how to install a specific theme, start with the full bus booking website build walkthrough, and read the common bus reservation problems and their fixes before your first peak season rather than during it.
