

Thinking about an event seating plan for your event website?
According to Verified Market Research “The Seat Reservation System Market was worth USD 4.2 billion in 2024 and is expected to grow to USD 10.1 billion by 2033, with a solid 10.4% annual growth rate from 2026 to 2033. Pretty exciting growth for a system that makes booking seats for events, travel, and more so much smoother!”
The planning of an event may be pretty exciting. Still, when it comes to event planning seating arrangements, it may be quite a headache for you.
Be it a conference, a wedding, a concert, or any large gathering, an effective seating plan can make all the difference. If you are using the Event Manager plugin in WordPress, adding a seating plan becomes easy.
This incredible tool will let you create interactive and custom seating arrangements for a smoother experience for you and your attendees.
In this guide, we’ll show you how to add event seating plan using Seat Plan Addon.
But before jumping into the guide, let’s find out about the seating plan for an event.
- How Do You Plan a Seating Arrangement?
- How to Add Event Seating Plan Using Seat Plan Addon?
- Simple Grid
- Free-form Designer
- Create your own seat design
- Quick Starter Template
- Generate Seats from Ticket Capacity
- What is the proper seating arrangement?
- What Are the Best Seats on a Plan?
- How Do I Choose a Seating Plan?
- Wrapping Up
How Do You Plan a Seating Arrangement?
Planning a seating arrangement starts with understanding your event space’s layout and the type of seating required. For example, is this a conference where the audience needs to have a line of sight to the front, or is it a loose networking event?
Here are the steps to plan a seating arrangement:
Understand the Event Type: Know whether the event is formal, casual, or a mix of both.
Assess the Venue: Take measurements of the space and note the location of exits, entrances, and key focal points, such as stages or screens.
Consider Attendee Needs: Think about special accommodations like VIP seating, disabled access, or group seating.
Maximize Space: Make efficient use of space to avoid overcrowding, allowing enough room for easy movement and comfort.
How to Add Event Seating Plan Using Seat Plan Addon?
The Seat Plan Addon for Event Manager allows you to create and manage seating with ease.
Here’s a step-by-step guide:
Install the Seat Plan Addon: First, ensure you have the Event Manager and Ticket Selling plugin installed and activated on your WordPress site. Then, install the Seat Plan Addon by MagePeople.
Navigate to your WordPress dashboard and click Plugins -> Add New Plugin
Search “WpEvently” and click Install Now.
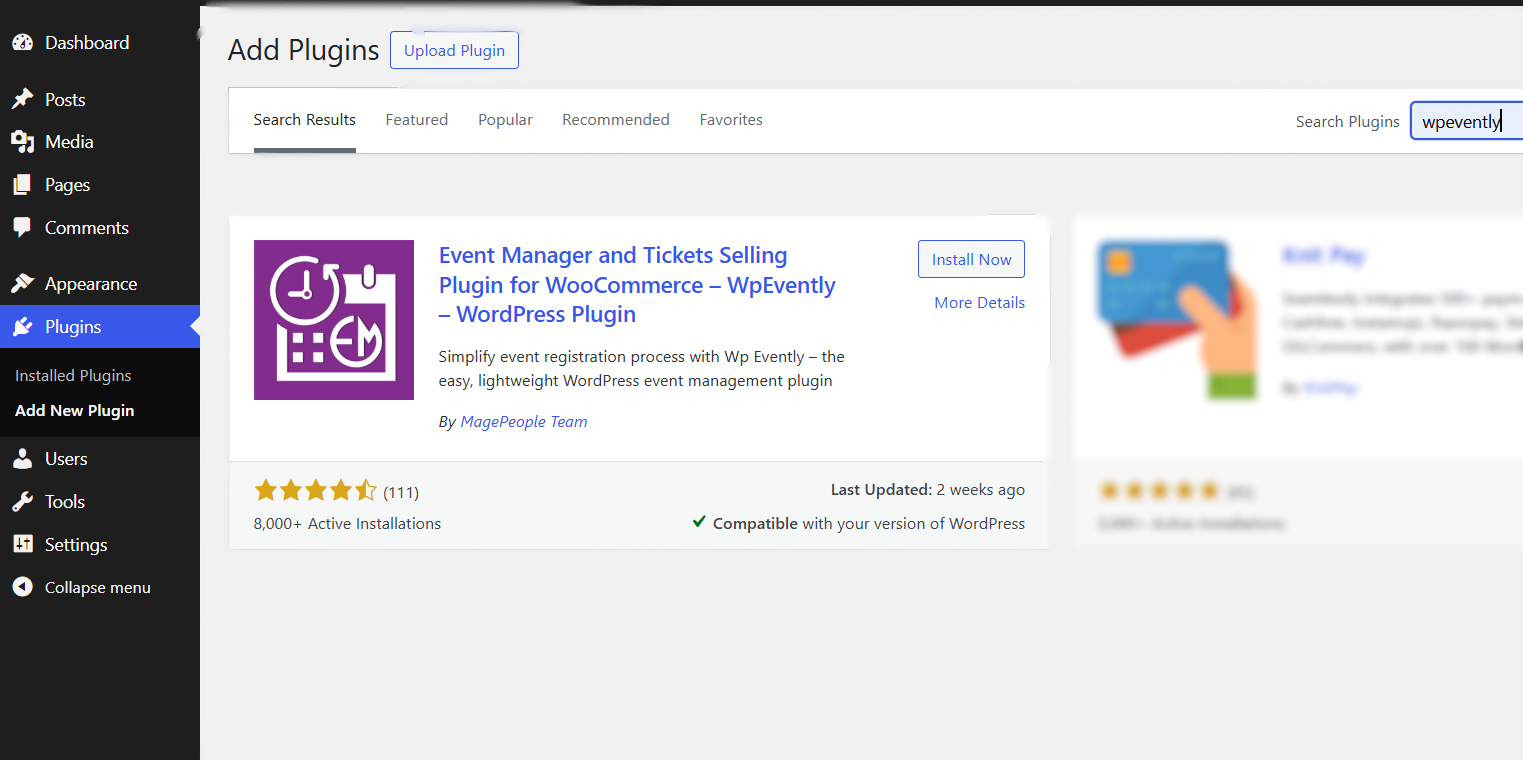
You will be welcome with a message to install and activate WooCommerce, as WpEvently is a WooCommerce based plugin.

Install and Activate WooCommerce. If it is already installed, click Next to finish the setup.
You can find the complete setup of WpEvently from how to use WooCommerce for Event Registration.
Once you have successfully set up WpEvently, it’s time to install the seat plan addon.
Visit the MagePeople site and look for the Seat plan Addon for Event Manager

Purchase the addon and navigate to your WordPress dashboard.
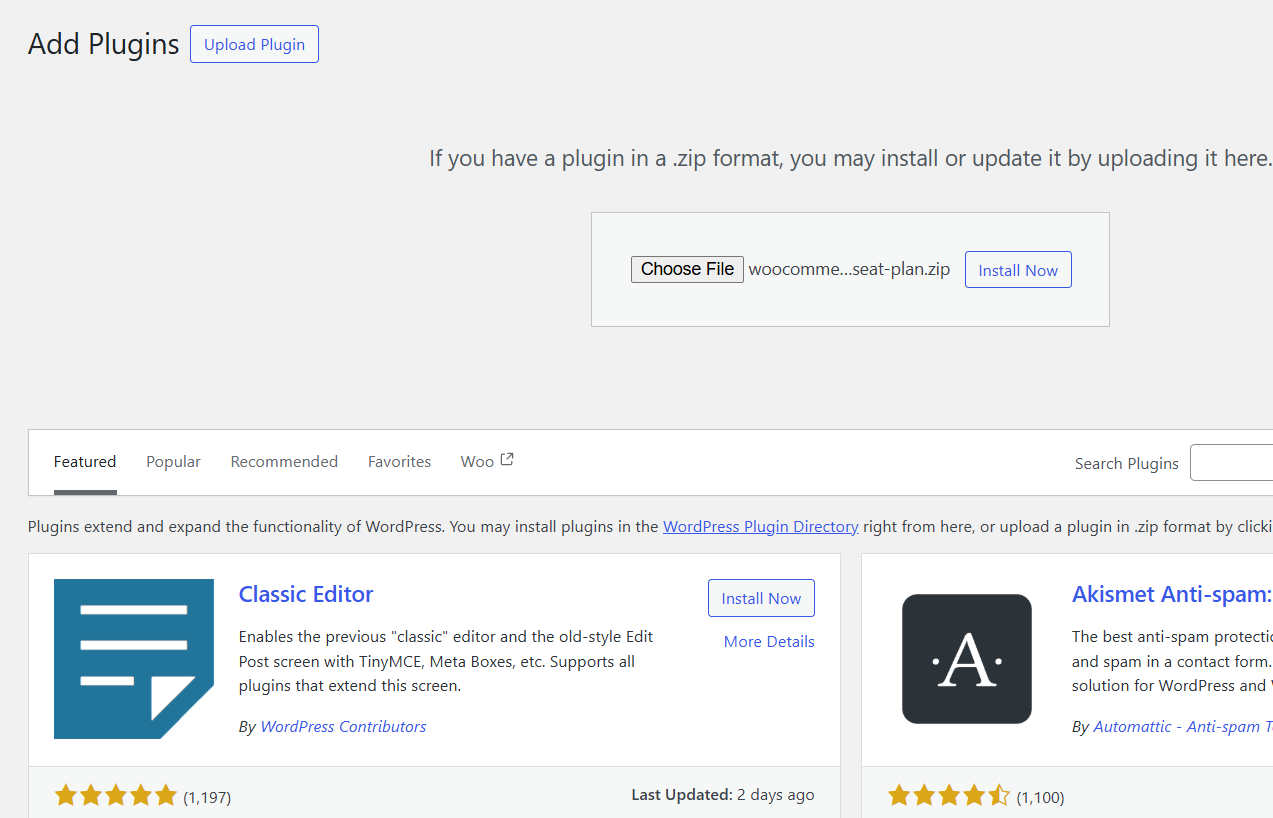
Click Add New Plugins and Upload the zip file of the addon.
Click Install Now and activate the addon.
Create Event: After logging into the WordPress Dashboard, go to Event Manager, Add New Event, or edit an existing event.

From your modern editor, navigate to Ticket & Pricing and start creating a Ticket type with ticket name, price, capacity, sales end time, and date.
Add more ticket types by clicking Add New Ticket Type.

Set up the Seating Layout: Scroll down and look for the Seat plan section.
Under Events Seat Plan Settings, you need to enable the seat plan for this event .
The option to set each ticket type’s quantity from its seat count will be enabled for the Free-form designer seat plan.
There are mainly two different options to add a seat plan for this event.
- Simple Grid and 2.Free-form Designer
First, we will learn Simple Grid.
Simple Grid

You can add any label for your screen or stage from the Screen/Stage label field.
Now add rows and seats based on the quantity of this event ticket type.
For example, here is the total of 60 seats for 3 seat types.
For VIP, it is 10 seats, for Medium, it is 20 seats, and for Normal chair, it is 30 seats.
So Rows will be 6 and seats per row will be 10.
You can label your seats based on numbers or letters from the Row labels.
Once you have set the row, seats, and labels, hit the Generate grid.

Now, add seat type color for different ticket types, sold, and selected row.
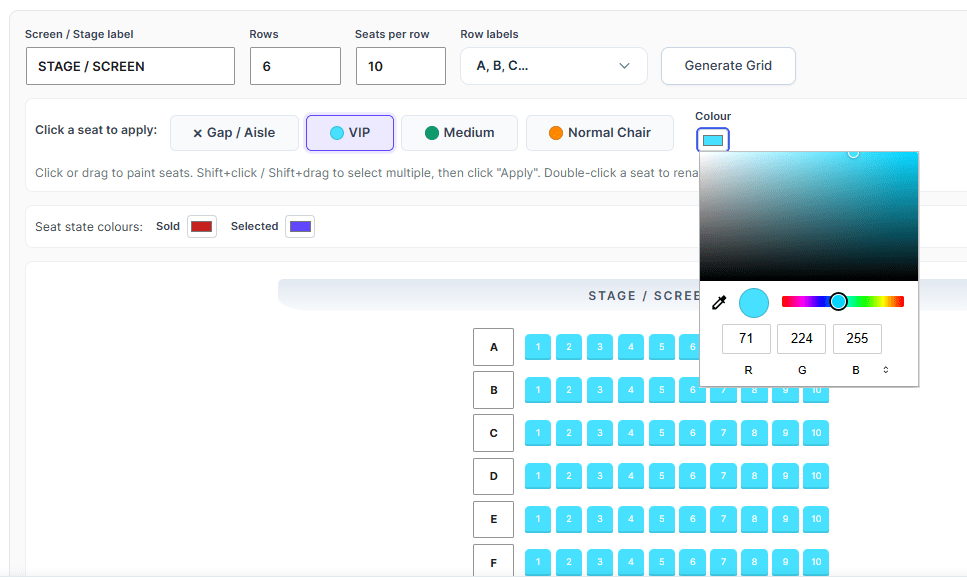
You can add any color to your seat type, and for the Gap/Aisle row, there is no color.

Now, click on any seat type and apply the color of this seat type to the rows.

You can create gaps between the rows using the x Gap / Aisle button.

Double click on any seats from the row, and you can change the seat number, label, and even the ticket type color or make it a gap. Once you have made the changes, hit the Save button.

You can find the changes in the seats.

Update and Publish: Once satisfied that it meets their seating requirements, click the update button at the top right corner and go live with their seating plan online for that specific event.
Book a Seat: Go to the event booking page and select the event you have configured the seats for.

Now select a seat from the seat type and click register for this event.
Now let’s check the Free-form Design
Free-form Designer
Similarly again navigate to your Seat plan section and choose Free-form designer option.

You will find many options in this seat plan designer.
There are 3 different ways to add a seat plan in this free-form designer.
- Create your own seat design, 2. Using existing seat templates and 3. Using the Seat type quantity generation button.
Let’s create the seat design and learn all the functional buttons.
Create your own seat design

At first click on the Select button, and navigate to Categories.
Click on any ticket types and choose the color for the seats.

Similarly, for seat state color, you can apply the color for sold or selected seats.

Click on the Seat button and simply click on the design panel.

A single seat just appeared based on the Row label and seat number.

Now, if you want to add another single seat for a different ticket type, simply click on the Select button, click the seat type color, and apply it to the seat.

You can also change the shape of the seats from the seat shape section.

Now, click on the Section button and add your row and number of seats per row, label, and fan curve, then hit Generate Sections.
A whole seat plan is generated based on the number of rows and seats.

Select the seats and change the color based on the ticket types.

Now, click the Clear all button, and everything on the design panel will be gone and reset.

Well, again, add a section, but this time add a fan curve to this section.
The fan curve lets you curve the seat design; you can specify the number of degrees to curve it at any angle.

If you want to add a seat design to the table, click the Table button and add your table label, your table shape, whether round or rectangular, and the number of chairs you want to add.

Here, the Table label is changed, and the shape of the table is changed.

Add any shape to your design panel by clicking the Shape button.
The shape can be changed into a rectangle or ellipses form and add a label and color to it.

There are many different quick facilities to add any shape based on stage, exit, entrance, toilet, etc.

To add any text label to your design, click the T Label button anywhere in the design, and text will appear.
You can check out the video for more detailed help.

If you click the All button, all the seats on your design will be selected.

Now, you click the Duplicate button after selecting all the seats, and another set of duplicate seats will appear based on your selection.

You can also delete them by clicking on the Delete button.

You can undo or redo any changes to your design using the Undo and Redo buttons.

If you want to zoom in and zoom out your seat design, use the + and – buttons to adjust the zoom percentage.
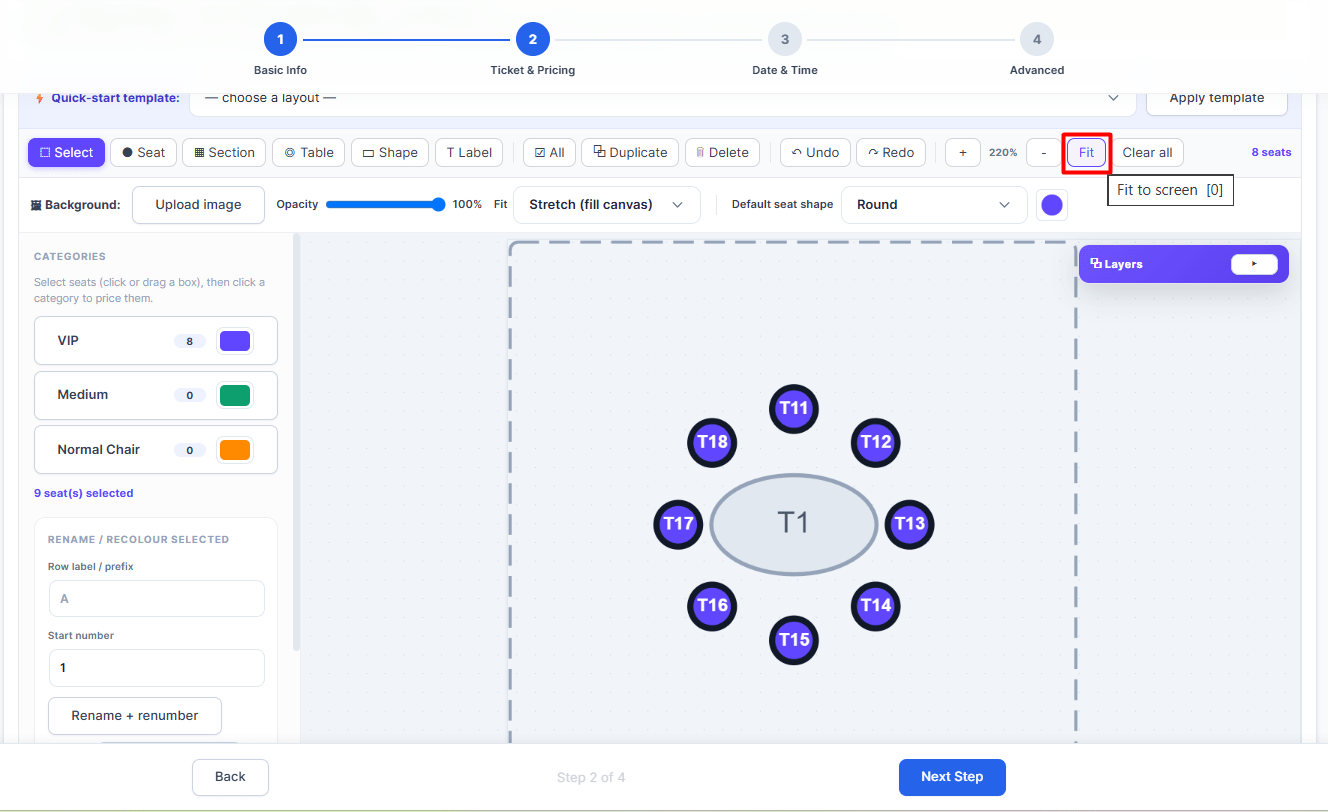
When you click the Fit button, the seat design gets aligned to the center.

Now, if you click the Clear all button, all your layers will be gone.
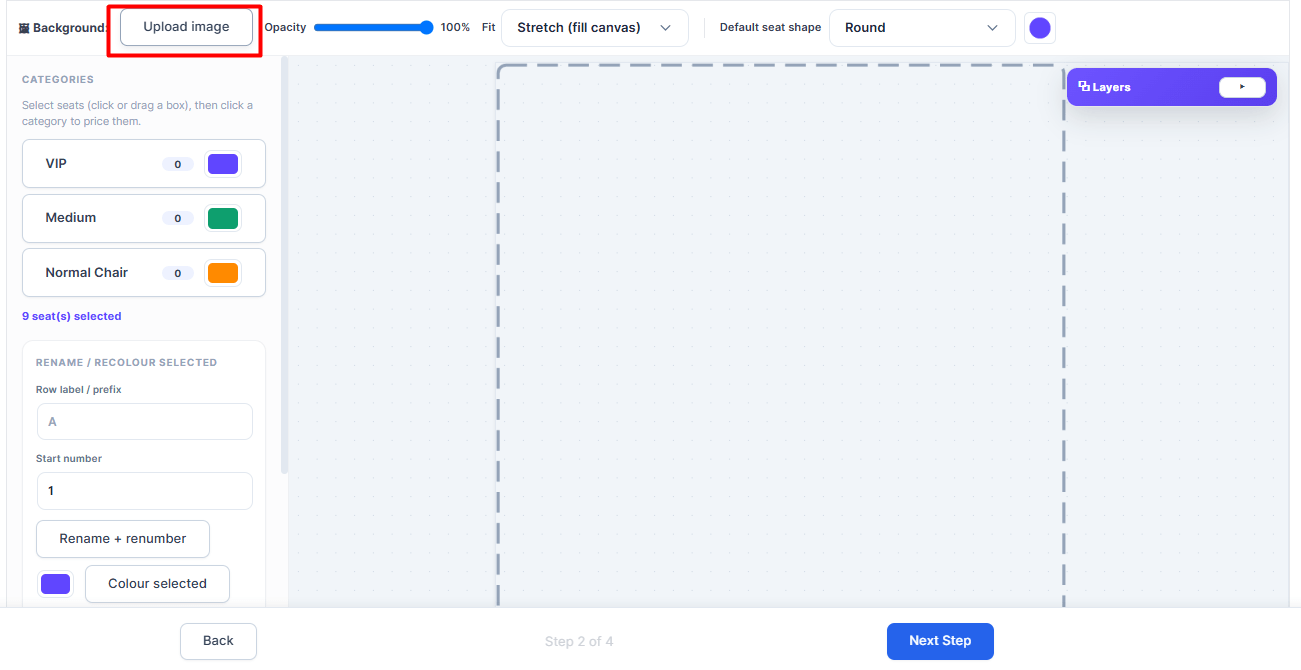
You can upload an image to your seat plan design; for that, you can click on the Upload image button.

Select an image from your media library, or you can upload from your local files and click the Use image button.

You can blur the uploaded image using the Opacity bar or remove the image using the Remove button.

To adjust the image size, you can use the Fit option.
There are 4 options, 1. Stretch (fill canvas), 2. Fit (Keep ratio), 3.Cover (fill + crop), and 4. Tile(repeat).
Quick Starter Template

If you don’t have much time to add a seat plan for your specific event, you can use the Quick-start template.
It has many seat design templates like Theater, Cinema, Banquet, Stadium, Classroom, Wedding, etc.

Select a template and click the Apply template button.
Well, your selected template will appear, which you can also edit further to make it your desired design.

You can hide, unhide, or delete any seats from the Layers tab.
Generate Seats from Ticket Capacity

If you want to add seat design based on the ticket types and capacity, you need to enable the Set each ticket type’s quantity from its seat count button.
A new button will appear beside the Apply Template button called Generate seats from ticket capacities.

Click Generate seats from ticket capacities, and your new seat design will appear based on your given ticket types with specific colors.

Now, click the Update button and check the seat design on your booking.
What is the proper seating arrangement?
The “right” seating arrangement does indeed vary based on the type of event you will be hosting. That said, here are some general guidelines on seating:
Formal Events: Conferences and other business events are best in a classroom-style seating arrangement with guests facing the speaker or stage.
Casual Events: If you are hosting a networking event, a round table, or theatre-style seating may be better for your audience.
Weddings or Banquets: A banquet-style seating arrangement with long rows or circular tables encourages socializing and a sense of community.
Theatre or Concerts: For performances, rows of seats facing the stage are ideal, ensuring everyone has a good view.
What Are the Best Seats on a Plan?
The best seats often depend on the layout of the venue and the purpose of the event. However, certain areas are generally considered prime seating:
Front and Center Seats: For most events, front-row seats or those directly in front of the stage are usually the best for seeing what’s happening on the stage most clearly. In addition, VIP sections are usually reserved for special guests or sponsors. They may have added benefits, such as exclusive services or better views. Middle Seats: In larger venues, middle seats that are centrally located may offer an equally good view without being too close or too far.
How Do I Choose a Seating Plan?
The type of event and the specific needs of your guests will determine which seating plan to choose. Here are some tips:
Consider the Event Type: For formal events, structured seating arrangements, such as rows or classroom styles, work best. For social events, flexible seating arrangements, such as round tables or lounges, encourage mingling.
Accessibility: Make sure there is sufficient seating for attendees who may have problems standing, and make that seating highly accessible.
Budget: Seating arrangements should be made considering your budget, so consider those seating options that provide maximum use of the venue while saving as much as possible.
Aesthetics and Comfort: Comfortable seating can make all the difference in comfort, so a seating arrangement must be chosen that serves the dual purpose of comfort and functionality.
Wrapping Up
Using the Seat Plan Addon for Event Manager is an excellent way to streamline the seating process and improve your attendees’ overall experience. With customizable layouts, interactive seat selection, and the ability to manage pricing and availability, this tool is a game-changer for event organizers.
This guide will walk you through how you can create an efficient and user-friendly event seating plan. Set up your seating arrangement with consideration for attendee needs, event type, and venue specifics in mind.
If you’re ready to get started, simply install the Seat Plan Addon and begin crafting your ideal event seating plan today!
