 Get Halloween 15% for Limited Time on Lifetime & Bundle Deal

You can sell event tickets from WordPress entirely on your own site, with no marketplace commission and no redirect to an external checkout, using a WooCommerce-native ticketing plugin like WpEvently (Event Booking Manager for WooCommerce). Install the plugin, connect a WooCommerce payment gateway (free with any gateway, including Stripe and PayPal), create your event through the guided setup wizard, build your ticket types, and publish. The whole process takes under an hour for a first event, and buyers complete their purchase in a checkout modal without ever leaving your event page.
If you want to sell event tickets from WordPress, you can do it entirely on your own site, with no third-party marketplace, no per-ticket commission, and no external checkout. With a ticketing plugin, a payment gateway, and a check-in method, your WordPress site becomes a complete box office. Whether you’re running a paid conference, a free seminar booking system, or any of the other types of corporate events that need registration, this guide walks through the setup, the plugin options, pricing decisions, and the practical details that catch organizers out on event day using the actual screens you’ll see along the way.
Why Sell Tickets on Your Own WordPress Site?
Ticketing marketplaces are convenient, but they take a cut of every sale, and they own the customer relationship. Running ticket sales through WordPress changes that balance:
- Lower fees. You pay your payment processor typically around 1.5–3% plus a small fixed fee instead of a platform commission on top. A plugin like WpEvently doesn’t add its own per-ticket charge on top of that; it works with every WooCommerce payment gateway for free.
- You own the data. Attendee emails, purchase history, and marketing consent stay in your database for future events.
- Full branding control. Buyers never leave your domain, which improves trust and conversion.
- Faster payouts. Money lands in your Stripe or PayPal account as sales happen, rather than after the event.
- Flexibility. You can configure custom ticket types, attendee questions, discount codes, and seating rules.
The trade-off is discovery. Marketplaces bring their own audience; your site does not. Many organizers run a hybrid model: sell the bulk of inventory on WordPress and list a limited allocation elsewhere for reach.
What You Need Before You Start
- A self-hosted WordPress site (WordPress.com users need a Business plan or higher to install plugins).
- WooCommerce installed; if you’re using a WooCommerce-native plugin like WpEvently, this is what handles your checkout, cart, and payment gateways.
- An SSL certificate so checkout runs over HTTPS; most hosts provide this free.
- A payment gateway account, usually Stripe or PayPal.
- Reliable transactional email. Ticket confirmations sent through default PHP mail often land in spam, so use an SMTP service such as Brevo, Postmark, or SendGrid.
- Your event details: dates, venue, capacity, price tiers, and refund policy.
Choosing a WordPress Event Ticketing Plugin
Your plugin choice shapes everything that follows. The main approaches:
| Approach | How it works | Example | Best for |
|---|---|---|---|
| WooCommerce-native ticketing | Tickets sell as products through WooCommerce’s existing cart, checkout, and payment gateways | WpEvently | Anyone who wants one checkout system, or already runs (or is willing to run) WooCommerce |
| Dedicated ticketing plugin + separate paid connector | Free calendar/listing plugin, with a separate paid add-on required to connect to WooCommerce for payments | Event Tickets + Event Tickets Plus | Sites already deep in one ecosystem and willing to manage multiple plugin updates |
| Hosted SaaS embedded via a WordPress plugin | A free WordPress plugin embeds a block or button that connects to an external ticketing platform; the transaction and attendee data live off-site | — | Organizers who want zero WooCommerce setup and don’t mind attendee data living outside WordPress |
| Booking/seat-reservation plugins | Seat maps or slot-based inventory so two buyers can’t claim the same seat | — | Assigned seating, tours, or time-slot capacity |
A WooCommerce-native approach avoids a common failure mode with the second option: stacking a free calendar plugin, a separate paid ticketing connector, WooCommerce, and a payment gateway plugin, each updating independently; any one of them can conflict with the others after an update. With a plugin like WpEvently, ticketing is built into WooCommerce from the start rather than bolted on afterward.
Features Worth Comparing
- PDF tickets with unique QR or barcode
- A check-in app or browser-based scanner
- Multiple ticket tiers, early-bird pricing, and group discounts
- Per-attendee data collection, not just per-order
- Capacity limits, waitlists, and stock warnings
- Tax and invoice handling for your jurisdiction
- Export to CSV and integration with your email marketing tool
Step-by-Step: Setting Up Ticket Sales
The steps below walk through the process using WpEvently’s actual setup screens, so you know what to expect rather than a generic description.
1. Install the plugin and confirm your payment method
Install and activate your ticketing plugin. With WpEvently, head to Events → Settings and confirm your payment method is active. The free version supports every WooCommerce gateway (Stripe, PayPal, bank transfer, cash on delivery, and 100+ local gateways), so this is usually already covered if WooCommerce payments are set up. Run a live test purchase with a real card, then refund it. Test mode alone won’t reveal problems with webhooks, currency settings, or receipt emails.
2. Create the event: basic info
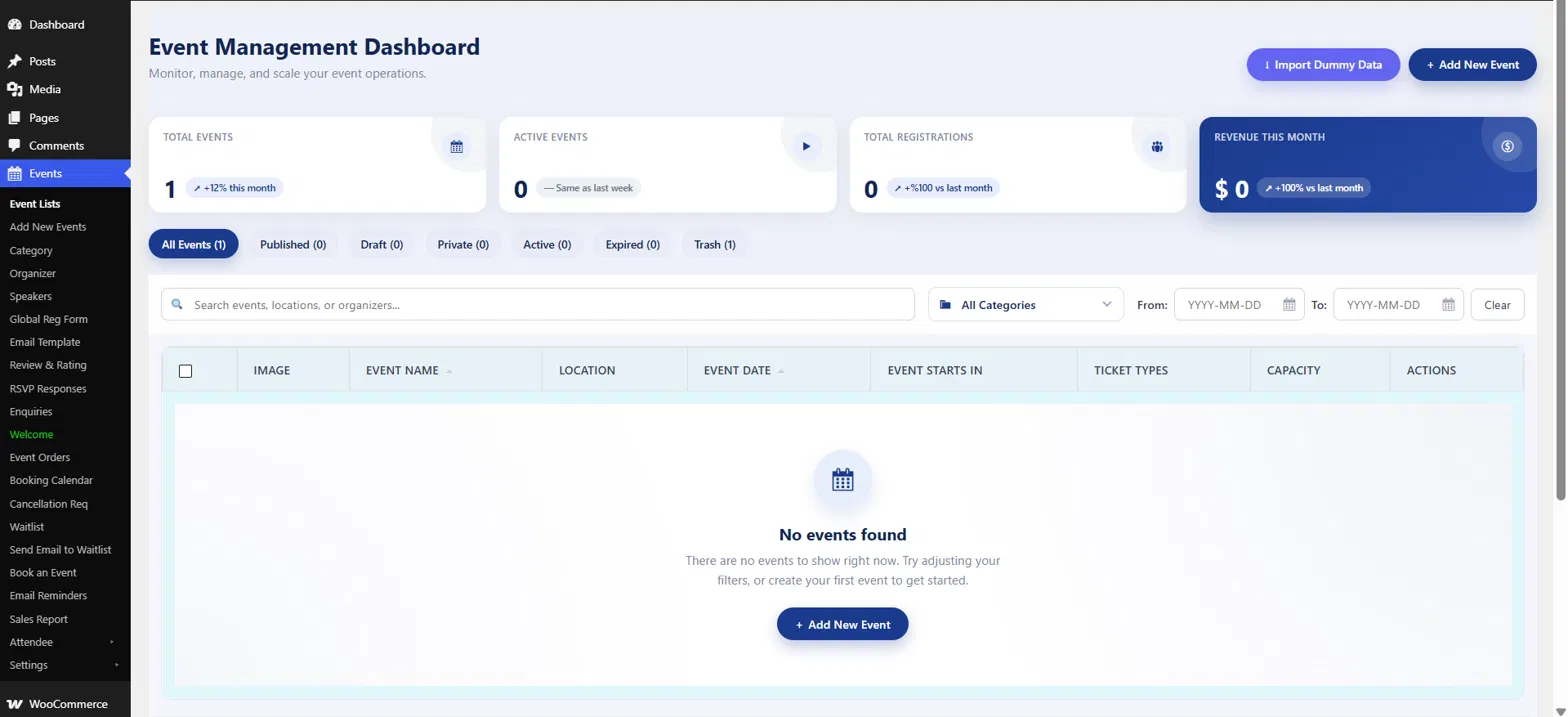
From Events → Add New Events, the setup wizard opens on a Basic Info step. Add your event title and description, then choose your event type: In-Person, Online, or Hybrid. For in-person events, enter the venue and WpEvently shows a live Google Map preview as you type. Add a featured image and gallery photos, set the event category, organizer, and tags, and check the auto-generated URL slug. Write the description for humans first, but include the event name, city, and date naturally; those are the terms people search.
3. Choose your event mode and build ticket types
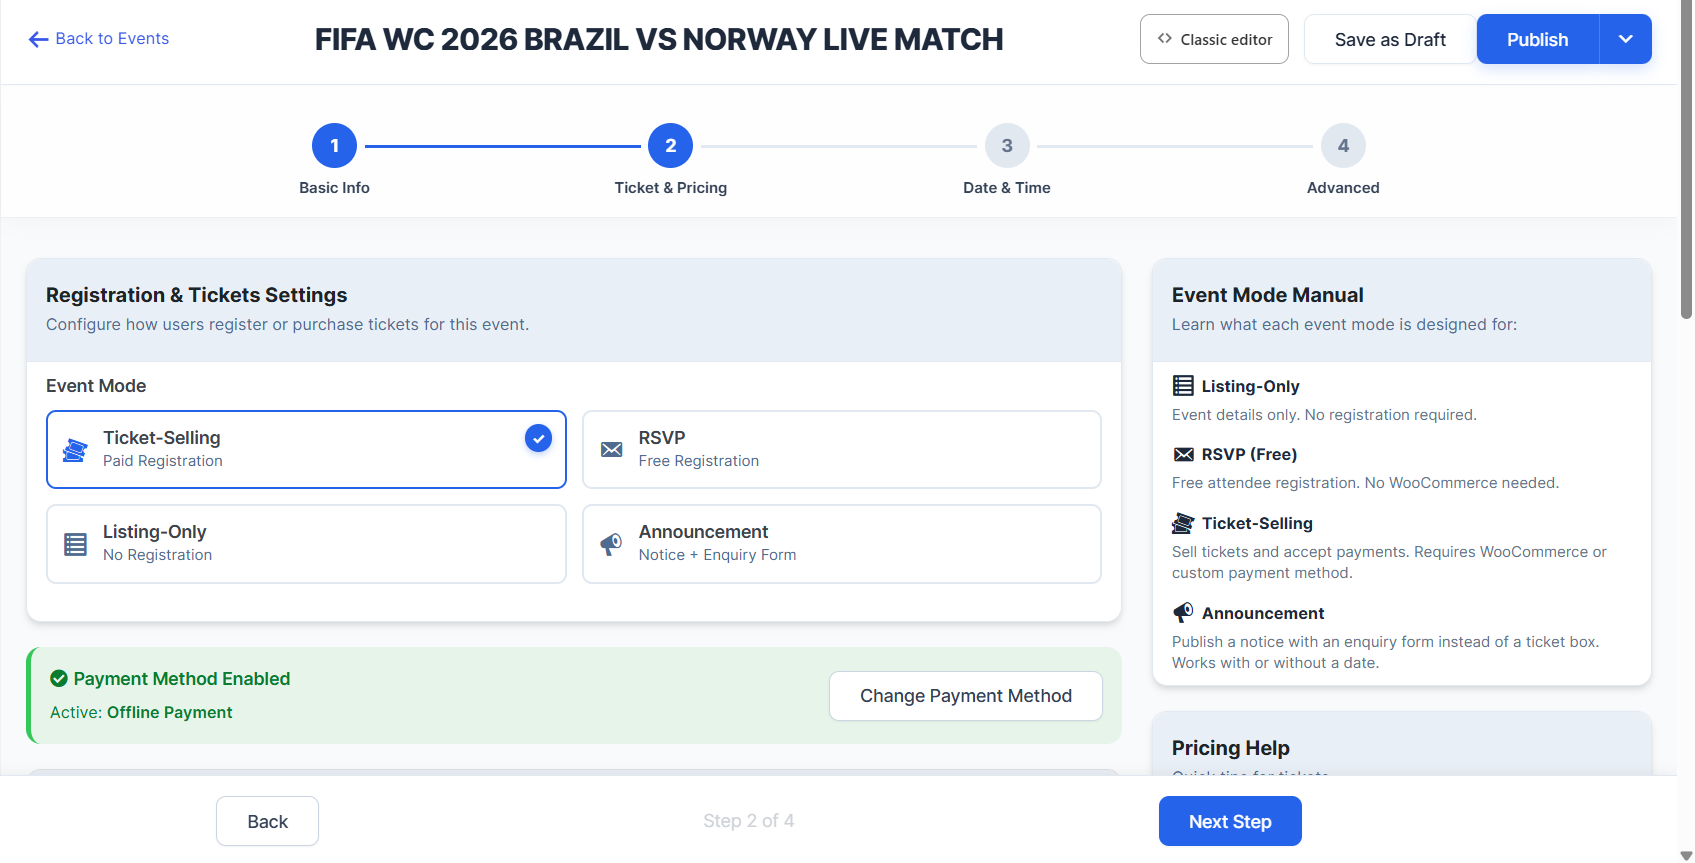
The second step is where you decide how people register. WpEvently offers four event modes:
- Ticket-Selling — paid registration, the standard ticketed-event flow.
- RSVP — free registration with no payment required, useful for meetups or webinars where you just need a headcount.
- Listing-Only — event details with no registration at all, for informational listings.
- Announcement — a notice with an enquiry form instead of a ticket box, useful for collecting interest before a date is confirmed.
For a ticketed event, add each ticket type with its own name, price, and total quantity; common structures include early bird, standard, concession, VIP, and group bundles. Set a hard capacity that matches your venue license. You can also add extra services here: optional paid add-ons like meals, merchandise, or upgrades that attendees attach to their ticket at checkout.
4. Decide how fees are handled
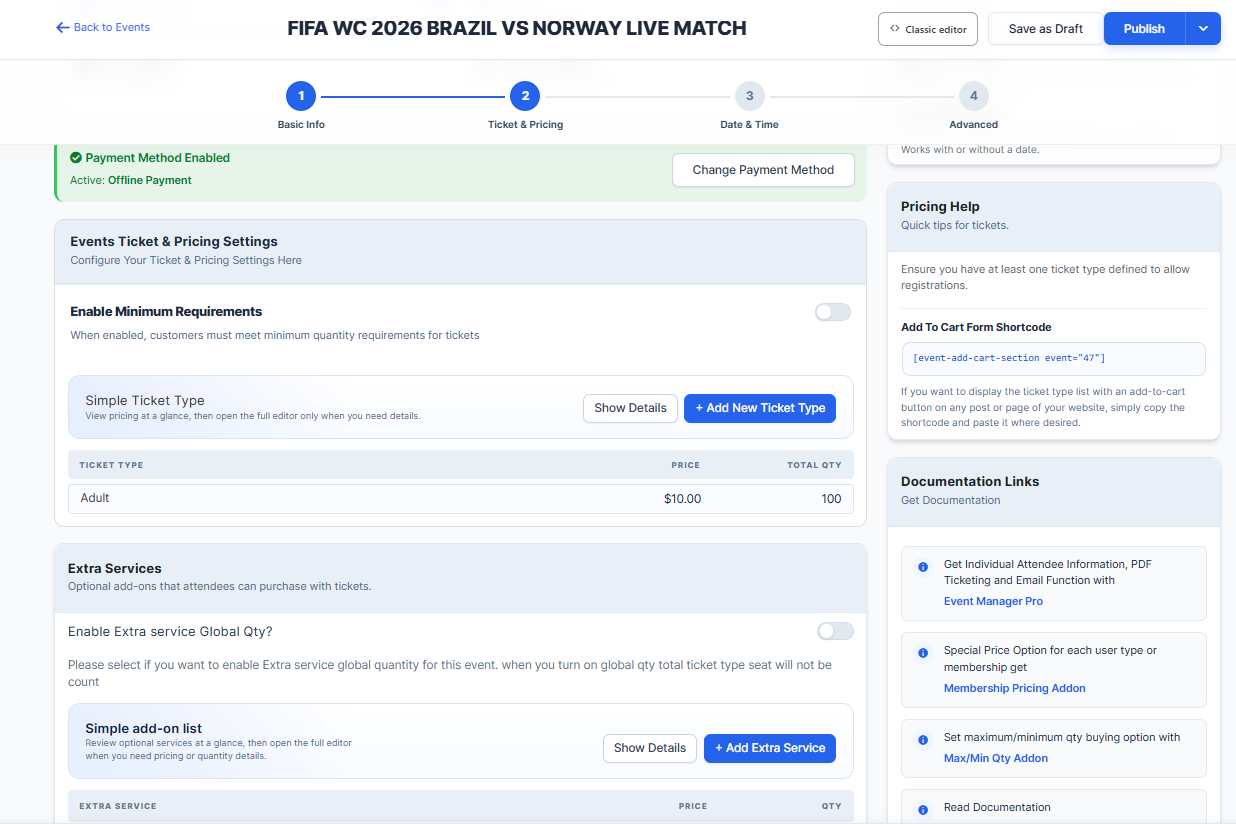
You can absorb processing fees into the ticket price or add them at checkout as a booking fee. Absorbing them looks cleaner and reduces cart abandonment; displaying them keeps the headline price low. Whichever you choose, show the total clearly before payment.
5. Set the date and time
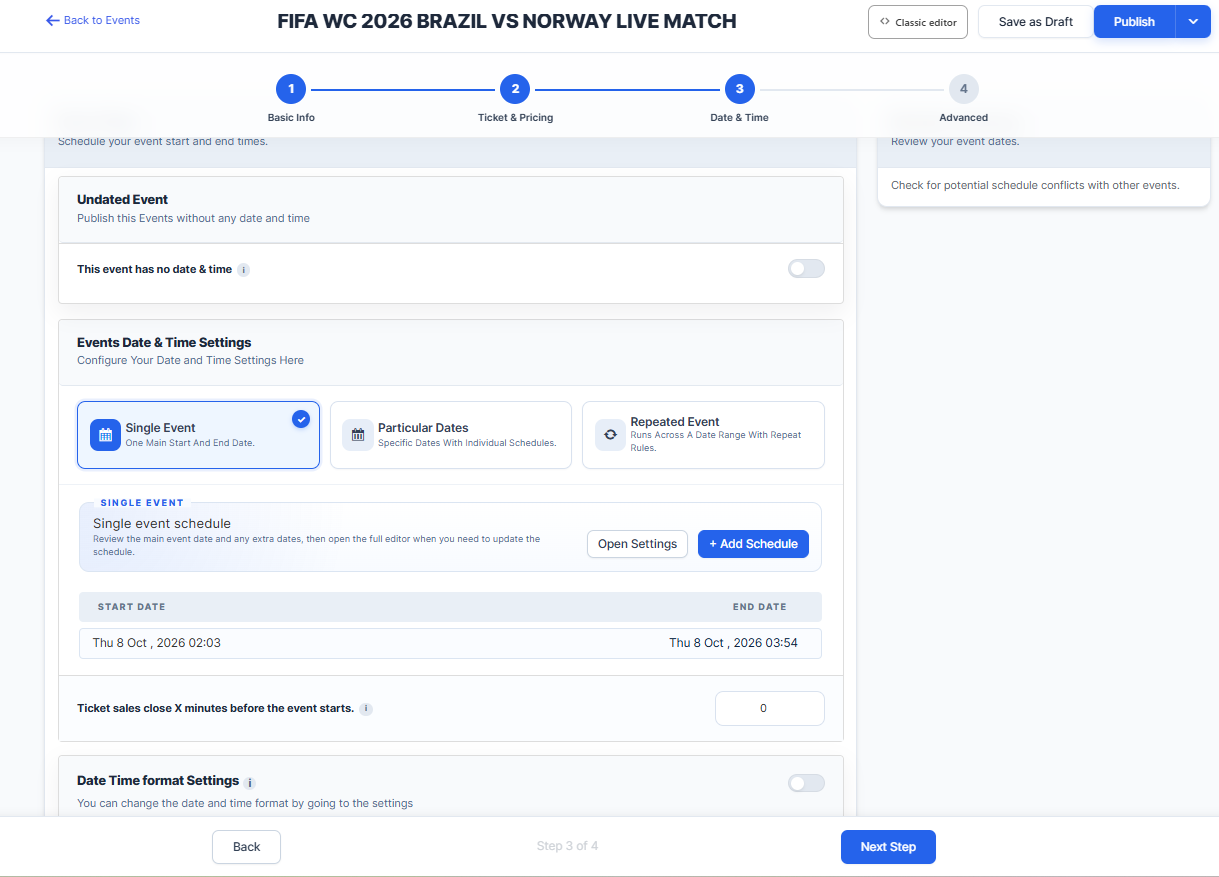
The third wizard step handles scheduling. Toggle “This event has no date & time” for an undated, open-ended listing, or choose between Single Event (one main start and end date), Particular Dates (specific dates with individual schedules useful for sessions or performances with a fixed calendar), and Repeated Event (runs across a date range with repeat rules; for recurring series, see how to create recurring events in WordPress for a full walkthrough of this mode). Set your start and end date-time, and optionally configure ticket sales to close a set number of minutes before the event starts. Getting the timezone right here prevents events from appearing to start at the wrong hour. WpEvently also flags potential schedule conflicts with your other events on this screen.
6. Configure the advanced settings
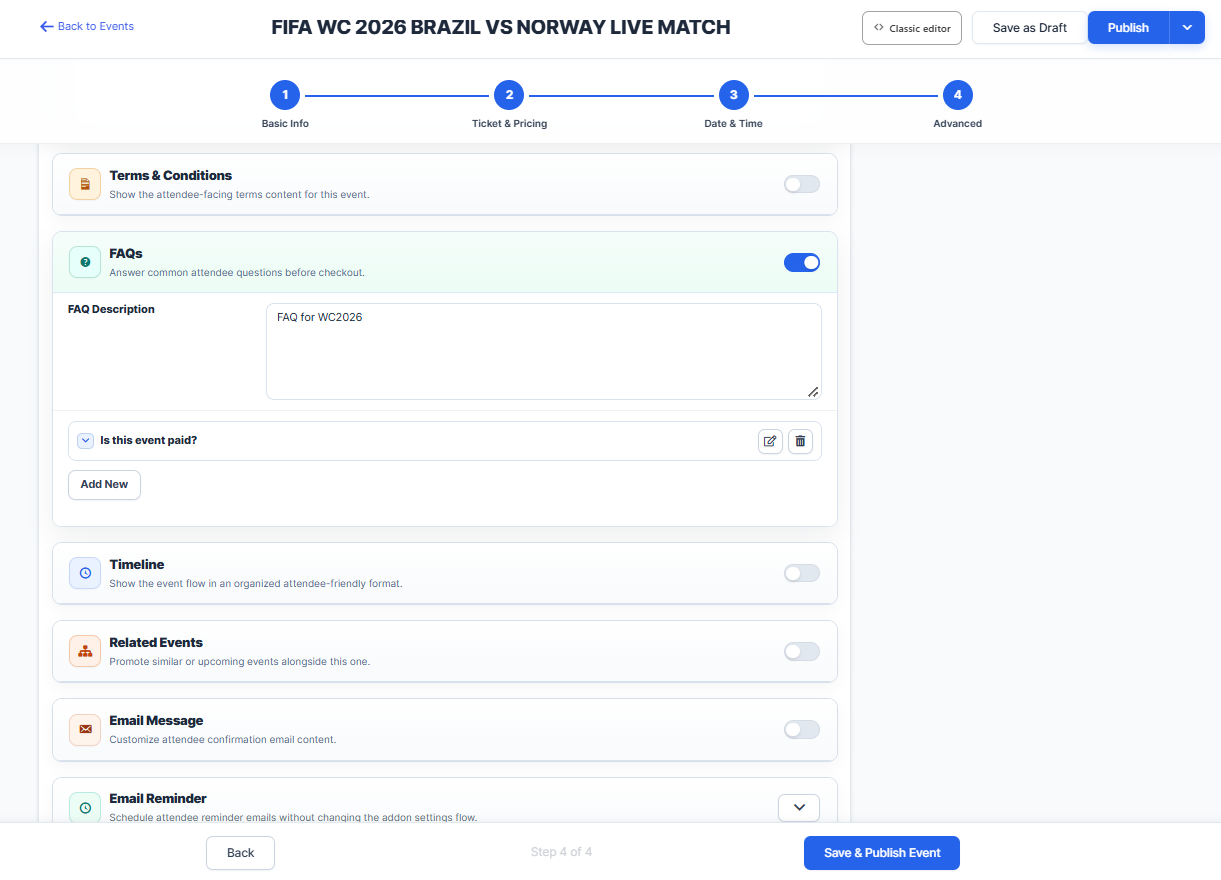
The fourth step covers presentation and policy details: pick a page template (several layout options are available, plus a dedicated Virtual Event template), enable Terms & Conditions and FAQs for the event page, and set up an email reminder schedule. A registration form builder lets you add custom fields with conditional logic, for example, showing a “school name” field only when the ticket type is “Child,” though the more advanced conditional-logic form builder is a Pro feature. This step also includes an SEO & Schema panel with a toggle to enable structured Event data and a button to check its status; this is what makes your event eligible for Google’s rich results, without touching any code.
7. Streamline checkout
Ask only for the information you genuinely need: name, email, and anything required for entry or catering. In WpEvently, ticket purchases happen in a checkout modal directly on the event page: an order summary, the registration details pulled from your custom form, billing details, and a “Complete Registration” button no redirect, no forced account creation. Make sure the form works comfortably on a phone, where most ticket purchases now happen.
8. Preview, publish, and check the confirmation flow
Preview the frontend event page; it should show your gallery, a live seat-availability counter, the event schedule and location with a “Find in Map” link, and a ticket selector with a running total. After checkout, buyers land on a confirmation page showing their booking ID, event and ticket details, attendee information, and payment status with an option to go back to the event or return home. Walk through this full path yourself before opening sales publicly.
9. Set up ticket delivery and check-in
PDF ticket generation with a unique QR code is available as a Pro feature or through a dedicated QR Code add-on, depending on your plugin. The QR code prints on the PDF ticket and can be scanned with a mobile app at the door. Check-in and check-out records save to a database as history, which matters if you need to handle duplicate scans or verify attendance after the fact. Install the scanner app and test it on your venue’s Wi-Fi or mobile data before the day, and always export a CSV attendee list as an offline fallback.
Promoting and Improving Sales
- Event schema markup helps your listing appear in Google’s event results. A plugin with a built-in SEO & Schema panel (like the one covered in Step 6 above) handles this automatically, without a separate SEO plugin.
- Create one dedicated, well-optimized landing page per event rather than burying details in a blog post.
- Use scarcity honestly: real countdowns and genuine “X tickets left” counters. A live availability count on the event page does this for you automatically.
- Offer discount codes for partners and past attendees to track which channels convert.
- Enable abandoned-cart recovery if your setup supports it.
- Cache carefully: exclude checkout and cart pages from page caching to avoid stale inventory.
Common Pitfalls to Avoid
- Launching without a live test transaction and refund.
- Relying on default WordPress email for ticket delivery.
- Hosting on an underpowered plan when a high-demand on-sale spikes traffic.
- Forgetting a clear refund, transfer, and cancellation policy at checkout.
- Ignoring local tax rules or invoice requirements for paid tickets.
Frequently Asked Questions About Selling Tickets From WordPress
Can I sell event tickets on WordPress without a third-party platform?
Yes. A WooCommerce-native plugin like WpEvently runs the entire ticket sale event listing, ticket types, checkout, and payment through your own WordPress site and WooCommerce checkout, with no redirect to an external marketplace and no per-ticket platform commission on top of your payment processor’s fee.
Do I need WooCommerce to sell tickets from WordPress?
It depends on the plugin. WooCommerce-native plugins require it, since that’s what handles the cart, checkout, and payment gateways, but it also means you inherit WooCommerce’s existing payment gateway support, coupons, and reporting rather than configuring a separate system. Some standalone ticketing plugins don’t require WooCommerce at all, at the cost of running their own separate checkout.
Can I collect free RSVPs instead of selling paid tickets?
Yes, if your plugin supports multiple event modes. WpEvently, for example, offers a dedicated RSVP mode alongside Ticket-Selling, so the same plugin handles both a paid conference and a free meetup without needing a separate tool.
How do attendees check in at the door?
Most ticketing plugins with a Pro tier or add-on generate a unique QR code per ticket, scannable with a mobile app. Check-in (and check-out) records save to a database, which lets you handle duplicate scans and verify attendance after the event. Always keep a CSV export of your attendee list as an offline backup in case connectivity fails at the venue.
Does selling tickets from WordPress hurt my SEO?
No, the opposite, generally. A plugin that generates Event schema markup automatically makes your event page eligible for Google’s rich event results, something an external ticketing marketplace listing can’t give your own domain. Keeping ticket sales on your own site also means all that page authority stays with you rather than a third-party platform.
Final Thoughts
Selling event tickets from WordPress takes an afternoon to set up and gives you control over pricing, branding, data, and cash flow that marketplaces cannot match. Start with a single event and a simple two-tier ticket structure, test the full journey from purchase to door scan, then layer on seating, waitlists, and automation as your events grow.