 Get Halloween 15% for Limited Time on Lifetime & Bundle Deal


If you want to add an event seating plan to your WordPress event site, the Seat Plan Addon for Event Manager gives you two ways to do it: a Simple Grid for fast, rule-based rows, and a Free-form Designer for stage-accurate layouts with tables, curved sections and venue images. You can also start from a ready-made template or generate seats automatically from your ticket capacities.
This step-by-step guide walks through installing the addon, enabling it on an event, building both layout types, and checking the finished plan on the booking page. Every screen and setting below is taken from the addon’s own editor, so you can follow along on a live site.
- Why an Interactive Seating Plan Is Worth the Setup
- Before You Start: Requirements and Prerequisites
- How to Add an Event Seating Plan Using Seat Plan Addon: Step by Step
- Option A: Build the Layout With Simple Grid
- Option B: Design a Venue-Accurate Map With Free-form Designer
- Creating Your Own Seat Design
- Starting Faster With a Quick-Starter Template
- Generating Seats Automatically From Ticket Capacity
- Choose the Right Layout Method for Your Event
- Seating Layout Conventions Worth Knowing
- Common Problems and Fixes
- Wrapping Up
Why an Interactive Seating Plan Is Worth the Setup
An interactive seating plan changes the buying experience. Instead of picking a ticket type and hoping for a decent spot, attendees choose the exact seat they want, see what is already sold, and arrive committed to the booking because they have already invested in a specific place.
For organizers, the practical benefits are just as real:
- Fewer support tickets. Attendees answer “where will I sit?” themselves rather than emailing you.
- Better price tiering. Aisles, VIP blocks and front rows can be visually separated by colour, so premium seats sell on their own merits.
- Accurate capacity control. Seat count and ticket stock stay in sync, so you cannot oversell a row that does not exist.
- Fewer double bookings. Sold and selected seats are visually distinct, so two people cannot take the same chair.
The trade-off is that a seat map needs real setup work before it goes live. The order of operations below is designed to keep that work short: get the event and tickets right first, then draw the room.
Before You Start: Requirements and Prerequisites
The Seat Plan Addon is an extension, not a standalone plugin. Nothing will appear in the editor until the base system is in place, so confirm these four things first.
- WordPress with a modern block or classic editor. You will be editing the event post itself.
- The WpEvently event manager and ticket-selling plugin installed and activated, since the addon adds its panels to that plugin’s event editor.
- WooCommerce installed and active. WpEvently sells through WooCommerce, so tickets cannot be checked out without it.
- The addon zip file from your MagePeople account, ready to upload.
If WooCommerce is not set up yet, finish that first — including payment methods and page assignments — so that your first test booking actually completes. You can find the full walkthrough in the step-by-step guide to using WooCommerce for event registration.
Plan the room on paper first
Five minutes with a pen saves an hour in the designer. Before opening WordPress, sketch the venue and decide:
- The stage or screen position — everything else is oriented around it.
- How many seats are in each price tier, and roughly where those blocks sit.
- Where entrances, exits and toilets are, so you can add them as labels or shapes.
- Whether you need tables (banquet, gala) or continuous rows (theatre, conference).
How to Add an Event Seating Plan Using Seat Plan Addon: Step by Step
The whole process falls into five stages: install, create the event and tickets, enable the seat plan, design the layout, and verify the booking page. Work through them in that order.
Step 1: Install and Activate the Base Plugin
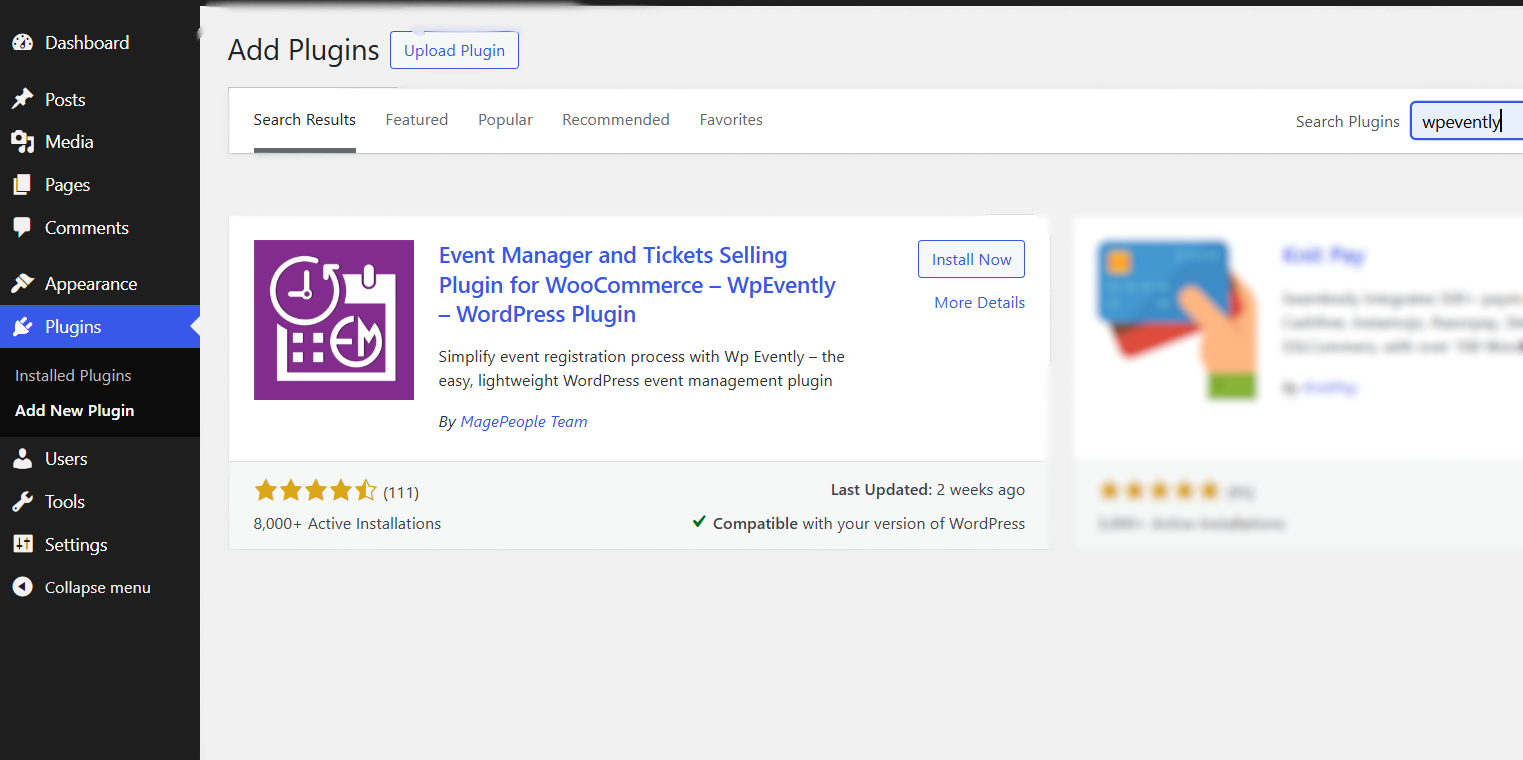
From your WordPress dashboard, go to Plugins → Add New Plugin, search for “WpEvently”, then click Install Now and activate it.
On activation you will be shown a prompt to install WooCommerce, because the ticketing runs on WooCommerce. Install and activate it, then press Next to finish the setup wizard if it is not already configured.

Step 2: Install the Seat Plan Addon
With the base system running, get the addon from the MagePeople store: open the Seat Plan Addon for Event Manager product page, purchase it, and download the zip file to your computer.

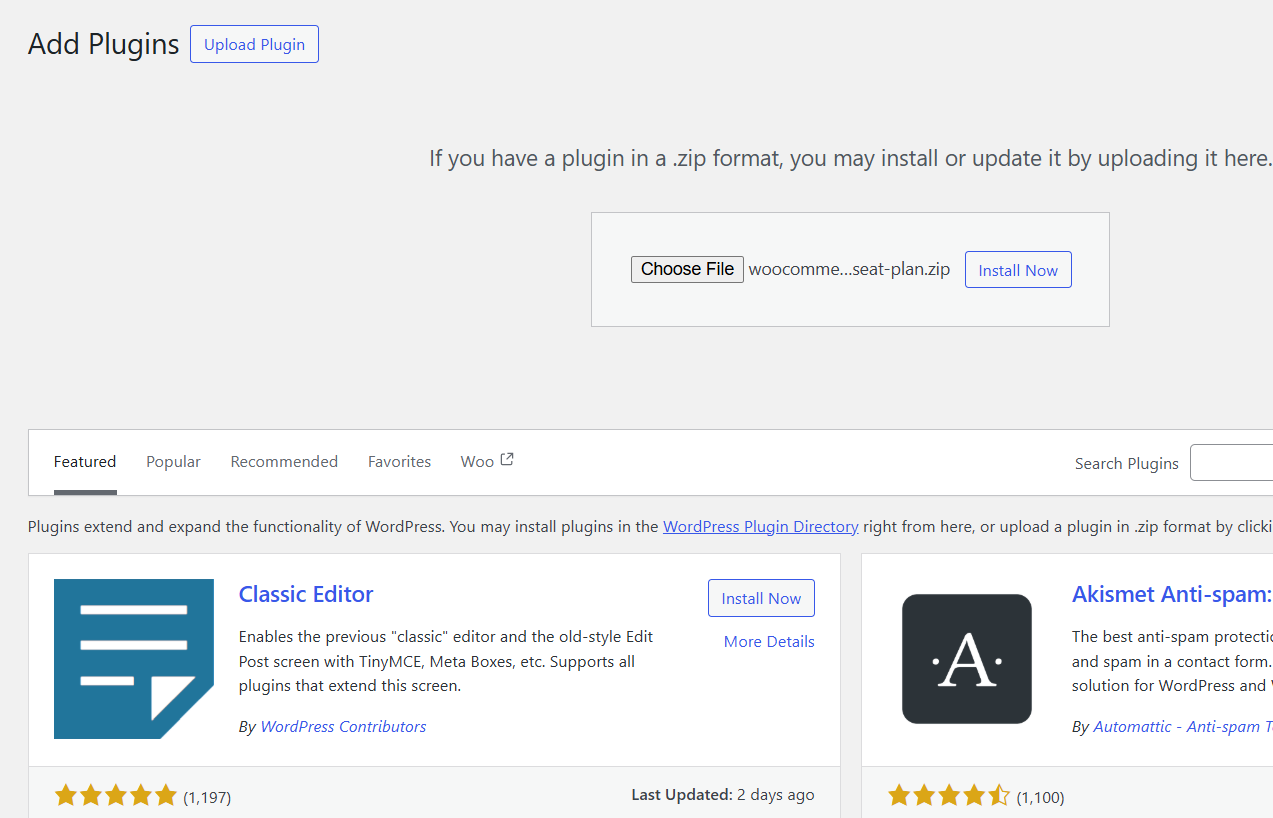
Back in the dashboard, go to Plugins → Add New Plugin → Upload Plugin, choose the zip file, click Install Now, then Activate. A new Seat Plan panel now appears inside every event you edit.
Step 3: Create the Event and Its Tickets
Go to Event Manager → Add New Event (or open an existing event to edit it). Fill in the event title, date, time, venue and description as usual — the seating plan only appears after the event itself exists.

In the event editor, open the Ticket & Pricing section and create at least one ticket type. For each one you set:
- Ticket name and price
- Capacity — the maximum number of seats this ticket can sell
- Sales start and end date/time
Use Add New Ticket Type to create additional tiers, for example VIP, Standard and Balcony. These tiers become the colour categories in the seat designer, so naming them clearly now saves confusion later.

Keep the capacity numbers on a sticky note — you will need them when you set rows and seat counts.
Step 4: Enable the Seat Plan for This Event
Scroll down in the same editor until you reach the Seat Plan section, then switch on Enable seat plan for this event under Event Seat Plan Settings. This is the master switch; leaving it off hides the map on the front end no matter how good the design is.
Directly below, you will see the choice of layout method:
- Simple Grid — define rows and seats per row, then click to generate a clean block layout. Fastest option.
- Free-form Designer — drag and place individual seats, sections, tables and shapes on a canvas. Slower, but can mirror a real venue.
There is also a checkbox for setting each ticket type’s quantity from its seat count. That option is only active for the Free-form Designer, and it ties stock directly to the number of seats you have drawn.
Start with the Simple Grid. Even if you plan to move to the designer, it is the quickest way to see your capacity as a layout.
Option A: Build the Layout With Simple Grid
The Simple Grid is a rows-and-seats calculator with colour coding and aisle control. It suits conferences, classrooms, auditoriums and any event where the seating is a regular block.

1. Label the stage or screen
Type anything into the Screen / Stage label field — “Main Stage”, “Screen 1”, “Head Table”. The label appears above the grid on the booking page, which immediately orients attendees.
2. Decide rows and seats per row
Work out your grid from total capacity. For example, if the event has 60 seats across three ticket types — 10 VIP, 20 Medium and 30 Standard — a grid of 6 rows × 10 seats covers exactly 60. Map each ticket block to the rows it occupies before generating.
You can also choose whether seats are labelled with numbers or letters from the Row labels setting. Letters suit rows (A, B, C), numbers suit seats (1–10).
Once the rows, seats per row and label style are set, click Generate grid.

3. Assign colours to each ticket type
Set a seat colour for each ticket type, plus colours for sold seats and selected seats. Pick a palette that remains distinguishable for colour-blind attendees — blueprint-style blue for VIP and grey for sold is safer than two shades of green.
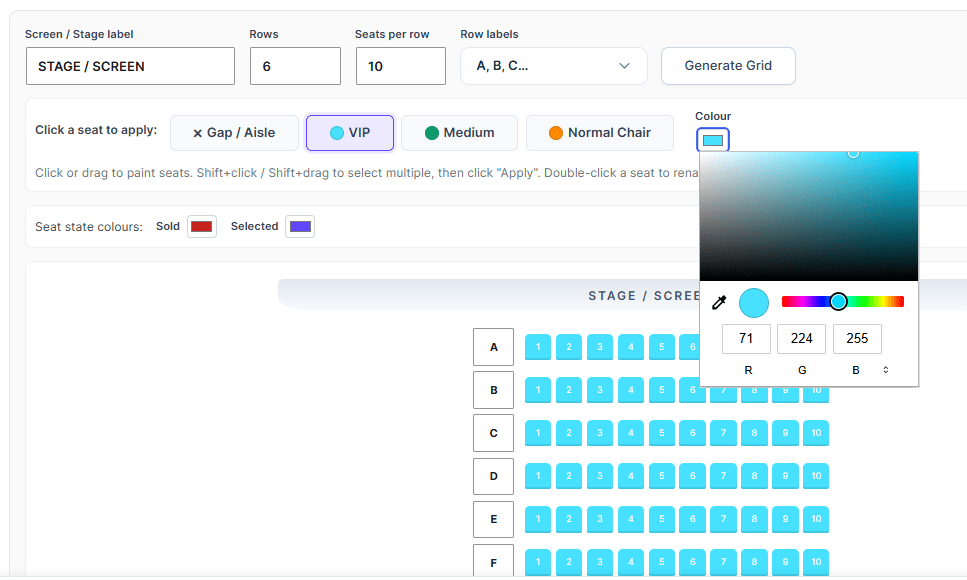
Colours are applied per ticket type rather than per seat, which keeps the map consistent. Note that the Gap/Aisle type takes no colour at all — it is deliberately blank.

4. Paint the ticket types onto the rows
Select a ticket type, then apply its colour across the rows that should carry it. Painting row by row means the VIP block, the standard block and any balcony rows all appear correctly on the front end.

5. Add aisles and walkways
Use the × Gap / Aisle button to insert empty space between rows or seat blocks. Aisles do not just look better — they reflect how people actually move, and they give you a natural place to split price tiers.

6. Fine-tune individual seats
Double-click any seat to edit it. You can change the seat number, the seat label, its ticket type or colour, or convert it into a gap if a chair should not exist there — a pillar, a camera position, an accessibility space.
Click Save to commit the change, and the updated seat appears straight away in the grid.


7. Update, then test the booking page
When the layout matches your plan, click Update in the top-right corner to publish it. Then open the event’s booking page on the front end to confirm the map displays correctly.

Select a seat from the map, check that the chosen ticket type and price appear in the summary, and complete a test booking. If the seat is then marked as sold on reload, the layout is wired correctly.
If you also sell fixed-entry items alongside seated ones — a workshop add-on, a meal package, a parking pass — the min-max quantity limiting addon guide explains how to cap those per order without touching seat stock.
Option B: Design a Venue-Accurate Map With Free-form Designer
Switch the layout method to Free-form Designer in the same Seat Plan section. Here you get a canvas with a toolbar, and the shapes you place are roughly where attendees will sit relative to the stage.

The designer gives you three starting points:
- Create your own seat design — place seats, sections, tables and shapes manually.
- Quick-start template — apply a pre-built layout (theatre, cinema, banquet, stadium, classroom and more).
- Generate seats from ticket capacity — draw seats automatically from your ticket quantities.
The sections below cover all three.
Creating Your Own Seat Design
This is the manual route and gives you the most control. It helps to think in layers: category colours first, then seats and sections, then annotations such as tables, exits and text labels.

Set category colours first
Click Select, open Categories, then choose a ticket type and assign its seat colour. Repeat for every tier so that each one is instantly recognisable on the map.
Next, set the seat state colours — one for sold seats and one for selected seats. These two states need to be unmistakable, because they are the difference between “available” and “gone”.


Place individual seats
Click the Seat tool, then click anywhere on the canvas. A single seat appears with its row label and seat number already assigned.


To add a seat in a different tier, click Select, pick that category’s colour, then place the seat. Handy for a single VIP chair on an aisle or one wheelchair space near a door.

Seat shape can be changed too — useful if your venue uses stools or benches rather than individual chairs.

Generate whole sections in one click
Placing hundreds of seats one at a time is unnecessary. Click the Section tool and enter the number of rows, seats per row and a label; the fan curve field lets you arc the block. Hit Generate Sections and the full block appears on the canvas.

Then select the block and recolour it by ticket type so the section matches its price tier.

If the arrangement goes wrong, Clear all wipes the canvas back to empty so you can start the section again.

Curve a section with the fan control
Add a section again, but this time enter a value in the fan curve field. The block bends by the number of degrees you specify at any angle — the fastest way to imitate a horseshoe theatre, an amphitheatre or a curved balcony without placing seats individually.

Add tables for banquets and galas
Click the Table tool and set the table label, the table shape (round or rectangular) and the number of chairs around it. The table and its chairs are drawn as one unit.

You can then reposition the table, change its shape and rename its label — useful for naming tables after sponsors or numbers.

Draw venue features and landmarks
The Shape tool adds a rectangle or ellipse with its own label and colour — ideal for the stage itself, a bar, a dance floor, a sponsor stand or a registration desk.

There are quick-add presets for common features such as stage, exit, entrance and toilet, so you do not need to draw them from scratch.

For anything else, the T Label tool drops free text anywhere on the canvas — “Cloakroom”, “Photography area”, “Keep clear”.

Select, duplicate and delete in bulk
Click All to select every seat on the canvas, then Duplicate to create a second copy of the selection — a quick way to build a mirrored balcony or a second seating tier.


The Delete button removes the selected items.

Undo, zoom and align
Undo and Redo step back and forward through your edits, so an experiment costs nothing.

Use + and − to change the zoom percentage when working on dense rows.
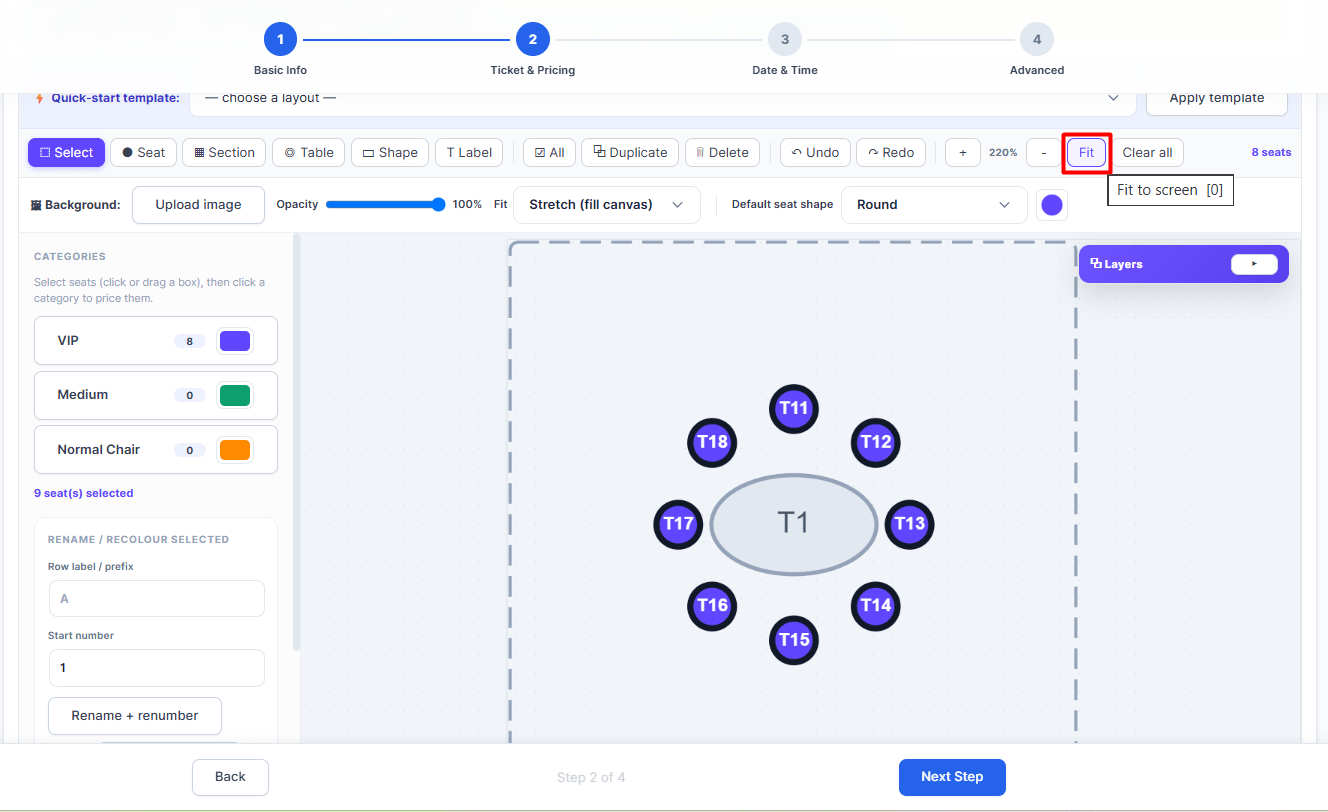
Fit centres the design in the canvas so nothing sits off-screen when you publish.

And Clear all removes every layer if you want to start over.
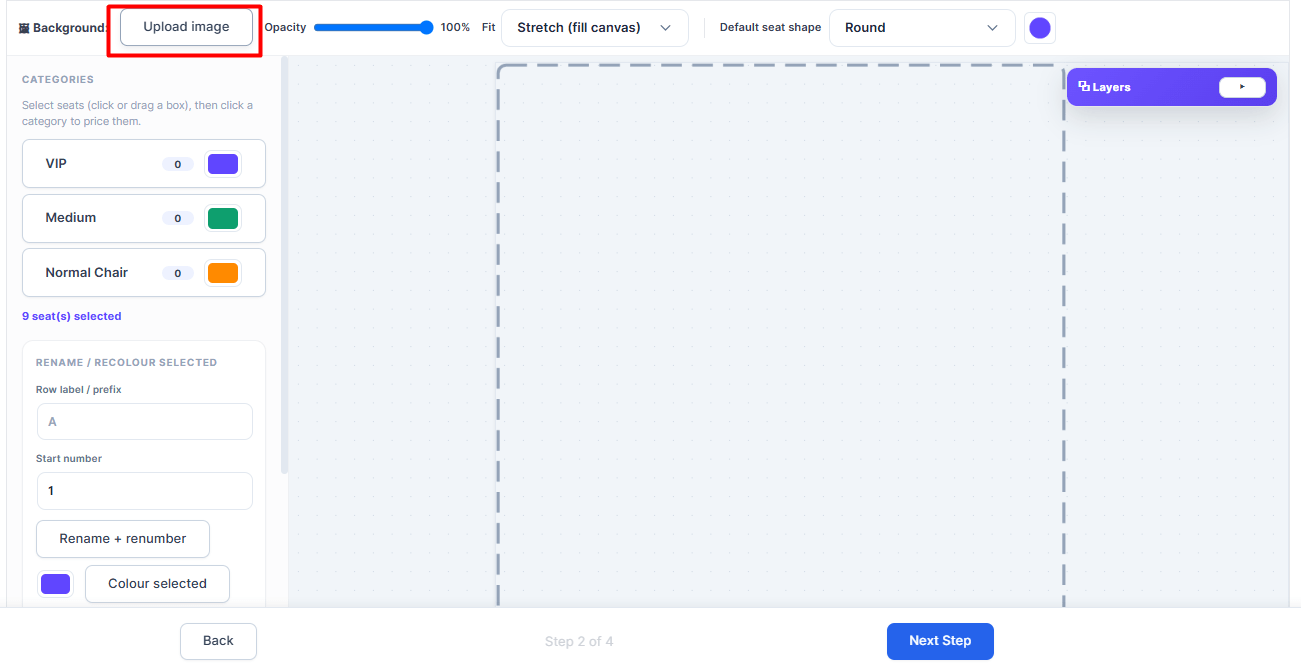
Use a venue floor plan as a background image
This is the feature that makes a map genuinely look like the room. Click Upload image, pick a floor plan or architectural drawing from the media library (or upload it fresh), then click Use image. Place seats on top of the drawing and the layout matches reality.


If the plan is too busy, fade it with the Opacity slider so seats stand out, or remove it entirely with Remove.

Four image fitting options are available — Stretch (fill canvas), Fit (keep ratio), Cover (fill and crop) and Tile (repeat). Use Fit for a scanned floor plan so its proportions are not distorted.
Starting Faster With a Quick-Starter Template
If you have a launch deadline, do not build from an empty canvas. Open the Quick-start template panel and you will find pre-built layouts including theatre, cinema, banquet, stadium, classroom and wedding arrangements.

Pick the closest match and click Apply template.

The template loads onto the canvas fully editable, so you can delete surplus rows, recolour tiers, add tables and rename sections rather than starting from zero.

The Layers tab lists everything on the canvas — seats, sections, shapes and labels. From there you can hide an element temporarily, unhide it, or delete it outright without hunting for it on the map.
Generating Seats Automatically From Ticket Capacity
The third route is the fastest of all, and it guarantees that seat count and ticket stock agree. It relies on the checkbox mentioned in Step 4: Set each ticket type’s quantity from its seat count.

Enable that option and a new button appears next to Apply Template called Generate seats from ticket capacities.

Click it and the designer draws a layout built from your ticket types and their quantities, with each tier already carrying its category colour. You then rearrange, curve or annotate the result as needed — the seat count is already correct, so the work is purely cosmetic.

When everything looks right, click Update and open the booking page to confirm the map renders, seats are selectable, and sold seats are greyed out.
A short video walkthrough
If you prefer to watch rather than read, this walkthrough covers the designer’s main tools in motion.
Watch the Seat Plan Addon walkthrough on YouTube
Choose the Right Layout Method for Your Event
Most organizers can decide in a few seconds using this rule of thumb.
| Scenario | Best starting point | Why |
|---|---|---|
| Conference, lecture, classroom | Simple Grid | Regular rows, straight aisles, one stage |
| Theatre, concert, cinema | Quick-start template, then curve sections | Curved tiers and fan shapes are native to the designer |
| Wedding, gala, awards dinner | Free-form Designer with tables | Round or rectangular tables with named labels |
| Stadium or arena | Generate from ticket capacity, then refine | Seat count matches stock automatically |
| Mixed venue with floor plan | Free-form Designer with a background image | Layout mirrors the actual room |
Seating Layout Conventions Worth Knowing
A well-drawn map still needs sensible rules behind it. These conventions hold across most venues.
- Theatre style — continuous rows facing the stage. Best sightlines, highest density.
- Classroom style — rows with writing surfaces, a centre aisle. Suits training and seminars.
- Banquet rounds — ten-seat tables that encourage conversation. Lower density, better for networking.
- Cabaret — half-round tables angled toward the stage. Good for entertainment-led dinners.
- Boardroom — a single large table for small, senior groups.
Whatever you choose, keep accessible spaces adjacent to aisles and near exits rather than buried mid-row, leave clear walkways to fire exits, and make sure the stage or screen is unmistakable in the diagram. Attendees judge a seat map within seconds, and orientation is the first thing they look for.
If your venue seats change per session — a day-long event with talks in halls of different sizes — it is worth reading how to add a calendar to a WooCommerce event management website, so attendees can see which sessions run where before they pick a seat.
Common Problems and Fixes
- No Seat Plan section in the editor. The addon is not activated, or the event was created before activation. Reactivate the addon, then refresh the event editor.
- The map does not show on the booking page. “Enable seat plan for this event” is off, or the event has not been updated since the layout was designed.
- Tickets sell out but seats remain free. The “quantity from seat count” option is enabled and your ticket capacity is lower than the number of seats drawn. Align the two.
- Two people booked the same seat. Almost always a caching issue. Exclude event and cart pages from your page cache and retest.
- Design looks cut off. Press Fit in the designer before saving, so the layout is centred in the canvas.
Wrapping Up
Adding an event seating plan with the Seat Plan Addon comes down to a repeatable sequence: install the base plugin and WooCommerce, create the event and its ticket tiers, switch on the seat plan, build the layout, then verify it with a test booking. Choose the Simple Grid for regular rows, the Free-form Designer for venue-accurate maps with curves and tables, a quick-start template when time is tight, or capacity generation when stock accuracy matters most.
Whichever route you take, do a full test purchase before you announce the event. One practice booking will surface every configuration problem — caching, capacity, colours — before a paying attendee does.
