 Get Halloween 15% for Limited Time on Lifetime & Bundle Deal



To translate a WordPress plugin, you need its translation files (a .pot template, then a .po file you edit, and a compiled .mo file WordPress actually reads). You can edit those files in the free Loco Translate plugin from your dashboard, or in Poedit on your desktop, or you can load a community translation from the WordPress.org language packs. This guide walks through all three routes and the things that break on a live multilingual site.
Most plugins ship with English strings because that is the language of the developer community. Your site does not have to stay that way. WordPress core, themes and plugins all use the same gettext-based translation system, so the skill you learn here applies to every plugin you install.
- Why plugin translation is not the same as translating your content
- Before you start: what you need
- Understand the three files you will be working with
- Method 1: Translate a plugin with Loco Translate (recommended for most sites)
- Method 2: Translate a plugin with Poedit
- Method 3: Use an existing community translation
- Translating a plugin on a multilingual site
- Common problems and fixes
- Should you translate strings, or hire it out?
- Final checklist
- Conclusion
Why plugin translation is not the same as translating your content
It is worth separating two jobs that people often confuse.
- Content translation covers your posts, pages and product descriptions. You handle that with a multilingual plugin such as Polylang or WPML, or with manual duplicate pages.
- Interface translation covers the labels, buttons, error messages and emails that a plugin prints. That is what
.poand.mofiles control, and that is what this article is about.
Example: if you run a tour website, translating the page text with WPML will not translate “Book Now”, “Choose a date” or the confirmation email sent by your tour booking plugin. Those strings come from the plugin’s own translation catalogue. You need both jobs done to deliver a fully localized experience.
Before you start: what you need
- A site language set. Go to Settings → General → Site Language and choose your target language. Without this, WordPress will not look for a translation at all.
- The plugin’s text domain. Every string belongs to a text domain, usually matching the plugin folder name. Loco Translate shows it for you; in a desktop editor you find it in the plugin’s main PHP file.
- Write access to the plugin’s
/languagesfolder — or, better, use a location outside the plugin so updates do not wipe your work. - A staging copy if the site is live. Translation edits that load a broken
.mofile can take down the dashboard. - An editor. Loco Translate (free, inside WordPress), Poedit (free desktop app), or just a text editor for small fixes.
Back up the site before you edit anything, especially if you plan to change files by hand.
Understand the three files you will be working with
| File type | What it holds | Who creates it |
|---|---|---|
.pot | Template listing every translatable string in the plugin, in English, with no translations | The plugin developer, usually via a build script |
.po | The editable translation file: English source string plus your translated string | You, or a translation tool |
.mo | The compiled binary version WordPress reads at runtime | Poedit or Loco Translate, generated from the .po |
File names follow a fixed pattern. A French translation of a plugin with the text domain my-plugin is my-plugin-fr_FR.po and my-plugin-fr_FR.mo. Get the locale code wrong and WordPress silently ignores the files — this is the single most common mistake.
Method 1: Translate a plugin with Loco Translate (recommended for most sites)
Loco Translate is the easiest route because you never leave the browser. It generates the .po and .mo for you and can keep your translation in wp-content/languages/loco so plugin updates do not overwrite it.
- Install and activate Loco Translate from Plugins → Add New.
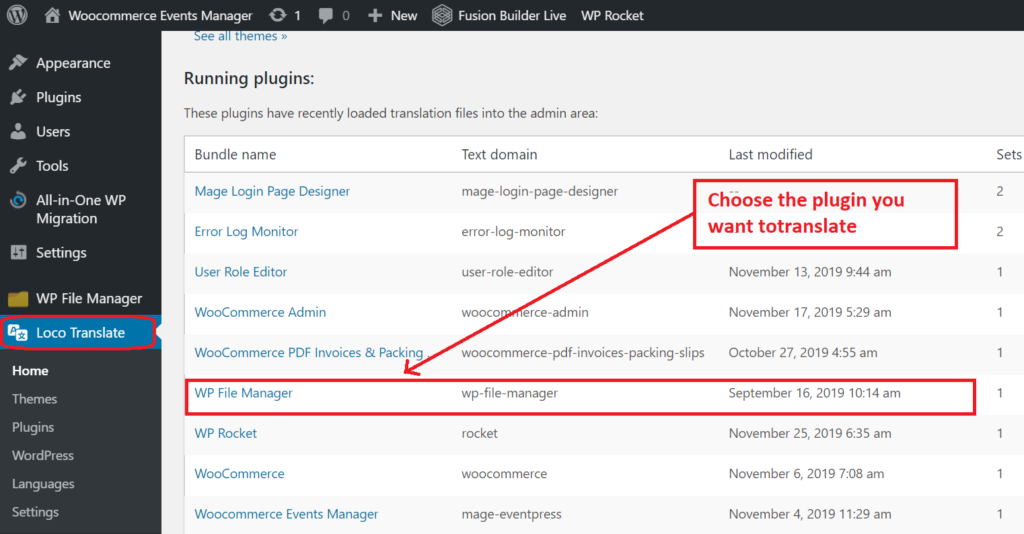
- Go to Tools → Loco Translate → Plugins and click the plugin you want to translate.
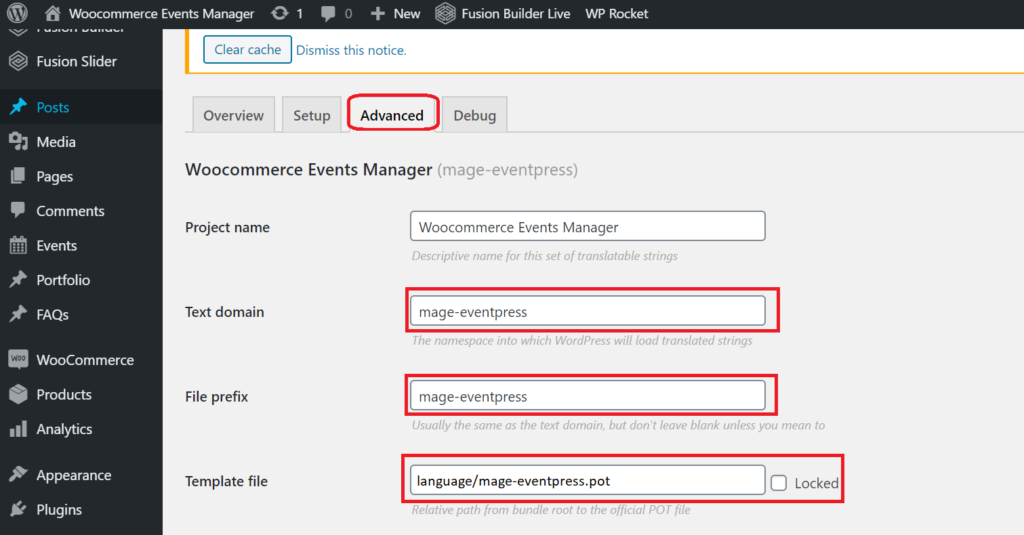
- Open the Overview tab. It shows the text domain, the current template file and where translation files will be stored. Choose the System or Custom location rather than Author so updates leave your work intact.
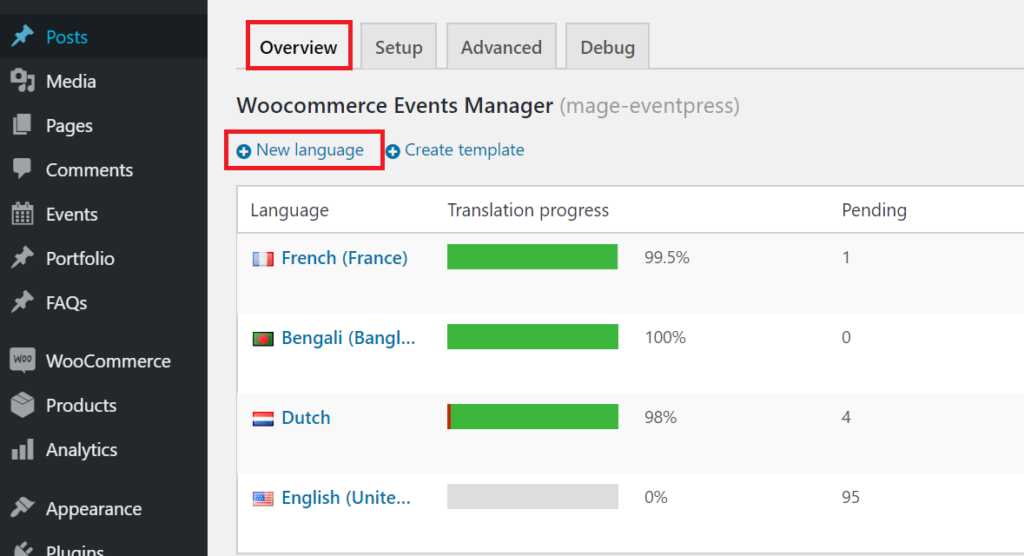
- Click + Add new language (on the Overview tab) and pick your language.
- Loco creates the
.pofile and opens the editor. The left column lists source strings, the right column is where you type the translation. - Use the filter box to find strings quickly. Save drafts as you go — nothing goes live until you save.
- When finished, click Save and confirm the status shows the translation as complete. Loco compiles the
.mofile automatically. - Clear any caching plugin and reload the front end to check the result.
Plugin Translation process
The screenshots below show the same steps in sequence. First, pick the plugin you want to translate.
Next, open the Advanced section and confirm three values: the text domain, the file prefix, and the template file. If these do not match the plugin’s actual files, translations load but never display.
Then, on the Overview tab, click + Add new language and choose your target locale.
After that, click Start Translating, work through the strings and save. Loco will report how many strings are translated and how many are still untranslated.
Practical tips for Loco Translate
- Handle plurals separately. Strings such as “%s guests” have a plural tab. Some languages need three or more plural forms, and leaving them blank shows English.
- Keep placeholders intact. Anything like
%1$s,%dor{name}must survive translation. Reorder them only if the language requires it, and never delete them. - Translate the email templates. Booking, rental and ticketing plugins send emails from the backend; those strings often sit in the same catalogue but are easy to miss. Search for “email”, “subject” and “confirmation”.
- Do not translate the text domain or file names. Only the values on the right-hand side of each row are yours to edit.
- Export your
.po. It is a portable backup and can be shared with a professional translator later.
Method 2: Translate a plugin with Poedit
Poedit is a desktop application for editing gettext catalogues. It is the better choice when you are translating a large plugin, working offline, or handing files to a translator who does not have WordPress access.
- Download and install Poedit from the official site.
- Open the plugin folder and find the
/languagesdirectory. Locate the.pottemplate (or an existing.poif the developer shipped one). - In Poedit, choose Create new translation (or File → New from POT/PO file) and select the template.
- Pick the target language from the dropdown. Poedit will propose a locale such as
fr_FR. - Save with File → Save As, using the plugin’s naming convention, and place the file in the
/languagesfolder — or inwp-content/languages/plugins/if you want it to survive updates. - Work through the source strings one by one. Fuzzy (machine-suggested) entries are flagged and must be reviewed, not accepted blindly.
- Save again. Poedit compiles the
.mofile alongside the.poautomatically. - Upload both files to the server, then set Settings → General → Site Language to your target language.
Reusing translations after a plugin update
When the plugin adds new strings, your existing .po stays valid but will be missing entries. In Poedit, use Catalogue → Update from POT file to merge the new template into your translation. Old translations are preserved, new strings appear as untranslated, and removed strings are marked obsolete. In Loco Translate, click Sync on the plugin’s Overview tab to do the same thing.
Method 3: Use an existing community translation
Before translating anything from scratch, check whether someone already did the work.
- WordPress can install language packs automatically. If the plugin is hosted on WordPress.org and has translation reviewers, your locale may already be available under Dashboard → Updates.
- Many free plugins accept translations through translate.wordpress.org. If your language is under 100% but above roughly 90%, the remaining untranslated strings fall back to English.
- Commercial plugins often ship with several ready-made
.pofiles in their/languagesfolder. Check before opening an editor. - If a translation exists but is incomplete, download the file and finish it in Loco or Poedit instead of starting over — your corrections can also be contributed back to the project.
One caution: community translations are user-contributed, and quality varies. Read through the strings that appear in your checkout or booking flow before trusting them on a live site.
Translating a plugin on a multilingual site
If your site serves several languages at once, the workflow changes. Each user must get the plugin interface in their own language, not just the site’s default.
- Set up one language per locale in your multilingual plugin (Polylang, WPML or similar) and make sure the locale codes match the translation file names exactly.
- Tell WordPress which language to load per request. Multilingual plugins usually do this automatically once the locales match.
- Translate the plugin strings once per locale — one
.po/.mopair each. - Translate the content separately. A booking form’s field labels come from the plugin catalogue; the page around the form comes from your page translation.
- Test end to end in each language: form submission, confirmation email, invoice or ticket PDF, and admin notifications.
If a plugin you rely on has no translation support at all, weigh the cost of translation against switching. The booking plugin test checklist includes language readiness as one of the checks worth running before you commit to a tool.
Common problems and fixes
| Symptom | Likely cause | Fix |
|---|---|---|
| Translations saved but not showing | Locale mismatch or a cached .mo | Confirm the file name matches the site locale, then clear the object cache and any page cache |
| Some strings stay English | Those strings were never wrapped in a translation function, or the plugin loads its text domain late | Report to the developer; late loading can sometimes be worked around with a small snippet in a child theme |
| Translation disappears after an update | Files were stored in the plugin’s own folder | Move them to wp-content/languages/plugins/ or use Loco’s System location, then re-save |
| Broken layout or missing symbols | Encoding problem | Save files as UTF-8 without BOM and recompile |
| Emails still in English | Email templates stored as options, not strings | Edit them in the plugin settings for each language, or use the plugin’s own multilingual fields |
Should you translate strings, or hire it out?
Do it yourself when the surface area is small — a few dozen labels on an internal tool, or a quick patch to an existing community translation. Hire a translator when the plugin sits in front of paying customers: checkout, ticket delivery, cancellation policies and legal notices all carry commercial risk if mistranslated. A machine-translated “non-refundable” clause is not a saving.
Whatever you choose, keep the .po files in version control or a shared drive. They are the only copy of work that took real effort, and they are the file a future translator will want.
Final checklist
- Site language set correctly under Settings → General
- Text domain confirmed and matching the plugin
- Translation files stored outside the plugin folder
- Locale codes matching exactly (
pt_BRis notpt_PT) - Plurals and placeholders checked
- Emails, invoices and admin notifications translated too
- Front end, checkout and dashboard tested in the target language
.pofiles backed up
Conclusion
Translating a WordPress plugin comes down to three files and one setting. Loco Translate handles it inside the dashboard and is the fastest route for most site owners; Poedit gives you a proper desktop workspace for larger catalogues. Either way, keep your translation files safe from plugin updates, match the locale code exactly, and test the whole flow — including the emails — before you call it done. If you are still choosing the plugin itself, run the language-support check first; retrofitting translation is far easier on plugins that ship with a .pot template and a clean text domain.
