 Get Halloween 15% for Limited Time on Lifetime & Bundle Deal

You can build a working equipment rental website on WordPress with the WpRently plugin — no coding required. WpRently turns WooCommerce into a rental engine with multi-day and multi-item bookings, real-time inventory, duration-based pricing, and deposits, so customers can reserve a drill, a jackhammer, or a camera rig for the exact dates they need.
This guide walks through the build in seven steps: installing WordPress and WooCommerce, configuring WpRently, adding rentable products, wiring up booking calendars, setting pricing rules, taking payments, and launching. It is written for tool, construction, party, and AV equipment hire businesses that want to rent gear online rather than by phone.
- What Makes an Equipment Rental Website Different
- Why WordPress and WpRently for Equipment Hire
- Step-by-Step: Building Your Equipment Rental Website
- Worked Example: A Three-Day Multi-Item Hire
- Features That Matter for Equipment Rentals
- Practical Tips for Equipment Rental Owners
- Frequently Asked Questions
- Wrapping Up
What Makes an Equipment Rental Website Different
Before you install anything, it helps to know which problems a rental site must solve that a normal shop does not:
- Availability over time, not stock counts. One item can be booked for next weekend and still be free the weekend after. Your system needs a calendar, not just an inventory number.
- Duration-based pricing. The same item is worth different amounts per hour, per day, or per week.
- Items leave and come back. Return dates, late fees, and condition checks matter as much as the sale itself.
- Multi-item jobs. A customer renovating a kitchen rarely rents one tool. They rent a set, for the same window.
If you are still deciding which vertical to enter, the 25 best rental business ideas to start with WpRently covers demand and niche angles before you commit to a catalogue.
Why WordPress and WpRently for Equipment Hire
WordPress gives you the content, SEO, and payment infrastructure; WpRently adds the rental logic on top of WooCommerce. Practically, that means you get the e-commerce features WooCommerce already handles well — checkout, tax, coupons, reporting, and payment gateways — plus the booking layer that rentals need:
- Multi-day and multi-item booking with flexible durations.
- Real-time availability that blocks double bookings automatically.
- Dynamic and day-wise pricing for weekends, peak seasons, or long hire.
- Configurable booking forms for pickup location, job site, or special requests.
The free plugin on WordPress.org is enough to launch. Check current pricing on the WpRently site for the Pro licence if you need advanced multi-day and multi-item features, and confirm which licence tier fits the number of domains you operate.
Step-by-Step: Building Your Equipment Rental Website
1. Set Up WordPress and WooCommerce
- Install WordPress on a reliable host with a one-click installer, or on a managed WordPress plan if you would rather not touch the server.
- Choose a theme that is WooCommerce-compatible and fast on mobile — most rental enquiries come from phones.
- Install WooCommerce from Plugins > Add New and run its setup wizard. WpRently depends on it, so complete this first.
Keep the site lean at this stage. Every plugin you add before the rental plugin is one more thing to debug later.
2. Install and Configure WpRently
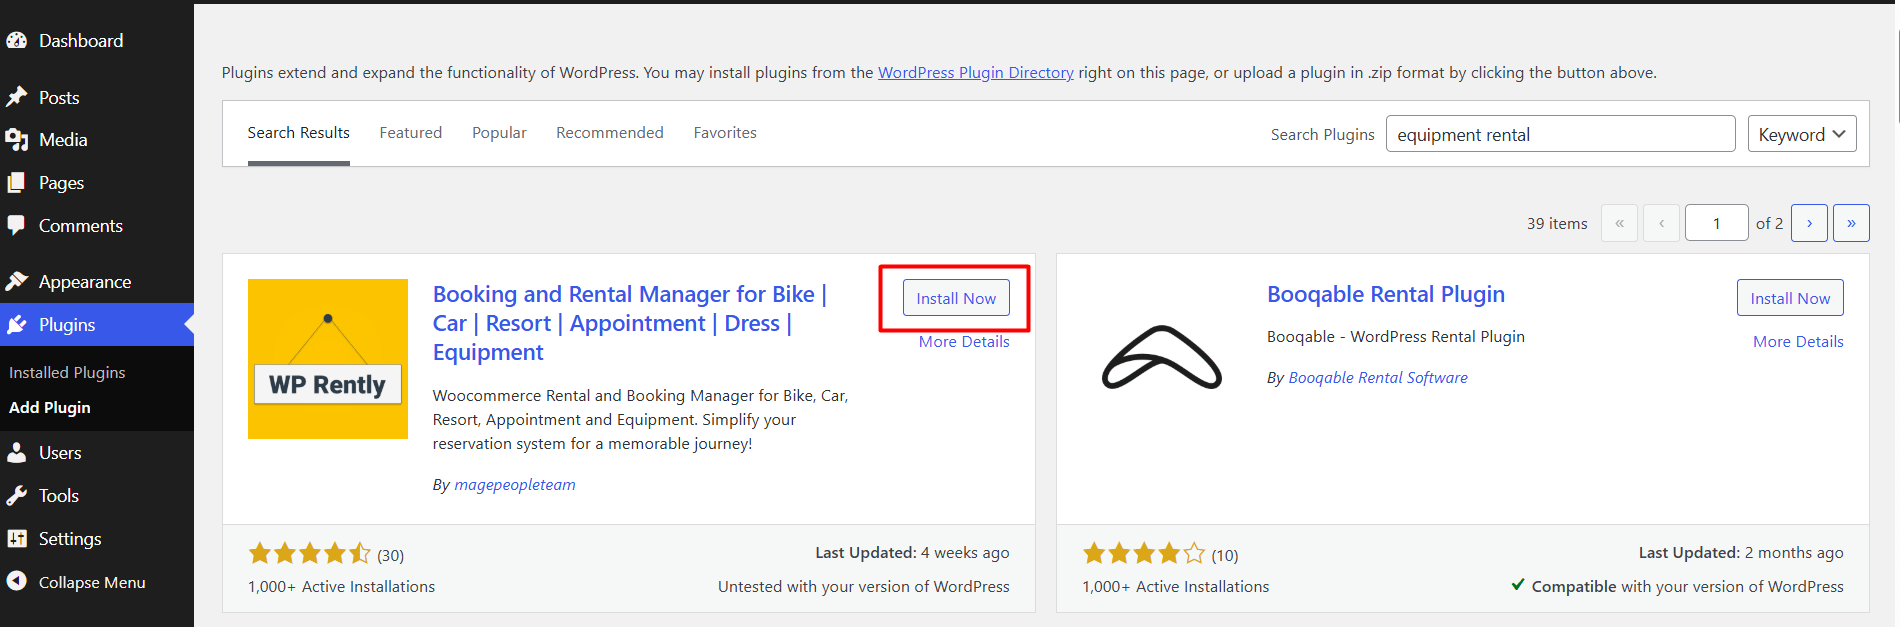
In your dashboard, go to Plugins > Add New, search for the WpRently booking and rental manager, install it, and activate it. Confirm WooCommerce is active at the same time — WpRently will not function without it.
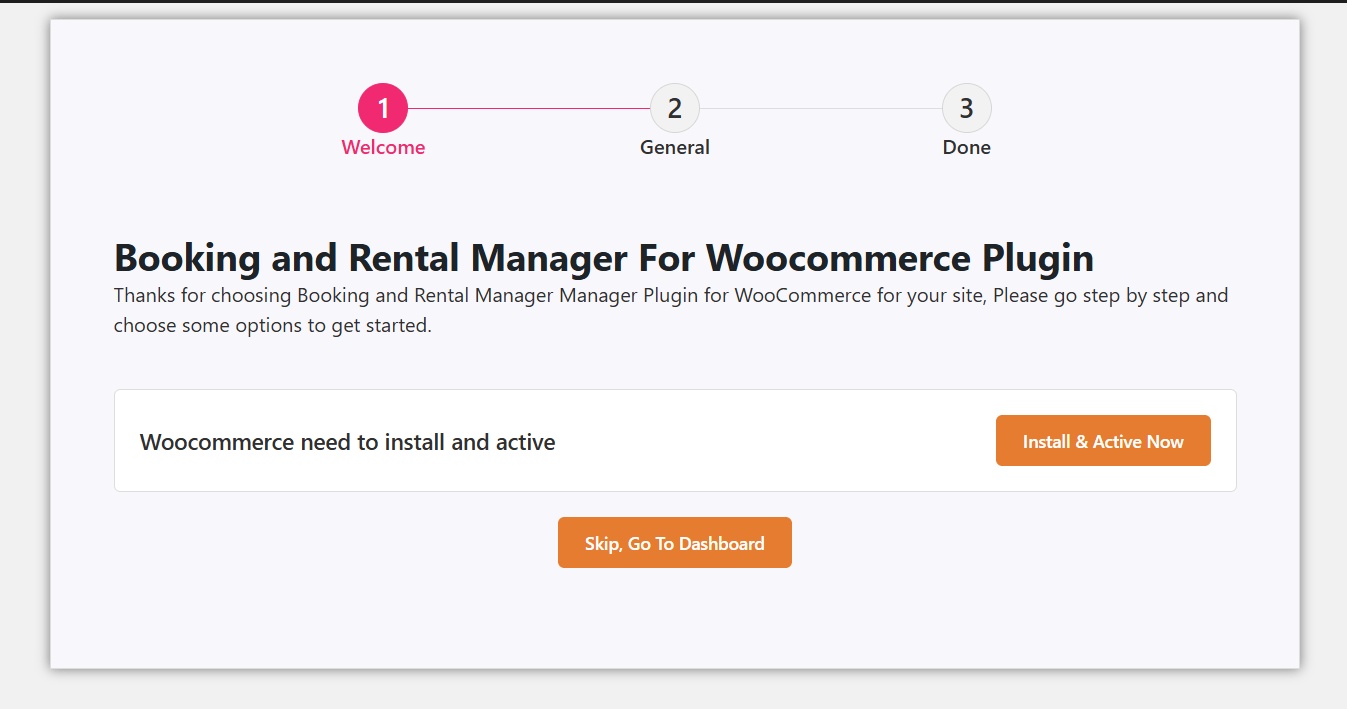
Once activated, open WpRently > Settings and work through the basics:
- General settings: currency, date format, and tax handling.
- Booking settings: enable multi-day and multi-item bookings so a customer can reserve several items for the same period in one checkout.
- Booking form settings: decide which fields customers must fill in, such as a pickup branch or a delivery address.
- Email settings: confirm the notifications your customers and staff receive.
Save your settings before adding products — pricing behaviour reads from these defaults.
3. Add Rental Products
Go to Products > Add New and create your first rentable item, for example a cordless drill or a concrete mixer.
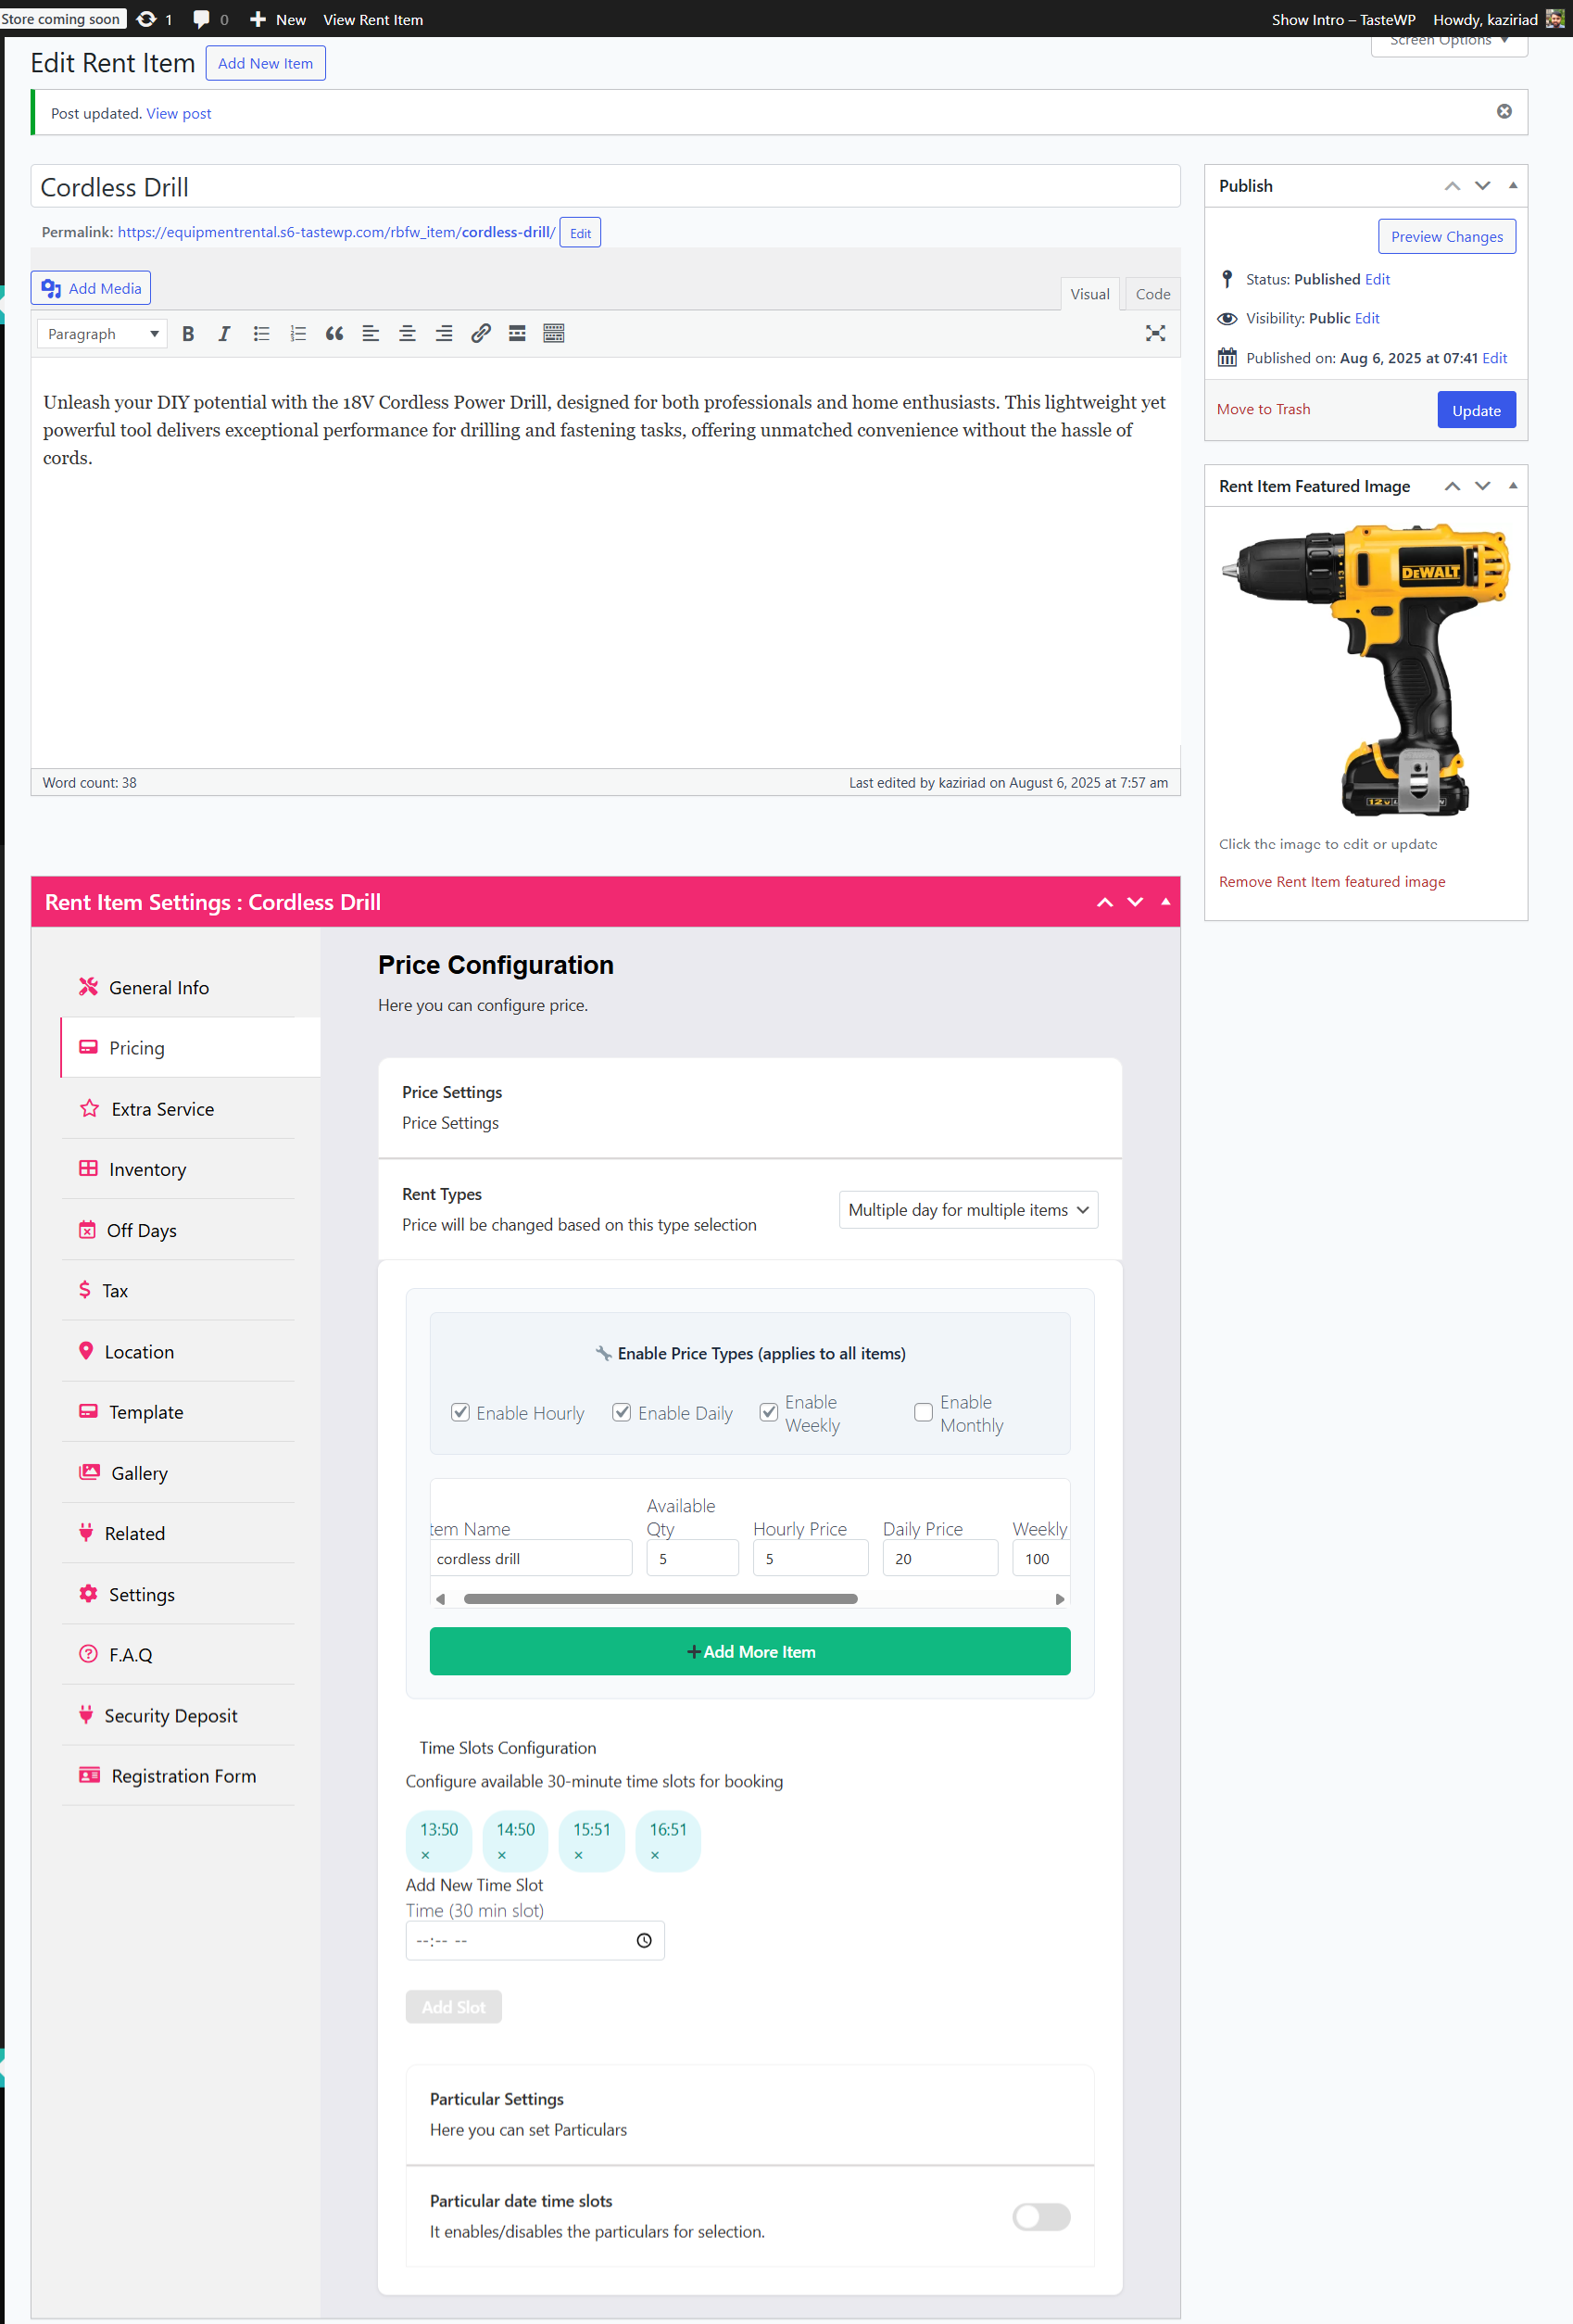
- Set the product type to the rental option in the product data panel.
- Enter the quantity you own so availability reflects reality. If you have five drills, availability should be five — not unlimited.
- Enable multi-day booking and set minimum and maximum rental lengths per item. A drill might be 1–30 days; a generator might be 2–90.
- Add an item description that answers practical questions: power supply, weight, what is included, and what the customer must supply.
- Upload clear photos from several angles, plus a short video if you have one. Renters are buying confidence as much as the item.
Repeat this for every item. Grouping related gear into categories early — power tools, access equipment, party and event, audio-visual — pays off later when you build search and filtering for the storefront. If you eventually add vehicles to the catalogue, the workflow overlaps with how to use a car rental plugin for WordPress step by step, but the product fields differ.
4. Set Up Booking Forms and Availability Calendars
This is the part your customers actually interact with, so give it attention.
- Customise the booking form. Under WpRently > Booking Form, add the fields your business needs — pickup location, delivery preference, job-site address, or a note field for special requirements.
- Embed the availability calendar on the product page so customers can see which dates are genuinely free.
- Add a search block to your homepage and category pages so visitors can filter by item type and dates instead of scrolling a long catalogue.
Test the calendar as a customer would: pick a date range that overlaps an existing booking and confirm the item is refused. Availability bugs are the number one source of refund requests in rental businesses.
5. Configure Pricing, Deposits and Fees
WpRently lets you price by duration and by specific days, which is how rental businesses actually earn margin.
- Tiered duration pricing: an hourly rate for short jobs, a discounted daily rate, and a cheaper weekly rate to encourage longer hires.
- Day-wise pricing: charge more on weekends or during peak season when demand is highest.
- Seasonal rates: adjust prices for the months your category is busiest — landscaping gear in spring, event equipment around festival season.
- Deposits: a partial payment at checkout reduces no-shows and gives you a refundable security sum. Present it clearly so customers understand what is a fee and what is returned.
- Extra fees: delivery, collection, cleaning, or damage waiver. Adding these as line items now avoids awkward conversations later.
Write your rental terms — damage, late return, and cancellation policy — and link them from the booking form. It is unglamorous, but it prevents most disputes.
6. Enable Payment Gateways and Confirmations
WpRently uses WooCommerce payment gateways, so configure them under WooCommerce > Settings > Payments. Common choices are a card gateway such as Stripe or PayPal, plus bank transfer or cash on collection for local trade customers.
Then set the confirmation emails: booking received, booking confirmed, pickup reminder, return reminder. Automated messages cut the phone calls that otherwise fill your day, and give customers a written record of dates and amounts.
7. Test, Optimise and Launch
- Place test bookings covering a single item, multiple items, a weekend rate, and a deposit payment. Check totals against what you expect.
- Check availability logic by booking the last unit of an item and confirming it disappears from the calendar.
- Optimise for search: write unique product titles that match how people search — “concrete mixer hire” beats “Mixer 001” — and add meta descriptions with a tool such as Yoast.
- Launch, then promote locally first: business directories, trade groups, and your own social channels.
Worked Example: A Three-Day Multi-Item Hire
Suppose a customer is tiling a bathroom and needs a jackhammer and a concrete mixer for three days.
- They add both items to the same booking and select a three-day window on the calendar.
- The calendar shows both items are available, and blocks those dates for other shoppers.
- WpRently calculates the total from each item’s daily rate — for example, a daily rate for the jackhammer plus a daily rate for the mixer, multiplied by three.
- The customer pays the deposit, receives a confirmation email with the dates, and inventory updates automatically.
No phone call, no double-booking, and a written record on both sides. That is the whole point of automating equipment hire.
Features That Matter for Equipment Rentals
| Feature | Why it matters for equipment hire |
|---|---|
| Multi-day bookings | Matches how trade customers rent — by the week, not the hour |
| Multi-item support | One job often needs several tools at once |
| Real-time availability | Stops double-booking the same unit for overlapping dates |
| Duration and day-wise pricing | Protects margin on peak days and rewards longer hires |
| Configurable booking forms | Captures pickup, delivery and job-site details up front |
| Deposits and partial payment | Reduces no-shows and covers security against damage |
| WooCommerce integration | Reuses tax, coupons, reports and gateways you already trust |
Practical Tips for Equipment Rental Owners
- Photograph every unit. Listings with real photos of your actual equipment convert far better than manufacturer stock images.
- Bundle consumables. Selling blades, drill bits, or fuel alongside the hire adds margin with no extra logistics.
- Offer delivery and collection as a paid extra. Many customers will pay for it, and it is a differentiator against the shop down the road.
- Review your booking reports monthly. Items that sit idle all season are candidates for sale; items booked out constantly justify a price rise or a second unit.
- Keep condition records. A photo of each item at checkout and return settles damage disputes quickly.
Frequently Asked Questions
What kind of equipment can I rent out with WpRently?
Anything you can describe, price by duration, and track as stock — power tools, construction plant, party and event gear, cameras and audio-visual kit, camping equipment, and more. The multi-day and multi-item features suit both single-item hire and large job lots.
Do I need coding skills to build an equipment rental website?
No. If you can install a WordPress plugin and fill in a product form, you can build the site. The work that matters is operational: accurate stock counts, sensible pricing tiers, and clear rental terms.
Can customers book several items for different durations in one order?
Yes. Customers can add multiple products to a single booking, and each item can carry its own minimum and maximum rental period. Keep your rules consistent so the checkout total is easy for the customer to understand.
How do I handle damage and late returns?
Put it in writing before the booking: a clear damage policy, a deposit that covers typical repairs, and a defined late-return fee. Photograph items at handover, and cite the policy in your confirmation email.
How do I get an equipment rental site found on Google?
Target the phrases your customers actually type — “concrete mixer hire”, “scaffold tower rental near me” — in product titles, descriptions, and category pages. Add local business details, keep pages fast, and collect reviews after each return.
Wrapping Up
Creating an equipment rental website with WordPress and WpRently comes down to seven steps: install WordPress and WooCommerce, configure the rental plugin, add rentable products with real stock counts, embed availability calendars, set duration-based pricing and deposits, connect payments, then test hard before launch. Get those right and the rest is catalogue and marketing work.
Start with ten well-photographed items and one clear pricing structure. Launch, learn from your first bookings, and expand the catalogue from there.
