

WooCommerce event booking means adding a date, capacity, and attendee-collection layer on top of WooCommerce’s existing cart, checkout, and payment gateways — no third-party ticketing platform taking a cut. Which plugin you need depends on your event model: for ticketed events with capacity and multiple ticket tiers, a plugin like Evently (Event Booking Manager for WooCommerce) is purpose-built; for appointment- or class-style bookings where customers pick a time slot, a plugin like WpBookingly (Service Booking Manager) fits better. Both run entirely through your existing WooCommerce checkout.
If you want to sell tickets, workshops, classes, or paid appointments directly from your own site, WooCommerce can handle it without a third-party ticketing platform taking a cut — see our comparison of self-hosted vs. SaaS Eventbrite alternatives if you’re weighing that decision first. This complete setup guide walks through every step: picking the right extension, creating event or booking products, controlling capacity and dates, automating confirmation emails, and checking attendees in on event day. Whether you run a single annual conference or weekly recurring classes, the same core workflow applies.
- What WooCommerce Event Booking Actually Involves
- Two Models, Two Plugin Types
- Step 1: Prepare Your WooCommerce Foundation
- Step 2: Choose the Right Event Booking Plugin
- Step 3: Create Your First Event or Booking Product
- Step 4: Configure Tickets, Slots, and Attendee Fields
- Step 5: Automate Communications
- Step 6: Test the Full Booking Journey
- Step 7: Manage Event Day and Beyond
- Ongoing Optimization Tips
- Frequently Asked Questions About WooCommerce Event Booking
- Final Thoughts
What WooCommerce Event Booking Actually Involves
Out of the box, WooCommerce sells physical and digital products. An event is different because it has a date, a time, a location, a limited number of seats, and often attendee details attached to each ticket. Event booking functionality bridges that gap by adding:
- Date and time scheduling for one-off or recurring events
- Capacity limits so you never oversell a venue
- Ticket types such as early bird, standard, VIP, or member pricing
- Attendee data collection for names, dietary needs, or accessibility requests
- Digital tickets with QR codes or unique reference numbers
- Check-in tools for the door on event day
Two Models, Two Plugin Types
Before you install anything, work out which of these two you actually run — they’re different problems and different plugins solve them well:
| Ticketed events | Appointment / class bookings | |
|---|---|---|
| What it looks like | Conferences, concerts, workshops with a fixed date and multiple attendees per ticket type | Consultations, classes, services where a customer picks a time slot |
| Core unit | A ticket, often with tiers (early bird, VIP, general) | A time slot, often tied to a specific staff member |
| Capacity model | Total seats per event or per ticket type | Slots per time period, sometimes per staff member |
| WooCommerce-native example | Evently (Event Booking Manager for WooCommerce) | WpBookingly (Service Booking Manager) |
| Typical extras | Extra services (merchandise, meals), early-bird pricing, RSVP mode for free events | Staff assignment, deposits, recurring bookings, buffer time between slots |
Some events genuinely need both a workshop with a fixed date and per-staff assignment, for instance but most organizers land clearly on one side once they map out their actual booking flow.
Step 1: Prepare Your WooCommerce Foundation
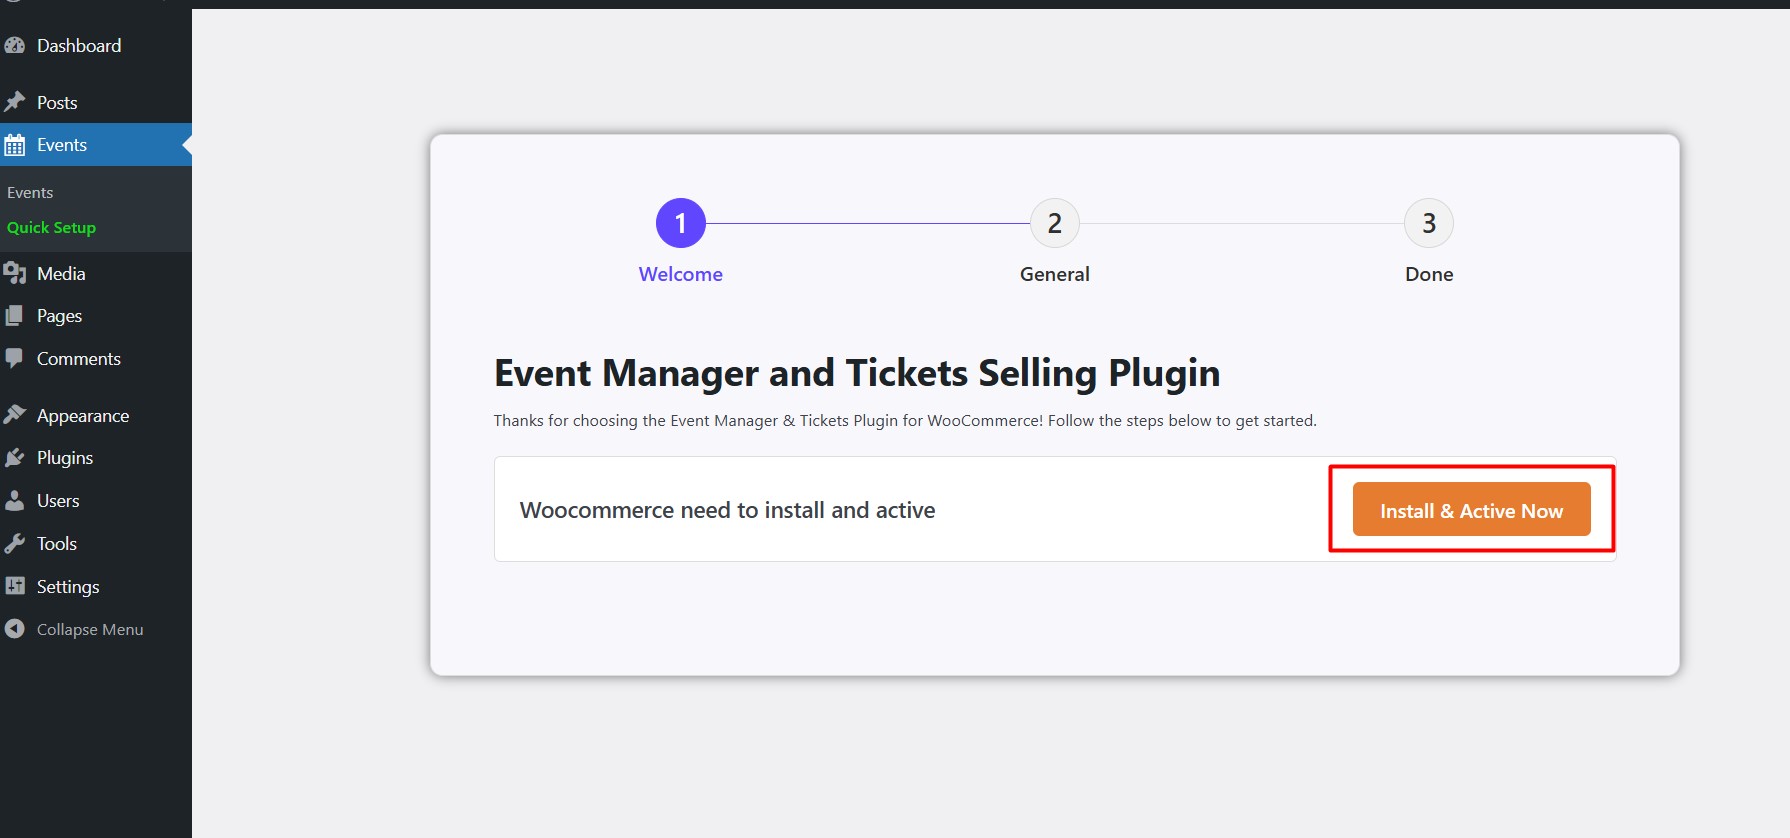
Before adding any booking extension, make sure the basics are solid.
- Install and activate WooCommerce, then complete the setup wizard.
- Set your store currency, country, and time zone. Time zone matters enormously for events — a mismatch will show incorrect start times on tickets.
- Configure at least one payment gateway. Stripe and PayPal cover most ticket sales; offline bank transfer works for invoiced corporate bookings. A WooCommerce-native plugin like Evently works with every WooCommerce gateway for free, including 100+ local options, so whatever you’ve already configured for the rest of your store carries over.
- Disable shipping for ticket or booking products, or create a “no shipping” zone so attendees aren’t asked for a delivery address.
- Confirm transactional email delivery using an SMTP plugin. Tickets that land in spam create support tickets.
Step 2: Choose the Right Event Booking Plugin
There’s no single official WooCommerce events plugin, so the choice depends on your model.
For selling tickets to scheduled events
Evently builds ticketing directly into WooCommerce as a product type rather than a separate system. It covers the ground most ticketed-event organizers need: multiple ticket types with their own price and quantity, a four-mode setup (Ticket-Selling, RSVP, Listing-Only, or Announcement) so free and paid events share the same plugin, recurring and multi-date events, extra services attendees can add at checkout, and automatic Event schema markup so listings are eligible for Google’s rich results without a separate SEO plugin. See our full best WordPress event booking plugins roundup for how it compares to other options.
For appointment and class-style bookings
WpBookingly is built around the slot-and-staff model rather than the ticket-and-capacity model. It handles individual staff schedules with working hours and off-days, a real-time Service Queue dashboard for daily dispatch, deposit or full payment at booking, recurring bookings for ongoing classes or maintenance visits, and backend order creation so phone or walk-in bookings land in the same system as online ones.
Selection criteria either way
- Does it support the ticket variations or pricing tiers you need?
- Is there a check-in app, or will you scan from a browser?
- Can attendee details be collected per ticket or per slot, rather than per order only?
- How does it handle refunds, cancellations, and transfers?
- Is it actively updated and compatible with your WooCommerce version and block themes?
Step 3: Create Your First Event or Booking Product
Ticketed events (Evently)
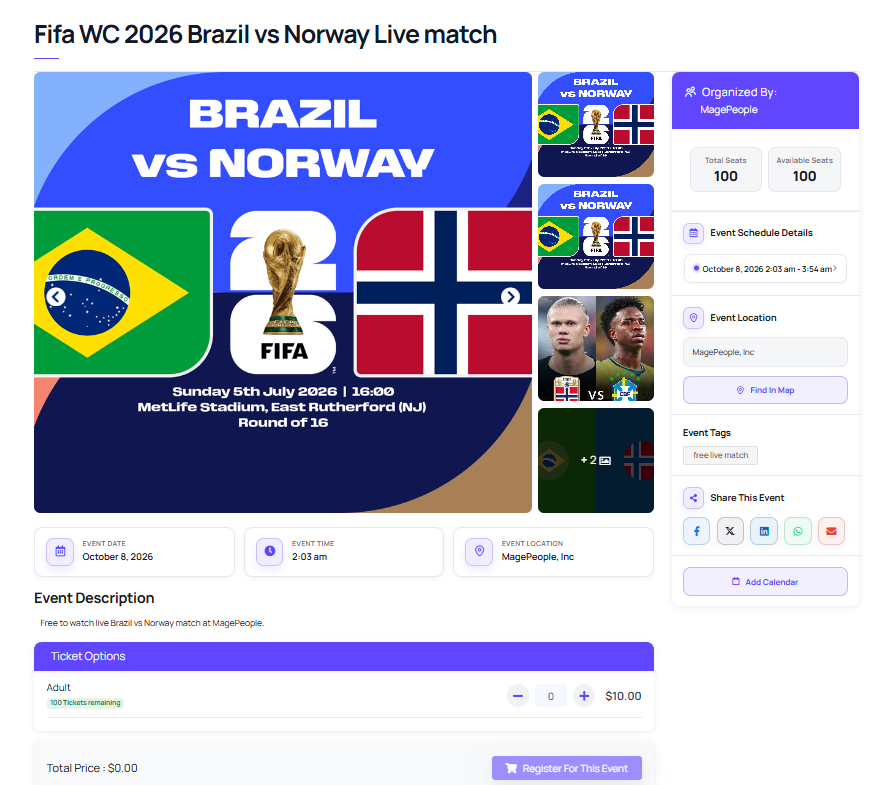
The setup runs through a guided wizard. In the Basic Info step, add your event title, description, and choose the event type — In-Person, Online, or Hybrid — with a live Google Map preview for in-person venues. The Ticket & Pricing step is where you pick the event mode and build ticket types, each with its own name, price, and total quantity — early bird, standard, VIP, and group bundles are all just separate ticket types. The Date & Time step handles Single Event, Particular Dates (specific dates with individual schedules), or Repeated Event (recurring series) scheduling, plus an option to close sales a set number of minutes before the start. The Advanced step covers the page template, a registration form builder, FAQs, and the SEO & Schema panel that generates structured Event data automatically.
Appointment and class bookings (WpBookingly)
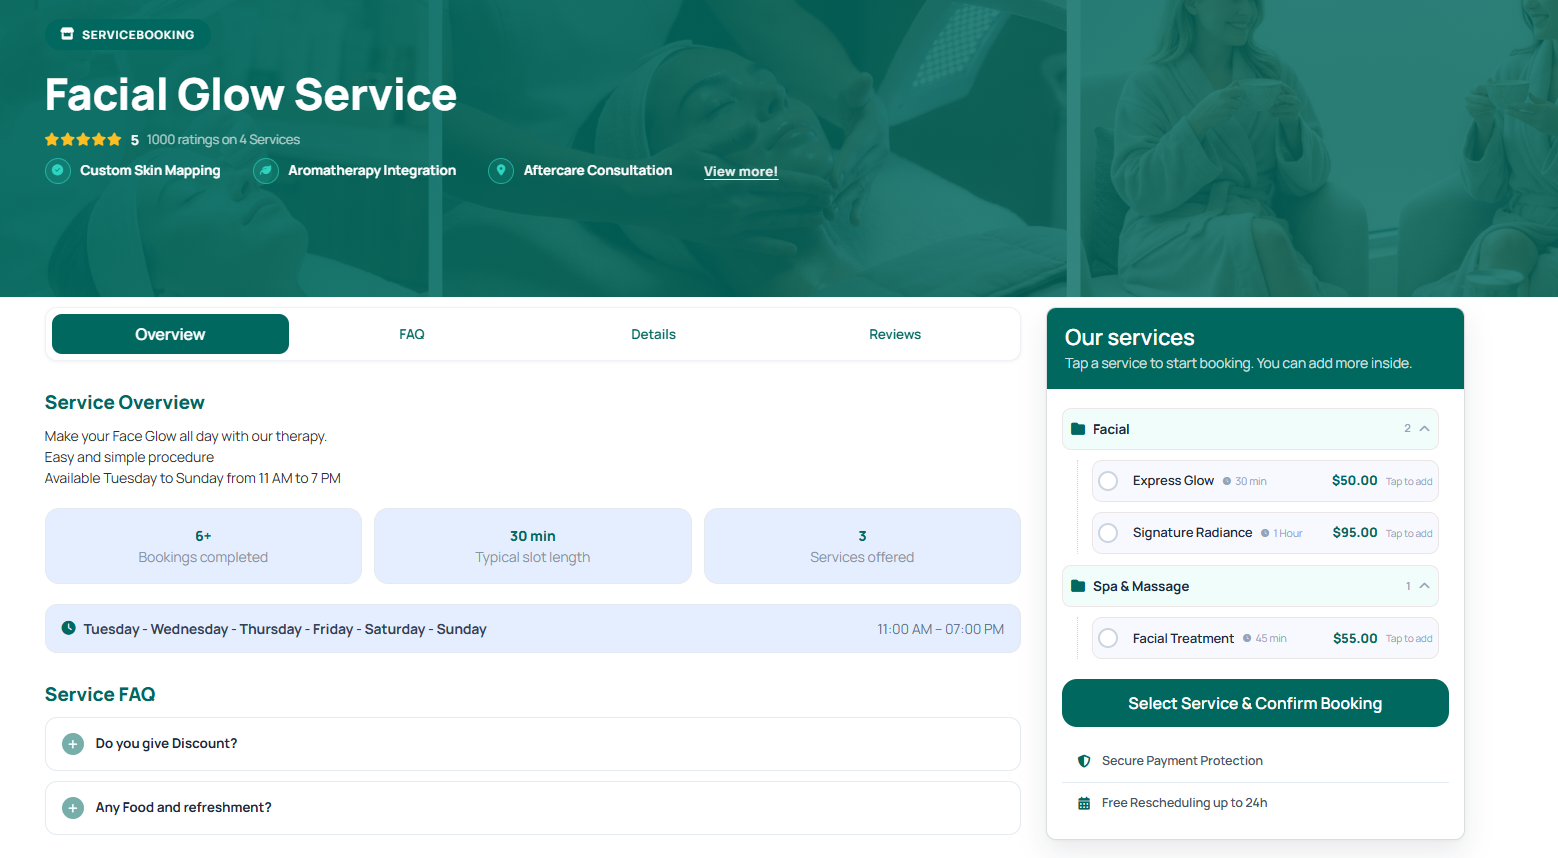
Set up each bookable service with its own duration, buffer time before and after (useful for cleaning or turnover between appointments), and assign specific staff members with their own working hours and off-days. Configure deposit or full-payment requirements per service, and set up recurring availability for classes or maintenance visits that repeat on a schedule rather than a single date.
Recurring events, either way
For weekly classes or repeating events, avoid duplicating dozens of products manually — both plugin types above support generating multiple dates or occurrences from a single event or service definition, which keeps reporting and SEO consolidated on one URL instead of splintering across duplicate listings.
Step 4: Configure Tickets, Slots, and Attendee Fields
Decide whether one purchase equals one ticket or whether a buyer can bring guests. If guests are allowed, enable per-attendee fields so each seat has a name and email. Typical fields include full name, email, phone, organization, dietary requirements, and consent checkboxes — Evently’s registration form builder supports conditional logic here, so a field like “school name” only appears when the ticket type is “Child.”
For extras, both ticketed and slot-based models support optional paid add-ons attached at checkout — merchandise, meals, or upgrades for ticketed events; extra services or resources for appointment-style bookings.
Step 5: Automate Communications
Good event comms reduce no-shows. Set up:
- Order confirmation with the ticket or booking confirmation attached immediately after payment
- Reminder emails ahead of the event or appointment
- Change or cancellation notices triggered manually from the order screen
- Post-event follow-up requesting feedback or promoting the next date
Replace default WooCommerce email wording with event-specific copy that restates the date, address, and arrival instructions in plain text — attendees often search their inbox rather than open a PDF. A plugin with custom confirmation email support — sender name, subject line, and dynamic variables like the attendee name, event name, ticket type, and date — saves you from writing this from scratch per event.
Step 6: Test the Full Booking Journey
Run a complete purchase in your payment gateway’s test mode and verify every stage:
- The event or booking page displays the correct date and time in your local time zone.
- Ticket tiers or service prices calculate correctly and respect their individual stock or slot limits.
- Attendee fields are required where they should be.
- The confirmation email arrives with a readable, scannable ticket or a clear booking summary.
- Stock or slot availability decreases, and the listing shows “sold out” or “fully booked” at capacity.
- A refund or cancellation restores the ticket or slot to available stock if your workflow requires it.
Step 7: Manage Event Day and Beyond
For ticketed events, install the check-in app or open the check-in dashboard on a tablet, and test scanning before doors open. For appointment-based bookings, a real-time dispatch view — filterable by staff, date, and status — does the same job for a service team working through a day’s schedule rather than a single door. Either way, keep a searchable attendee or booking list as a fallback for guests who can’t find their confirmation. Afterward, export attendee data for your CRM, review which ticket tier or service converted best, and use WooCommerce reports to compare revenue across events.
Ongoing Optimization Tips
- Add structured event data so dates appear in Google search results — this should be automatic if your plugin generates Event schema.
- Offer bundle or multi-event discounts through coupons.
- Use waitlists to capture demand once you sell out or fully book a slot.
- Archive past events rather than deleting them, preserving links and reviews.
Frequently Asked Questions About WooCommerce Event Booking
Do I need a separate ticketing platform if I already use WooCommerce?
No. A WooCommerce-native plugin adds ticketing or slot-based booking directly to your existing store, so tickets or appointments sell through the same cart, checkout, and payment gateways as everything else — no separate platform, login, or commission.
What’s the difference between event booking and appointment booking in WooCommerce?
Event booking centers on a fixed date with multiple tickets sold against a capacity — conferences, concerts, workshops. Appointment booking centers on a time slot a customer picks, often tied to a specific staff member — consultations, classes, services. The two models need different plugin features, even though both run through WooCommerce.
Can WooCommerce handle recurring events or classes?
Yes, with the right extension. Rather than duplicating a product for every date, a recurring or repeated-event feature generates multiple occurrences from one listing, keeping reporting and SEO consolidated on a single URL instead of splitting across duplicates.
How do I stop a WooCommerce event from overselling?
Set a hard capacity or slot limit on the product — total seats for a ticketed event, or slots per period for an appointment-based one. The plugin should close sales automatically once that limit is reached, without needing manual monitoring.
Can I collect free RSVPs and paid tickets with the same plugin?
Yes, if the plugin supports multiple event modes. This avoids needing a separate free-event tool alongside your paid ticketing setup.
Do WooCommerce event plugins support check-in on the day?
Many do, typically through a QR code generated per ticket and a mobile scanning app, with check-in history saved for reference. For appointment-based bookings, a real-time dispatch dashboard serves the same function — showing who’s due, staff assignment, and status at a glance.
Final Thoughts
WooCommerce event booking gives you ownership of your ticketing data, branding, and margins. Get the foundations right — accurate time zones, reliable email, sensible capacity, and a thoroughly tested checkout — and the platform scales comfortably from a single workshop to a full annual program. Start with one small event, refine the workflow, then roll it out across your calendar.