 Get Halloween 15% for Limited Time on Lifetime & Bundle Deal


To make a taxi booking website in WordPress, you install a booking plugin, connect a maps API, define how fares are calculated, create your vehicles and pricing rules, then publish a booking page with a shortcode. This guide walks through that sequence step by step using the free eCab (Taxi Booking Manager for WooCommerce) plugin — no coding required.
Ride-hailing demand keeps growing, and independent taxi operators can capture a slice of it without building a mobile app from scratch. A WordPress site with a proper booking engine is faster and cheaper to launch than custom software, and you stay in control of your fleet, fares and customer data.
Below you will set up three different fare models — distance-based map pricing, fixed-location pricing and hourly hire — and get a working checkout at the end. If you would rather start from the business side and understand how the pieces fit together before touching settings, read this guide to building a taxi cab booking system first, then come back here for the build.
What you need before you start
Getting these in place first saves backtracking later.
- WordPress 5.3 or newer with admin access, and ideally a backup plugin installed.
- WooCommerce — eCab is powered by WooCommerce, so it must be installed and active.
- A Google Maps API key if you want address auto-suggest and accurate distance calculations. A Google Cloud account with billing enabled is required. Prefer to avoid it? eCab also supports OpenStreetMap for free.
- Your fleet details — vehicle names, passenger capacity, luggage limits, engine and fuel type.
- Clear fare decisions — your base fare, per-kilometre rate, per-hour rate and any waiting charges.
What is eCab?
eCab, also listed as Taxi Booking Manager for WooCommerce, is developed by Mage People. It is a lightweight taxi booking plugin that runs on top of WooCommerce, so payments, taxes, coupons and order management all come from WooCommerce rather than a separate system you have to learn.
It is a practical choice if you are building a taxi site for your own business or for a client, because the free version already covers location management, custom rate plans, automatic fare calculation, map-based pickup and drop-off selection, and full order management from the WordPress dashboard. The plugin works with the default WordPress block editor (Gutenberg), and tickets are added through shortcodes.
What can you do with the free version?
- Create taxi (transportation) entries with vehicle details, plus extra services and global settings
- Connect a Google Maps API key so pickup and drop-off locations resolve to accurate coordinates
- Build custom rate plans by location zone, distance and time
- Calculate fares automatically from distance, time and your other criteria
- Offer distance-based bookings that let passengers select pickup and drop-off on a map
- Publish fixed-price bookings and manual bookings
- Let passengers choose an immediate pickup or a pre-scheduled ride
- View, edit or cancel any booking from the dashboard
- Take payments through multiple WooCommerce payment gateways
- Filter vehicles by passengers, bags and extra hours on the front end
- Use the built-in WooCommerce checkout for payment methods, order notes and discounts
- Collect custom passenger fields before boarding
- Run the booking form in multiple languages
- Drop a booking form onto any page with a shortcode
What the paid version adds
- Email notifications after each booking
- PDF ticket and confirmation generation
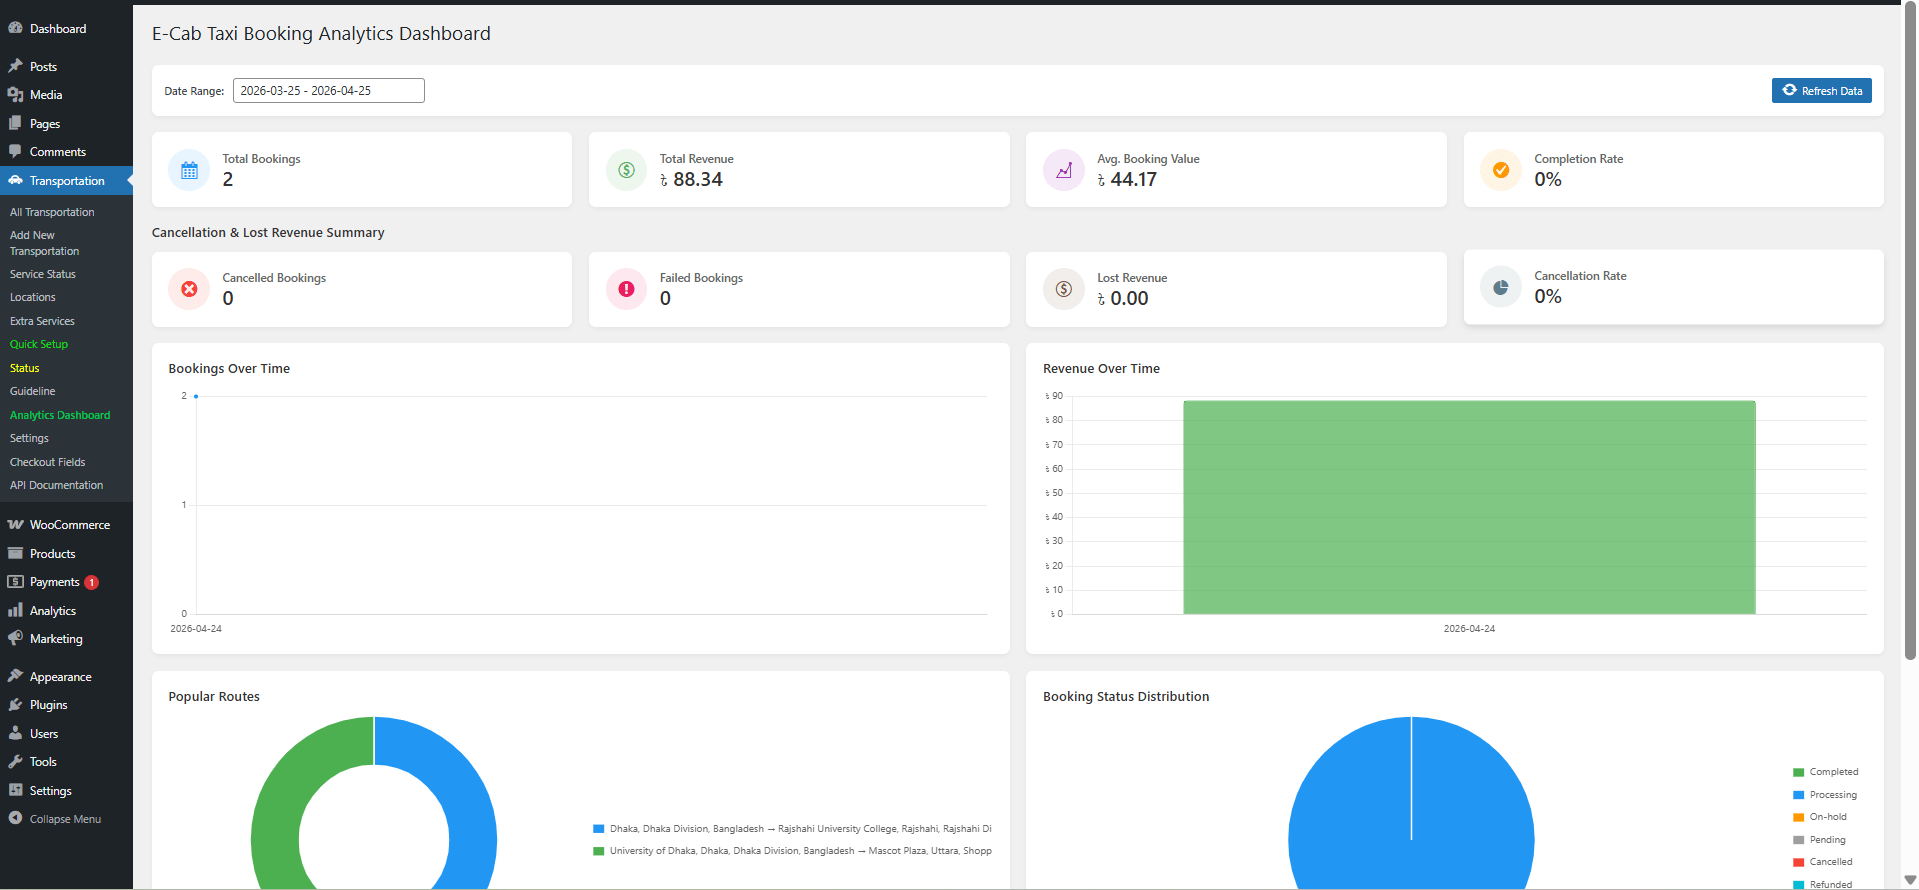
- Advanced reporting on bookings and revenue
- Backend taxi order list management as a dedicated flow
- Geofencing for your service area
You can find the full feature breakdown and licensing tiers on the official eCab product page. Check current pricing there before you decide, since plans and bundled add-ons change over time.
Now let’s build the site.
How to make a taxi booking website in WordPress
The build has five stages: install the plugin, run the setup wizard, configure global settings, add your locations and vehicles, then choose a pricing model and publish the booking page.
Step 1: Install and activate eCab
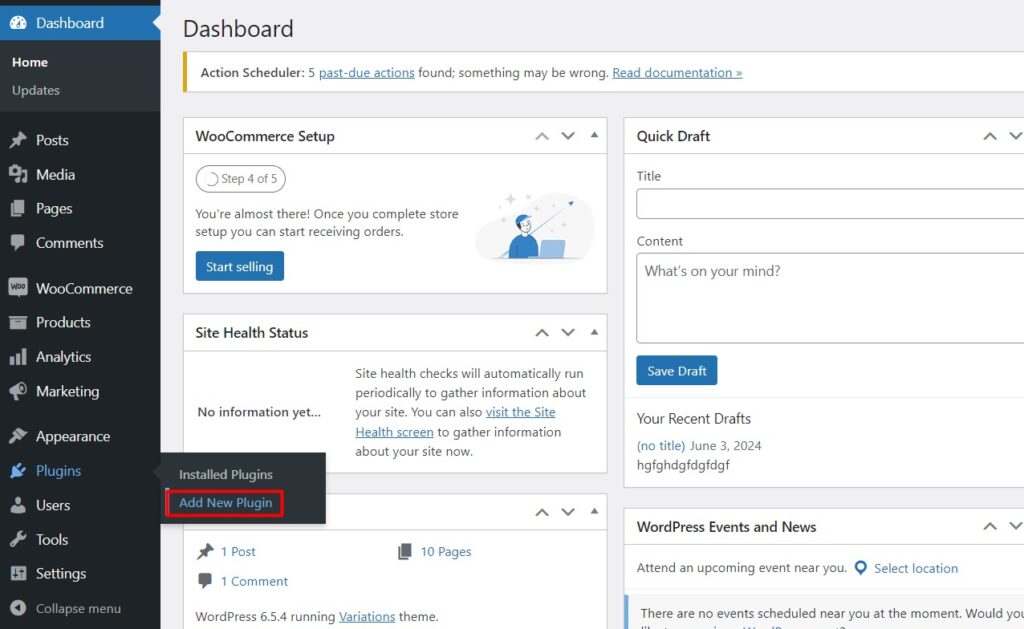
From your WordPress dashboard, go to Plugins → Add New Plugin.
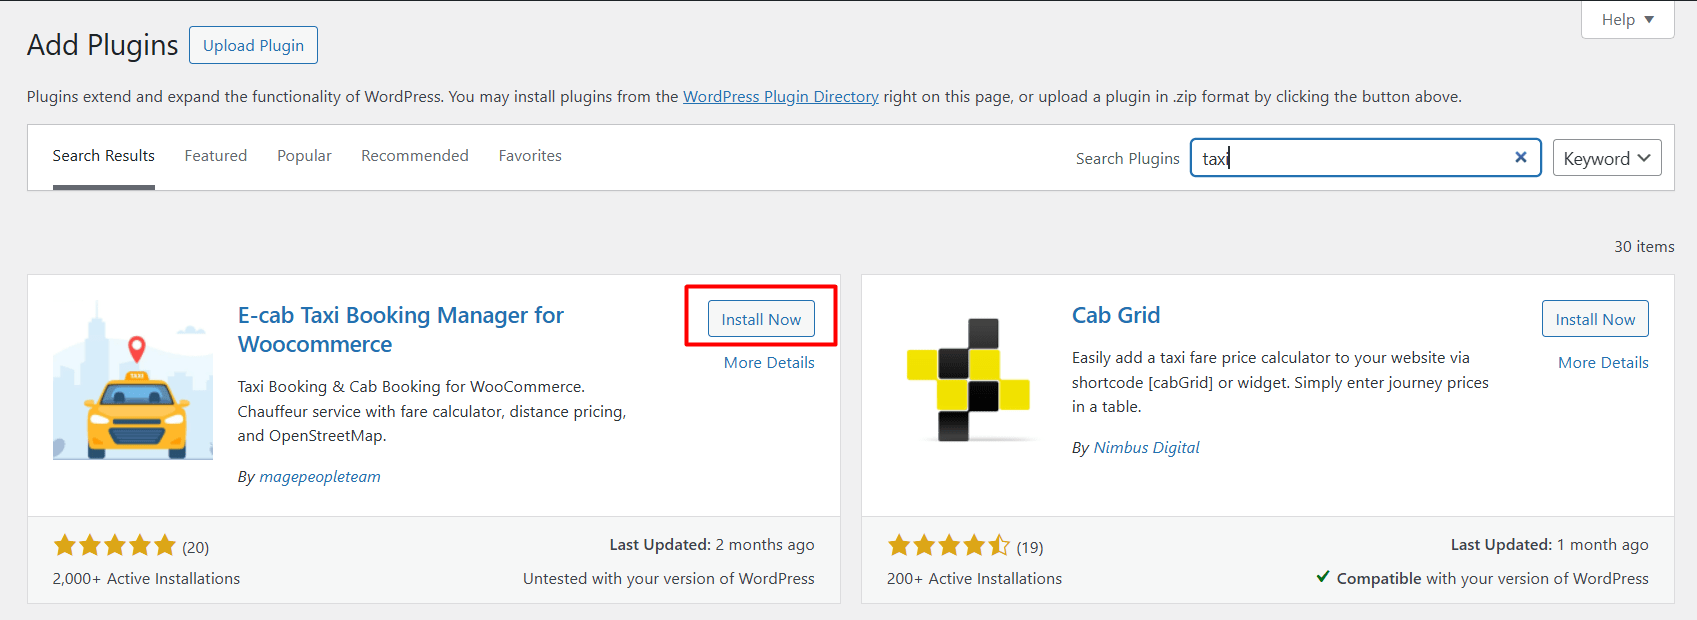
Search for taxi and you will find eCab in the results. Click Install Now.
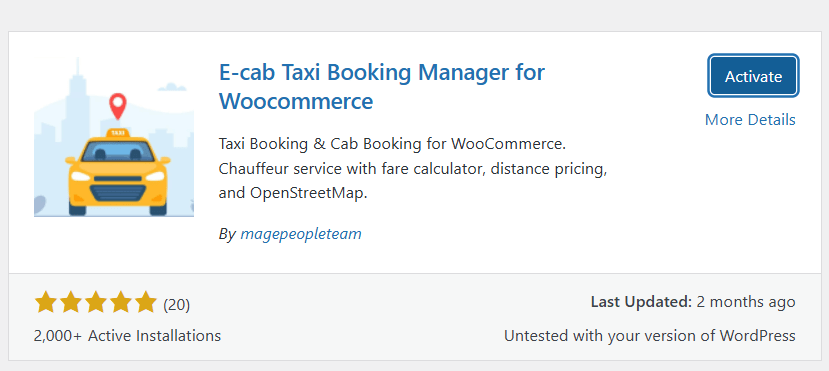
When installation finishes, click Activate.
Step 2: Run the setup wizard
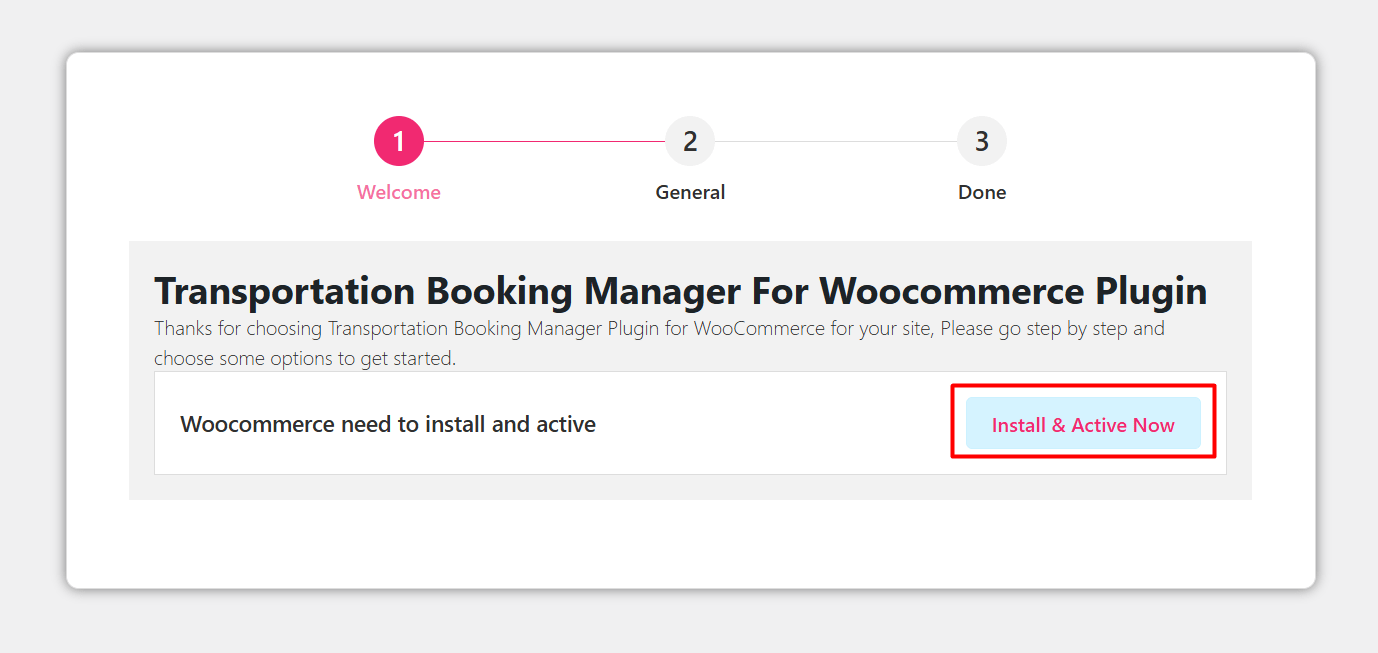
On first activation, eCab greets you with a setup wizard. It checks whether WooCommerce is installed — if you already have it running, move straight to the next screen. If not, install and activate WooCommerce first, because no booking can be paid for without it.
The wizard then asks you to set the label and slug for your taxi booking page. Choose something readable for both visitors and search engines, such as “Book a Taxi” with the slug book-a-taxi. Keep the slug short and avoid changing it later, since that would break any links you have already shared.
Click Next, then Finish & Save to complete the wizard.
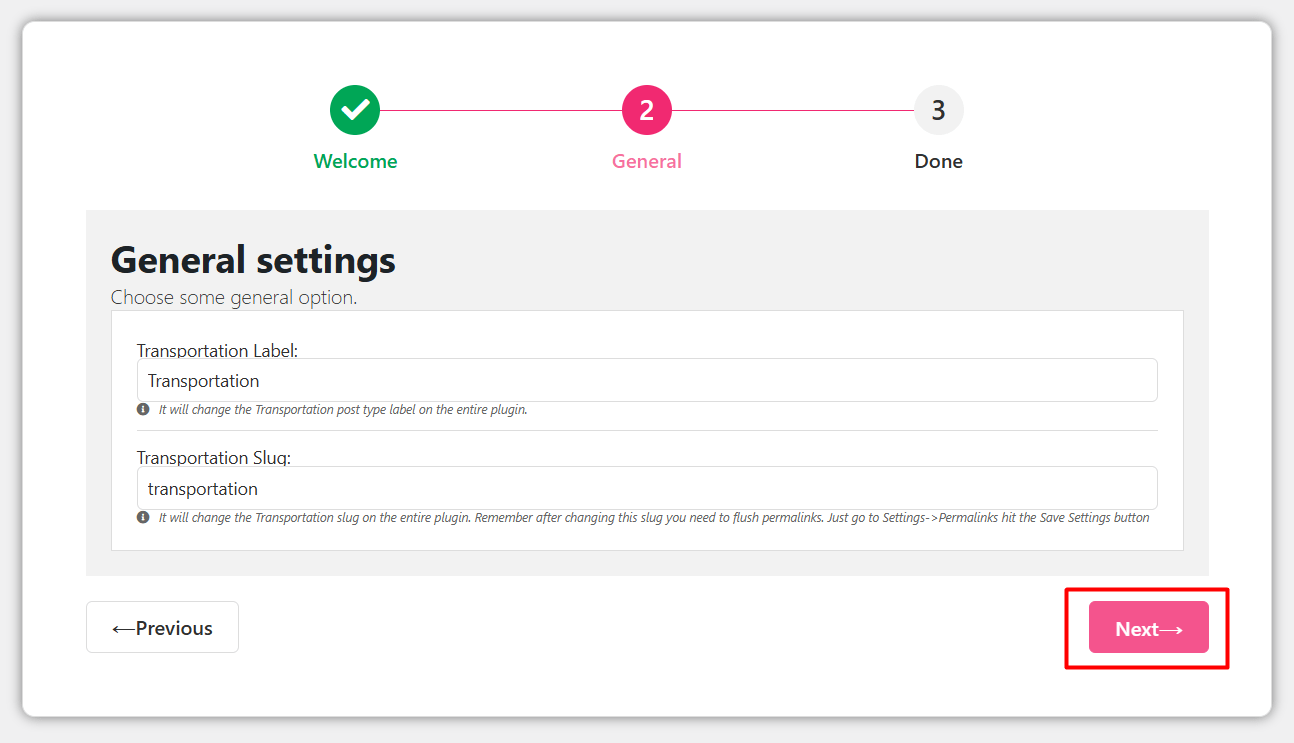
Once setup is done, a new Transportation tab appears in your left-hand admin menu. Everything below lives under that tab.


Sign in to your Google Cloud account and generate an API key with the Maps JavaScript API and Places API enabled. The setup instructions on the Google Maps Platform site walk through enabling billing and restricting the key to your domain — do restrict it, because an unrestricted key can be abused by anyone who copies it from your page source.
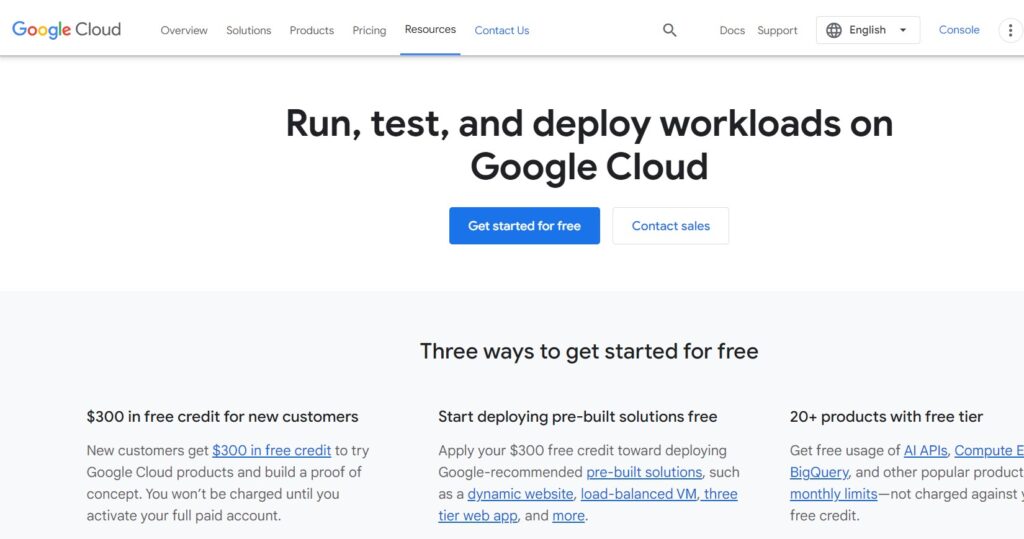
Paste the key into the Google Map API field.
Next, enter your business latitude and longitude and select your country. These become the default map centre before a passenger types an address.

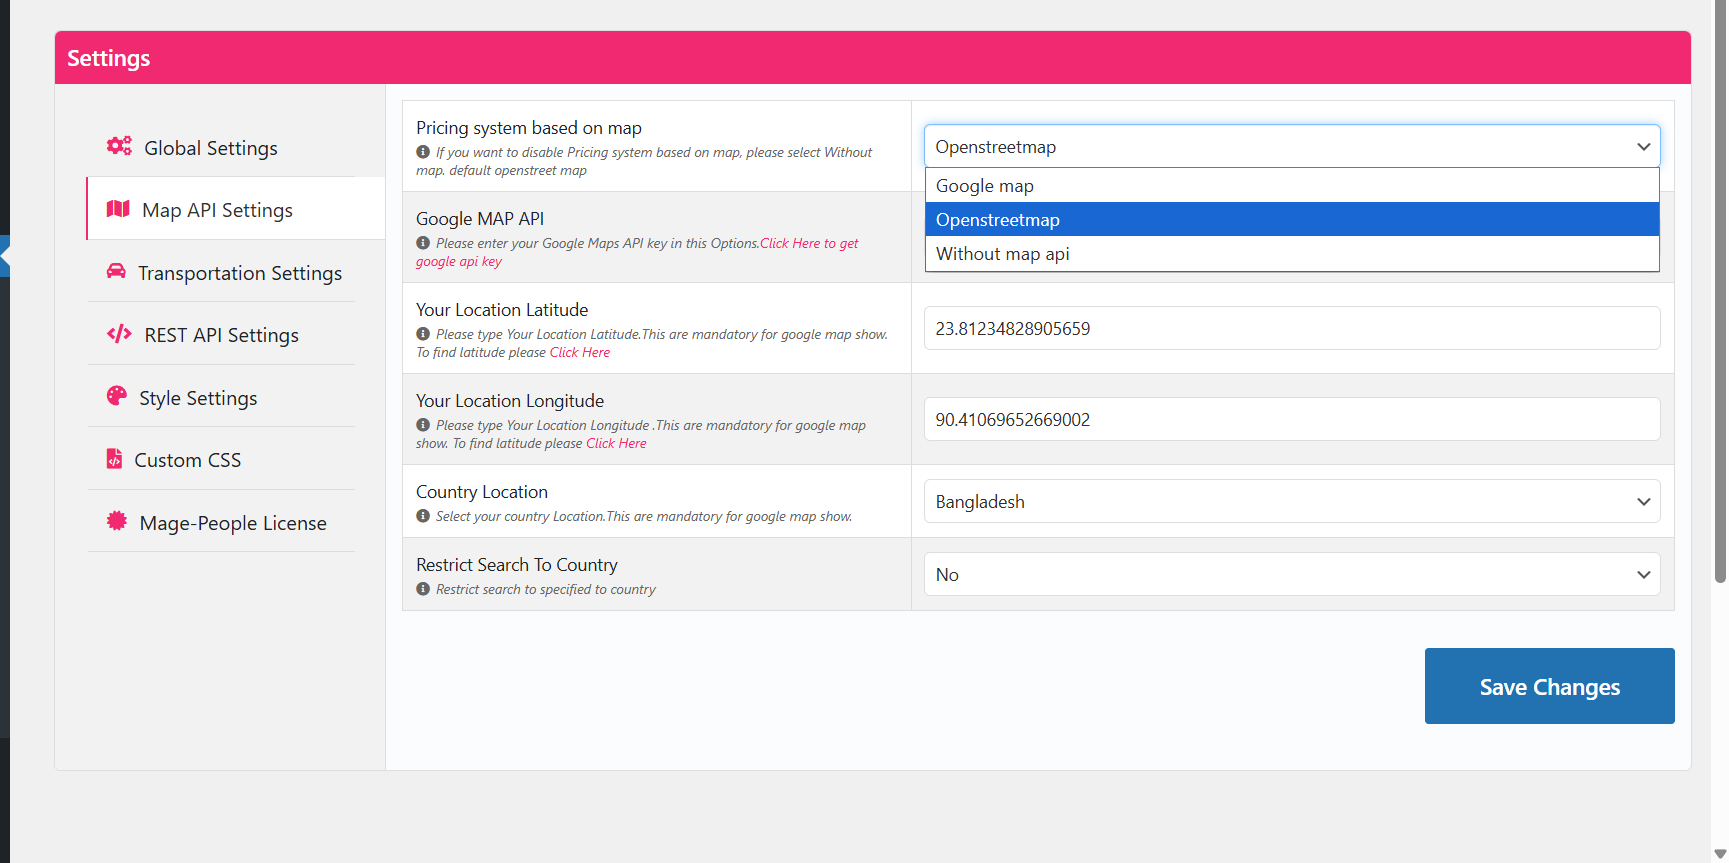
If you would rather not use Google Maps at all, switch to OpenStreetMap — it is free and needs no API key or billing account, though address auto-suggest is less precise than Google’s in many regions.
Step 4: Configure Transportation Settings
Now open Transportation Settings and decide how the booking form should behave.
- Filters — show or hide the passenger and luggage filters on the front end.
- Return date — enable this if you want to sell round trips with a scheduled return.
- Waiting time — let passengers add extra waiting time and, if you wish, charge for it.
- Labels and redirects — rename buttons and send passengers to a custom page after booking.
- Booking interval — the gap between available slots. A 30-minute interval means a driver can be assigned from the next half-hour slot onwards. Set this to match how your dispatch actually works.
- Payment system — choose pay on service, WooCommerce payment, or both. If you enable WooCommerce payment, make sure at least one gateway is configured. If you choose pay on service, enable Cash on Delivery under WooCommerce → Settings → Payments so the order can be completed.
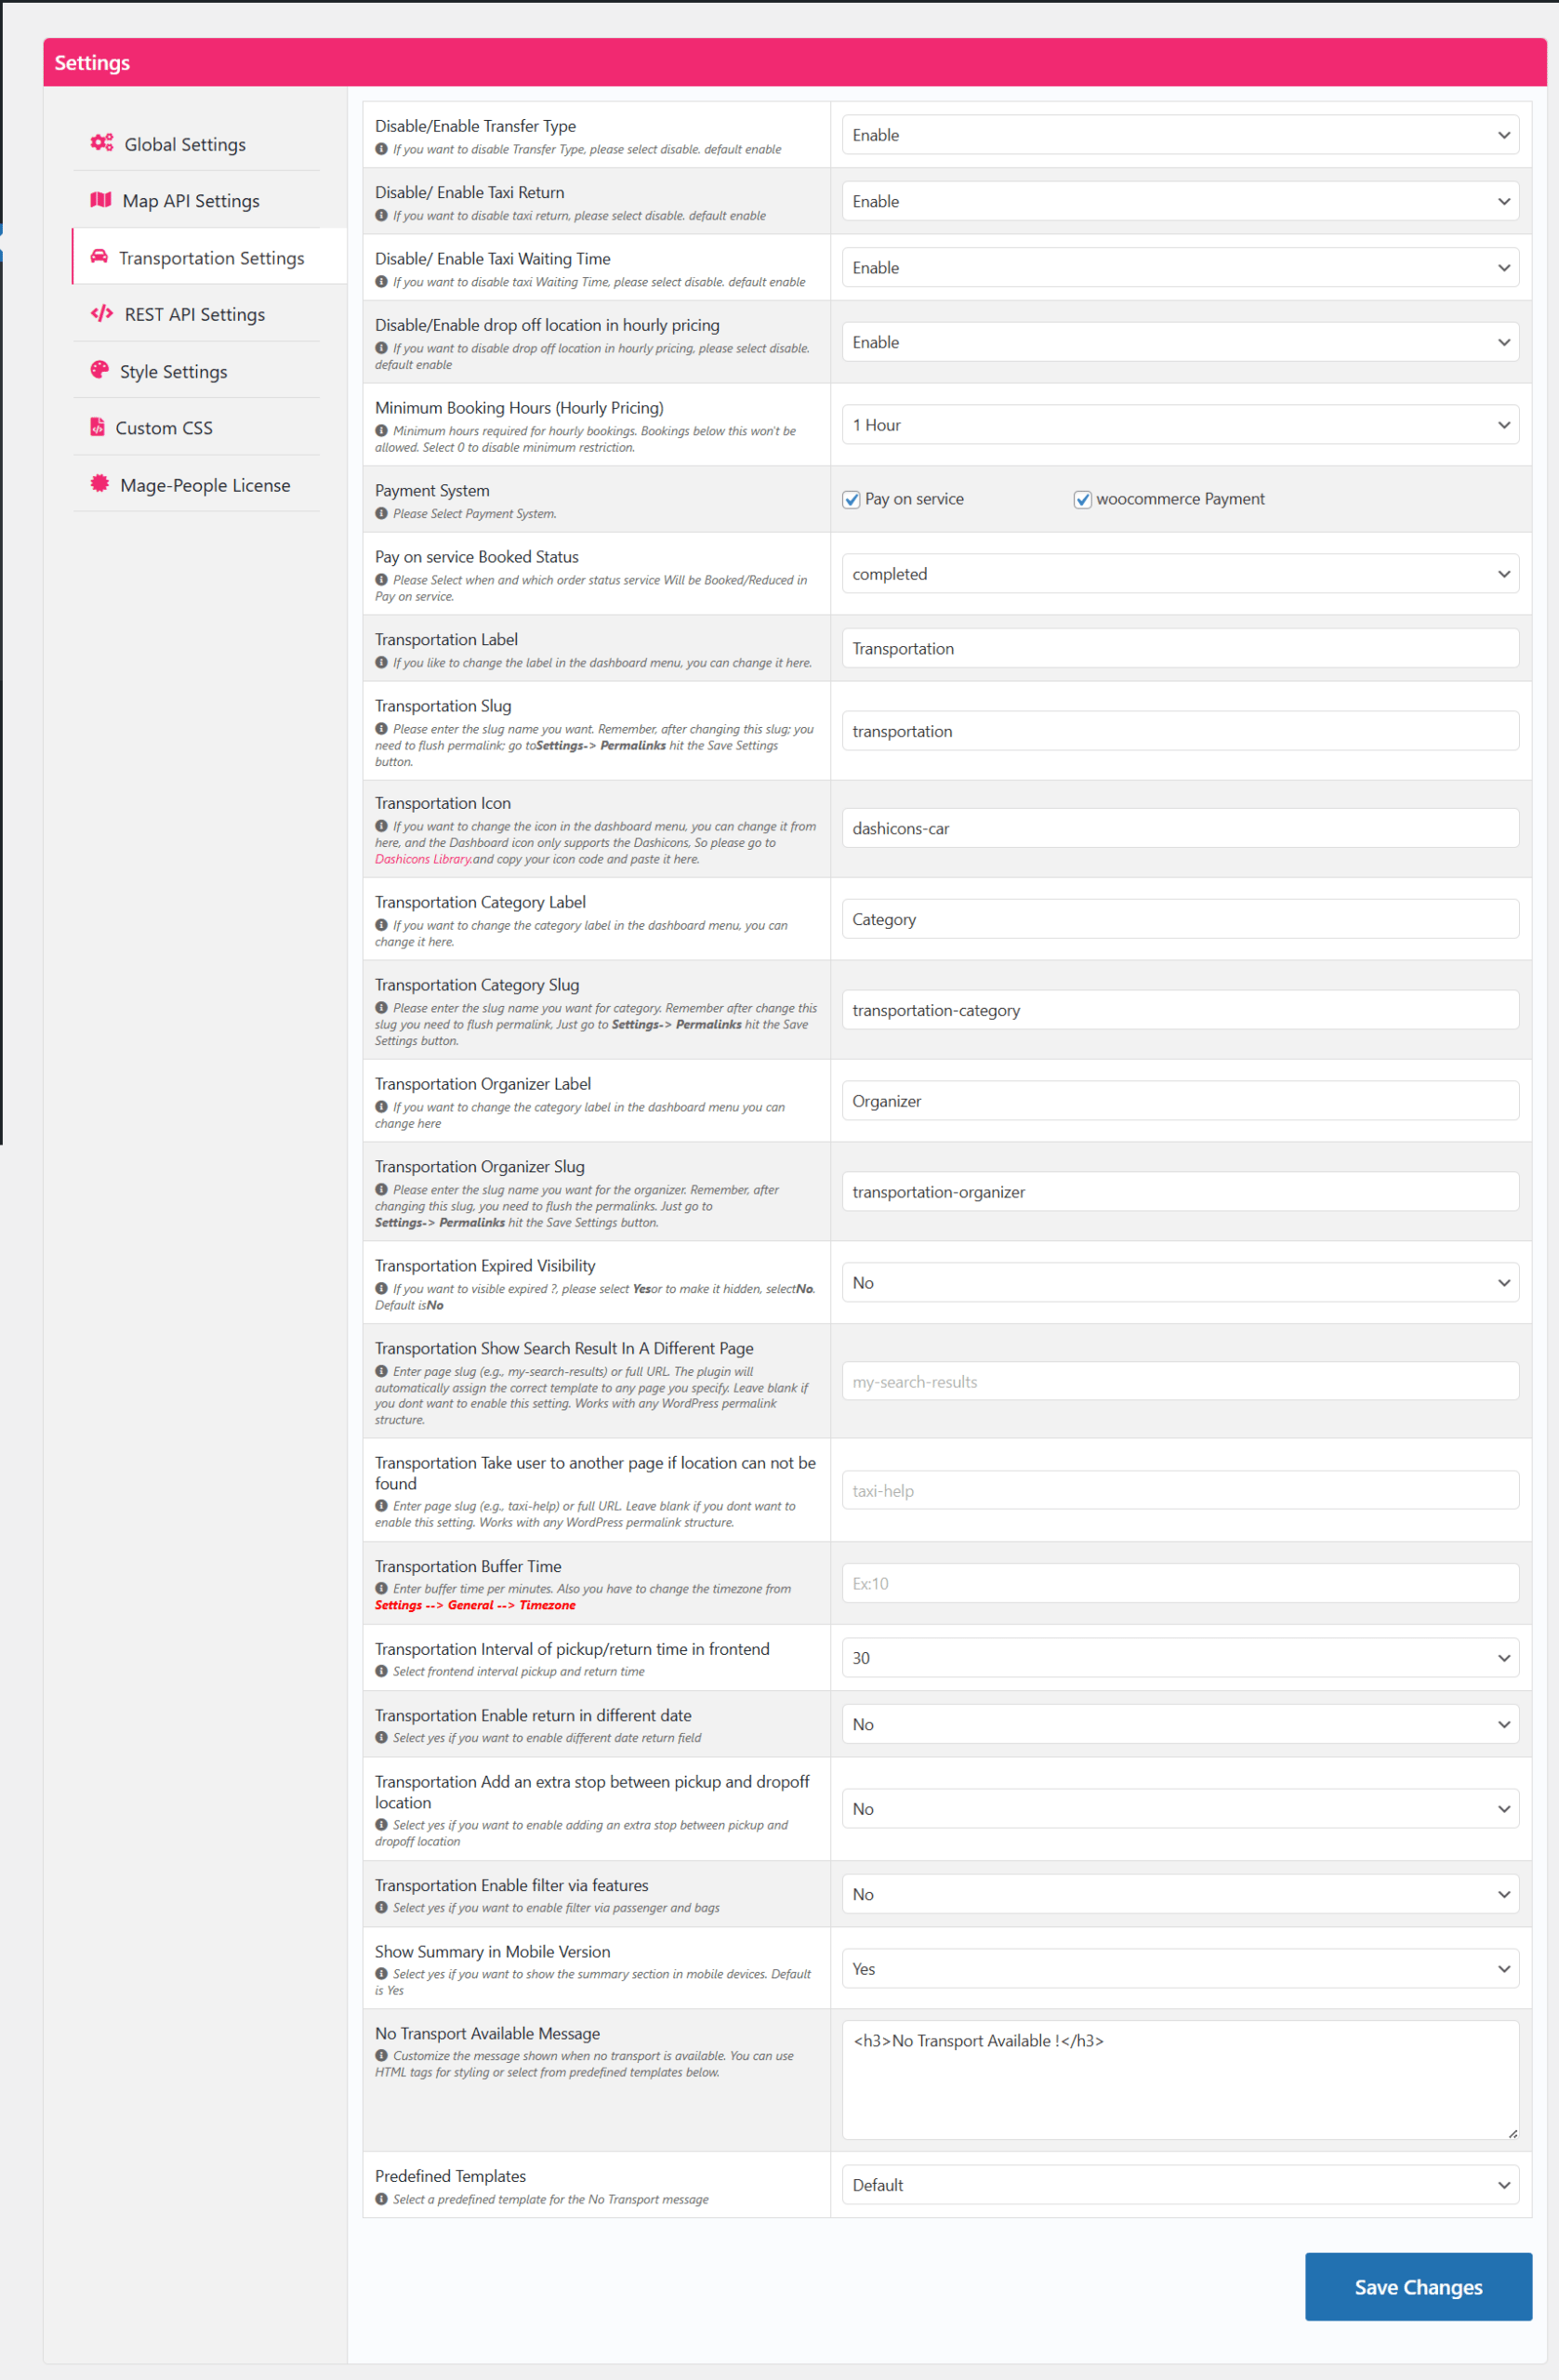

Click Save Changes when you are done.
Still in Global Settings, you can also enable or disable the block editor for taxi bookings, change the seat booking status labels, and pick your preferred date format. Under Slider settings, choose whether vehicles display as a slider or as a thumbnail grid. Style settings and a custom CSS box let you match the form to your theme without editing templates.


Step 5: Add locations, extra services and vehicles
Go to Transportation → Location and add each pickup area your business serves, with a name, slug and short description. Well-named zones make route-based pricing easier to reason about later.


Then open Extra Service and add optional add-ons such as child seats, meet-and-greet, or extra luggage handling. Each one becomes an item passengers can tick during checkout.
Finally, click Add New Transportation to create a vehicle. In the general information panel, fill in:
- Taxi name and car model
- Maximum passengers, checked bags and hand luggage
- Engine and fuel type
- Any extra information passengers should know before booking

Then move to the Date tab. Set the date type to repeated for a normal weekly schedule, or pick specific one-off dates if the vehicle is only available for certain events. For repeated availability, set a start date and the repeat interval. You can also enable advance booking — for example, allowing bookings up to 10 days ahead — so you are not fielding requests months out.

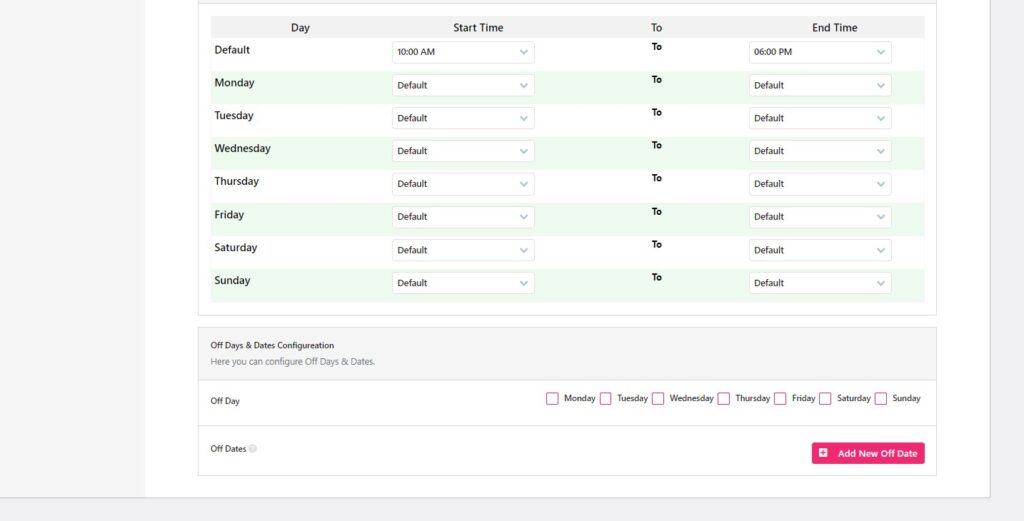
For each day, define the start and end time the vehicle can be hired. If you leave the default times in place, you do not need to add individual days, but you can still override the hours for any specific weekday.
Use the checkboxes to mark the driver’s weekly off days, and add any holiday dates under the off-date option so no bookings land on days you cannot serve.
Step 6: Choose a pricing model
The Pricing tab is the heart of the plugin. eCab supports three fare models, and you can assign different models to different vehicles, which is handy when your fleet mixes airport transfers with city hire.
Option A: Distance-based pricing with Google Maps
Select Pricing based on Distance as Google Maps. Set your price per kilometre and price per hour; the plugin combines both to calculate the fare. As an example, a rate of 12 per kilometre with 10 per hour would apply to a route calculated by the Maps API. Publish the vehicle when you are happy with the numbers.

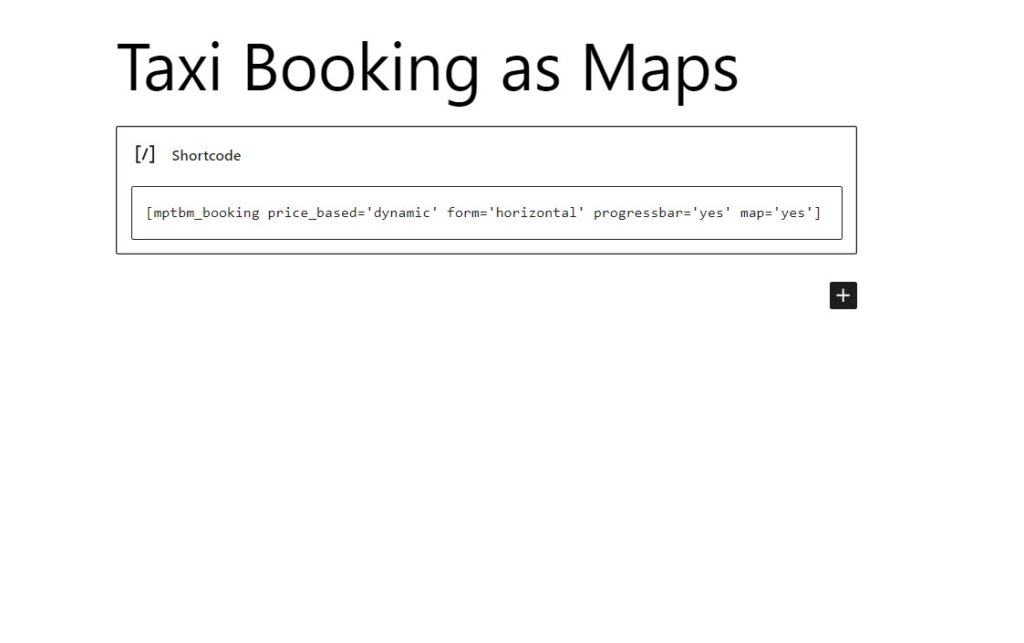
To display the form, copy the distance shortcode from Transportation → Guideline.
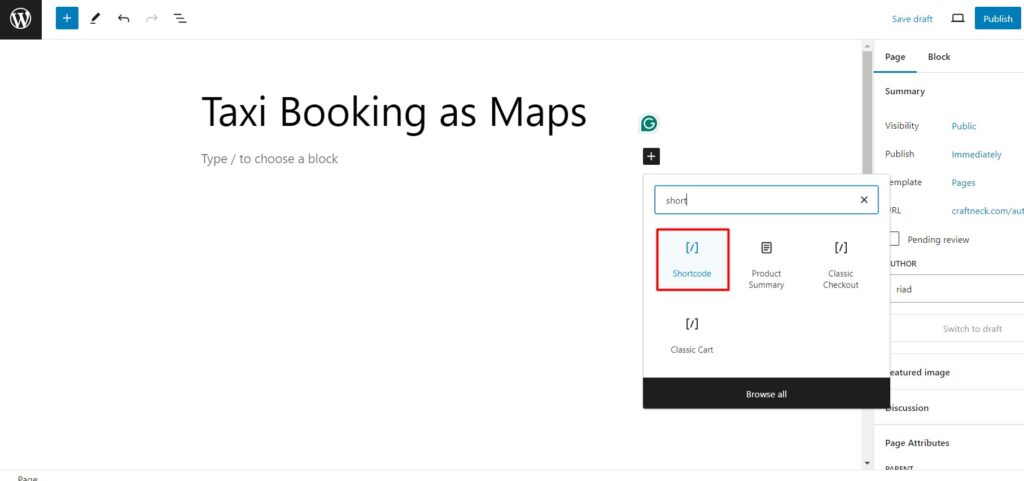
Create a new page, add a Shortcode block through the + icon, paste the shortcode, and click Publish.


On the front end, passengers select a pickup date and time, type their pickup and drop-off addresses (auto-suggested by the API as they type), choose one-way or round trip, and add waiting time if needed.
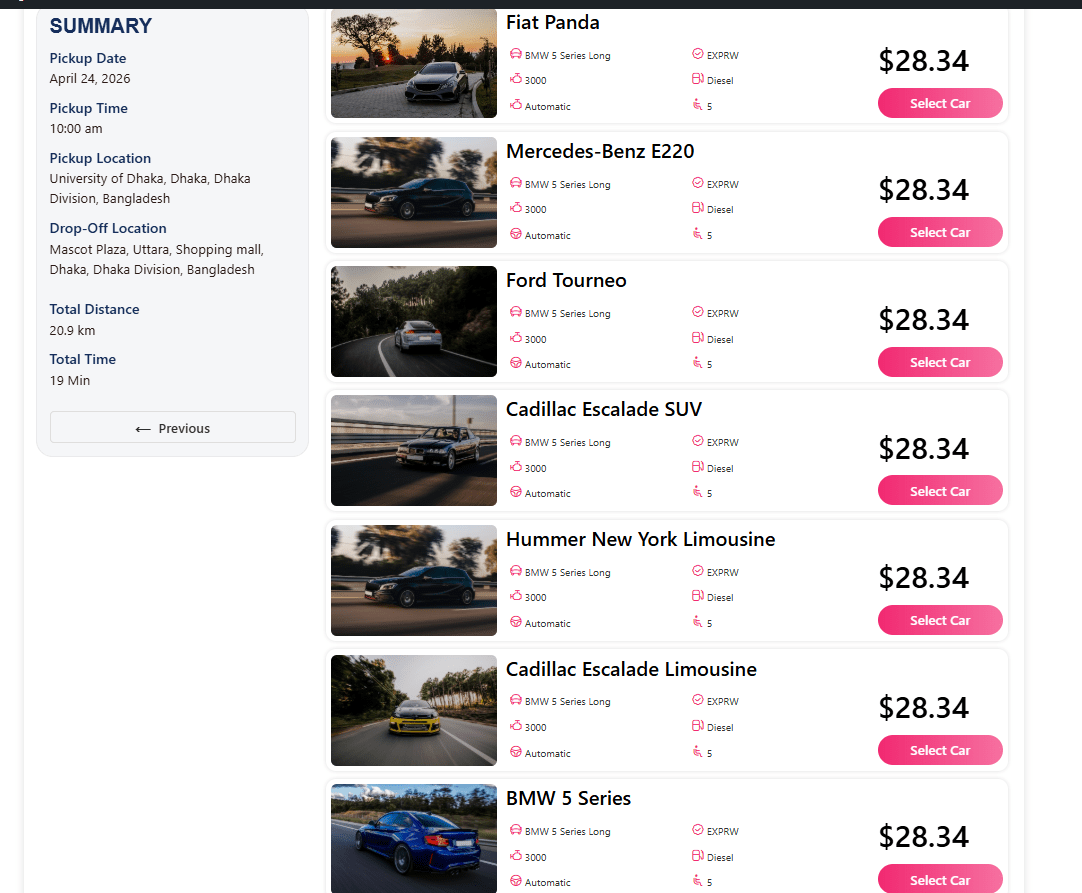
After they click Search, every vehicle available for that date and time is listed, and the passenger filter appears if you enabled it in Global Settings.

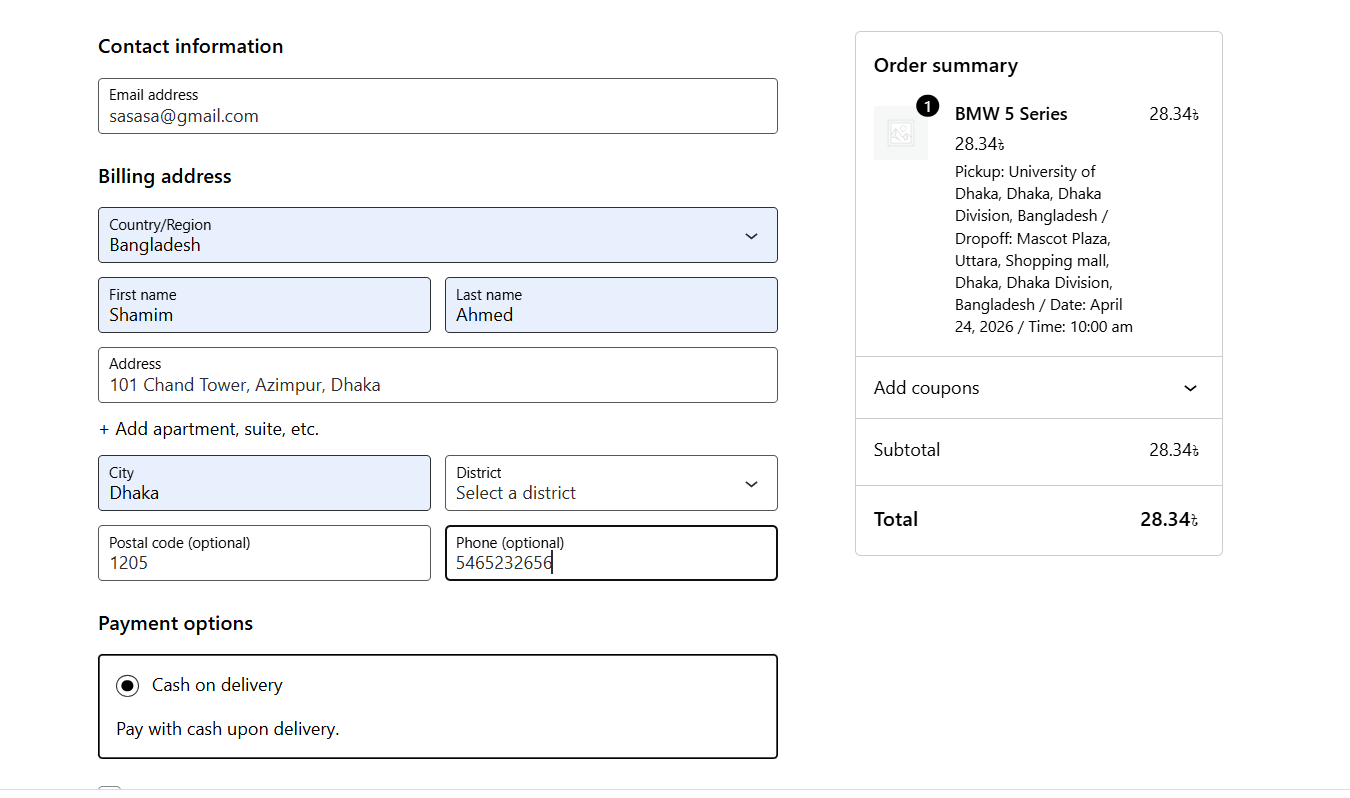
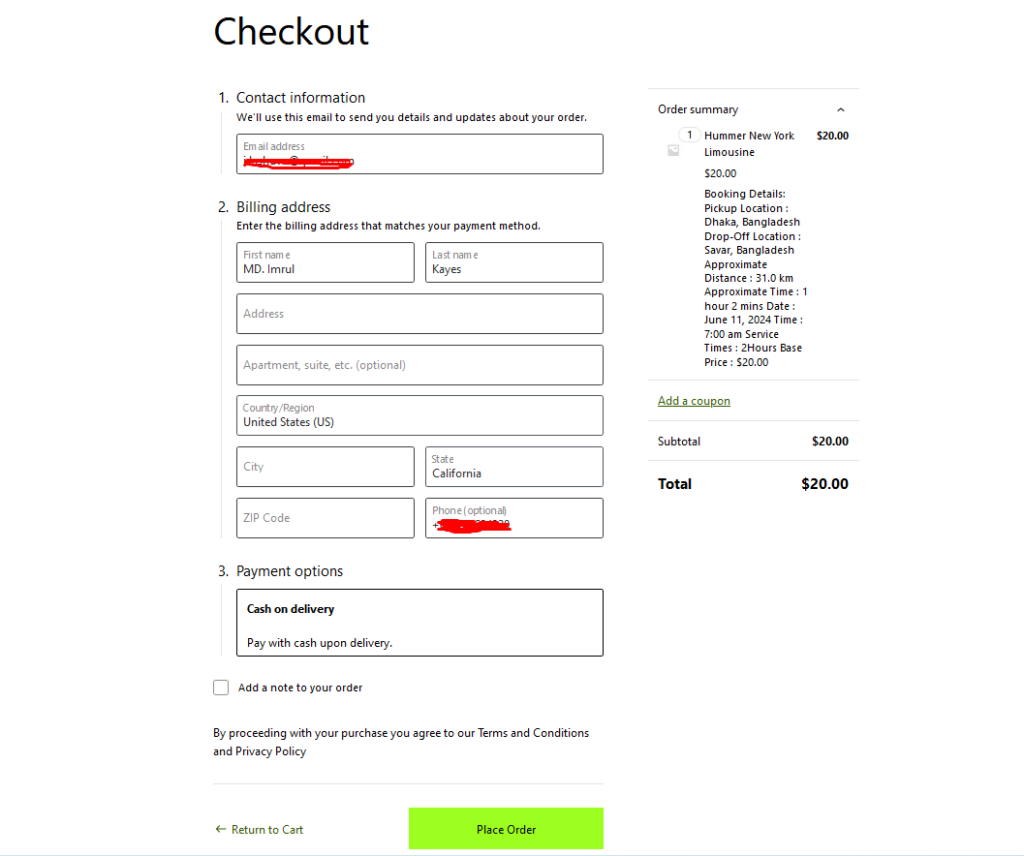
Selecting a car shows the calculated fare in the side panel. Clicking Book Now opens the WooCommerce checkout, where the passenger reviews the order and clicks Place Order.
If Cash on Delivery is your gateway, payment is collected after the ride. Email receipts and PDF tickets require the paid version of eCab.

Option B: Fixed-location (route-based) pricing
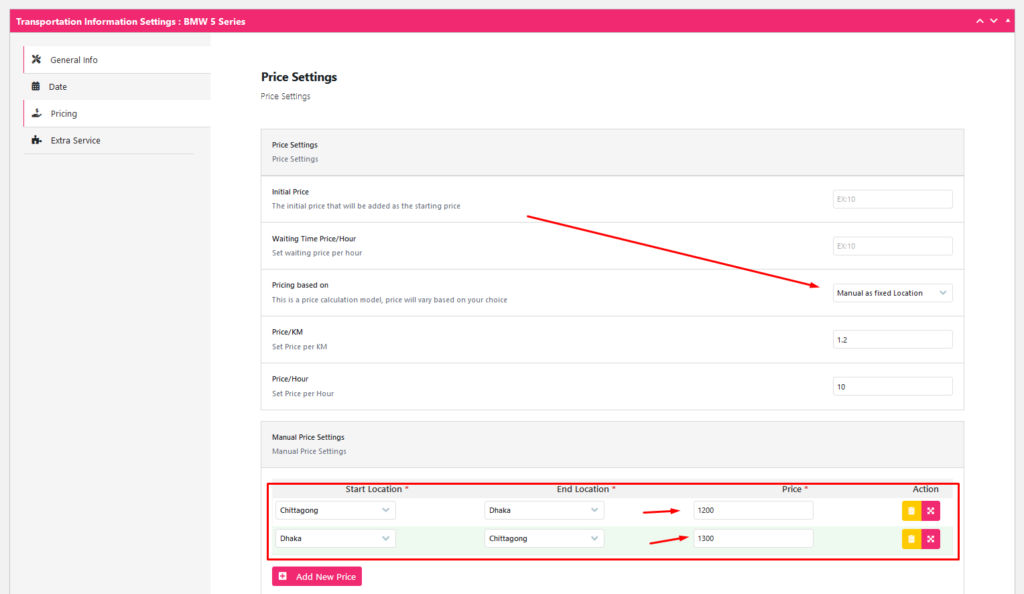
This model suits airport transfers and intercity routes where the fare should be a flat price regardless of traffic. Select Pricing based on Manual as Fixed Location. In this mode, price per kilometre and price per hour are ignored — only the initial price and waiting time apply.
Add each route by defining a start location, an end location and its price.
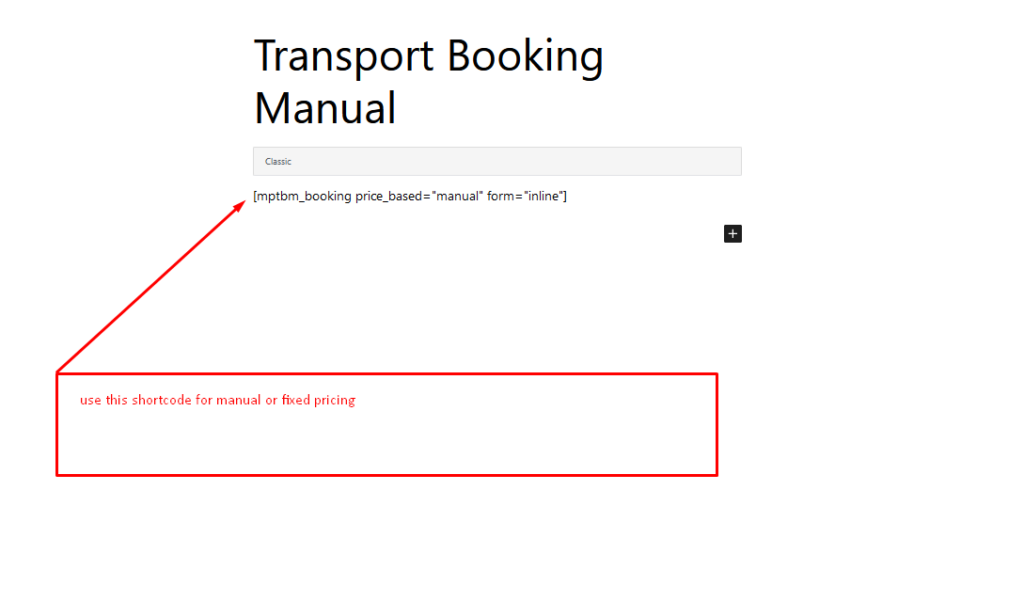
Copy the fixed-location shortcode from the Guideline tab and paste it into a Shortcode block on the page where you want the form.
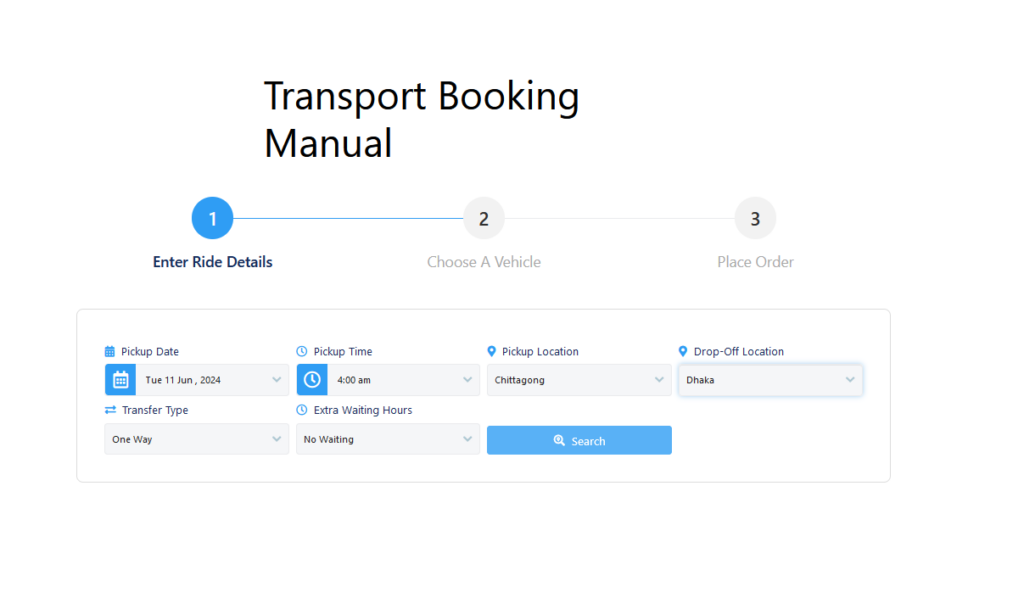
On the front end, the passenger picks a date, time, pickup point, drop-off point, transfer type and any extra waiting, then searches.
Available cars for that route are listed with the flat fare, and the order summary confirms the price before checkout.
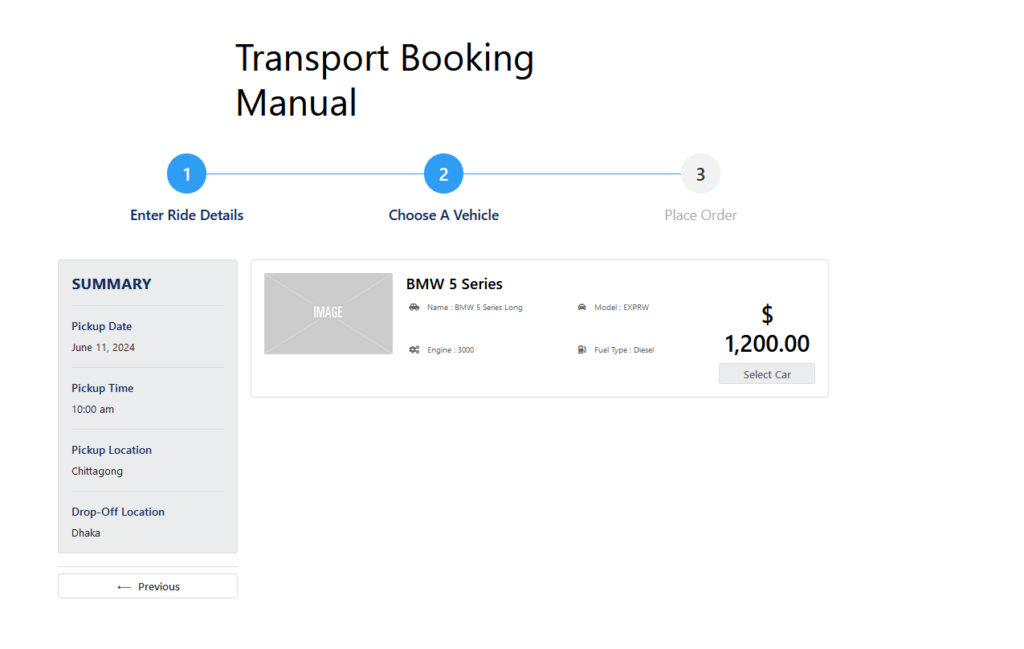
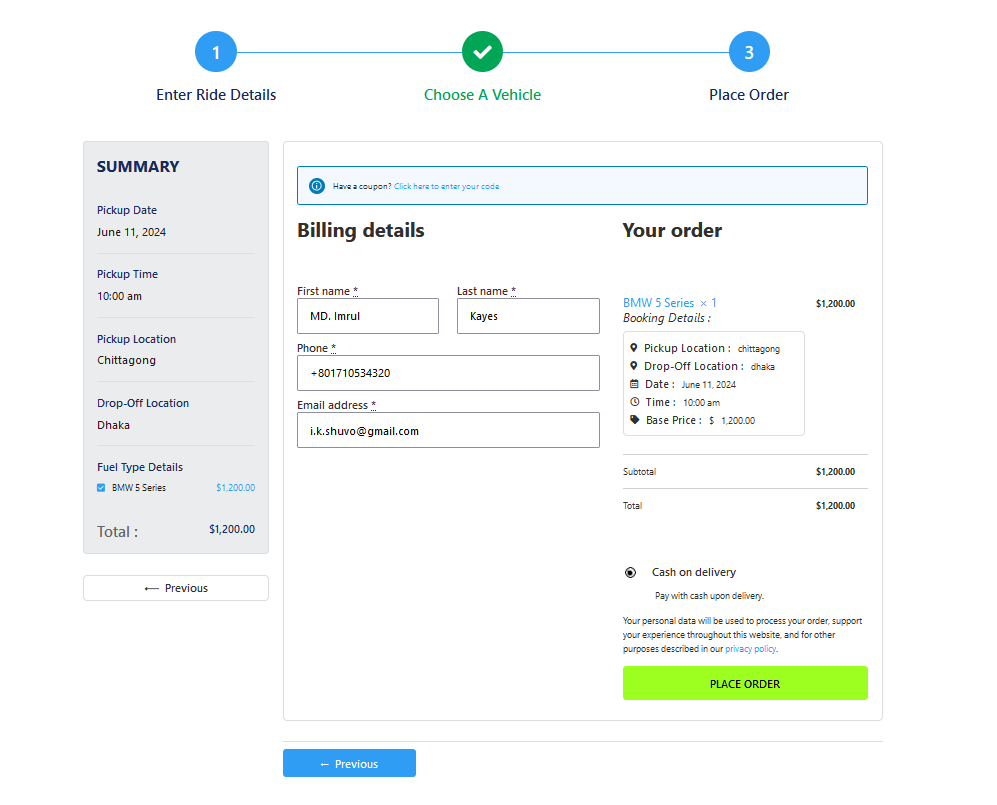
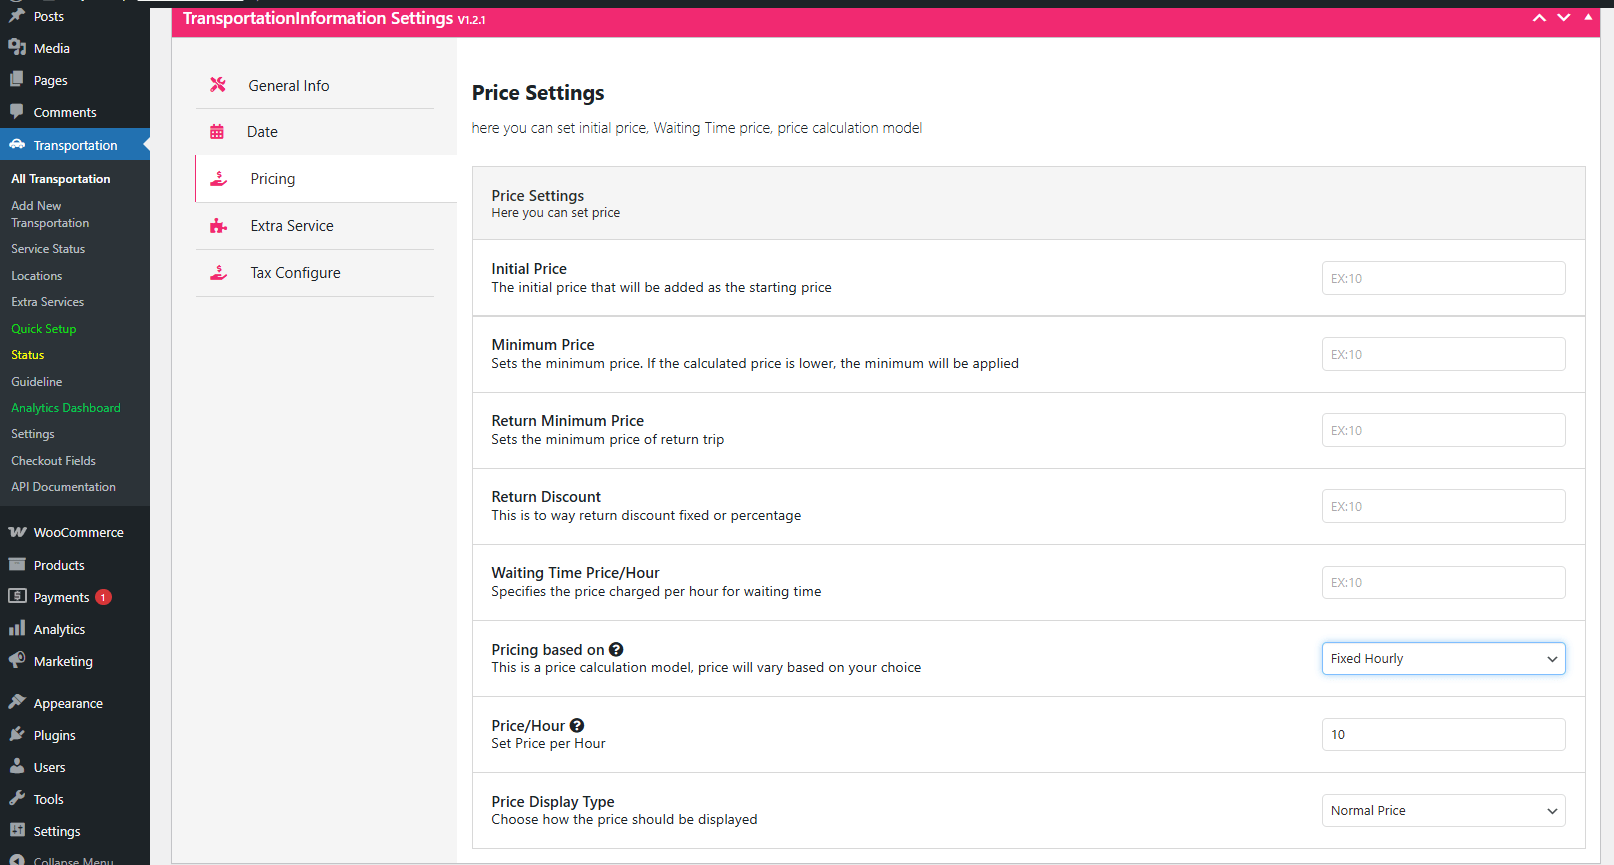
Option C: Fixed-hour (hourly hire) pricing
Use this for city hire, wedding cars and full-day rentals. Select Pricing based on Fixed Hours. Only the initial price applies here — waiting hours and kilometre rates do not factor into the calculation.
Copy the fixed-hour shortcode from the Guideline tab and paste it into a Shortcode block.
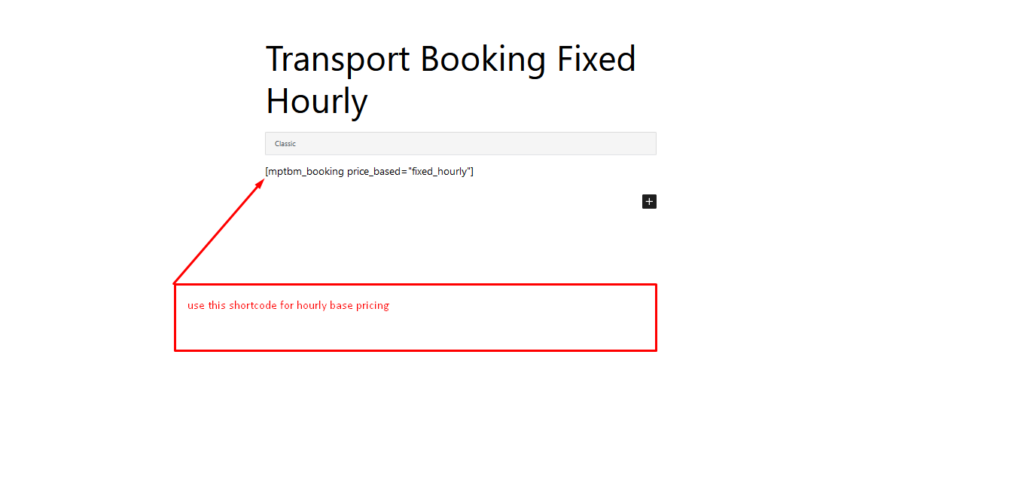
Publish the page, then test it: choose a pickup date and time, enter a drop-off location, and select how many hours of hire you want.

Searching returns the vehicles available for that request, and each result shows the price before it is added to the cart.

If the price looks right, the passenger continues to checkout and places the order.
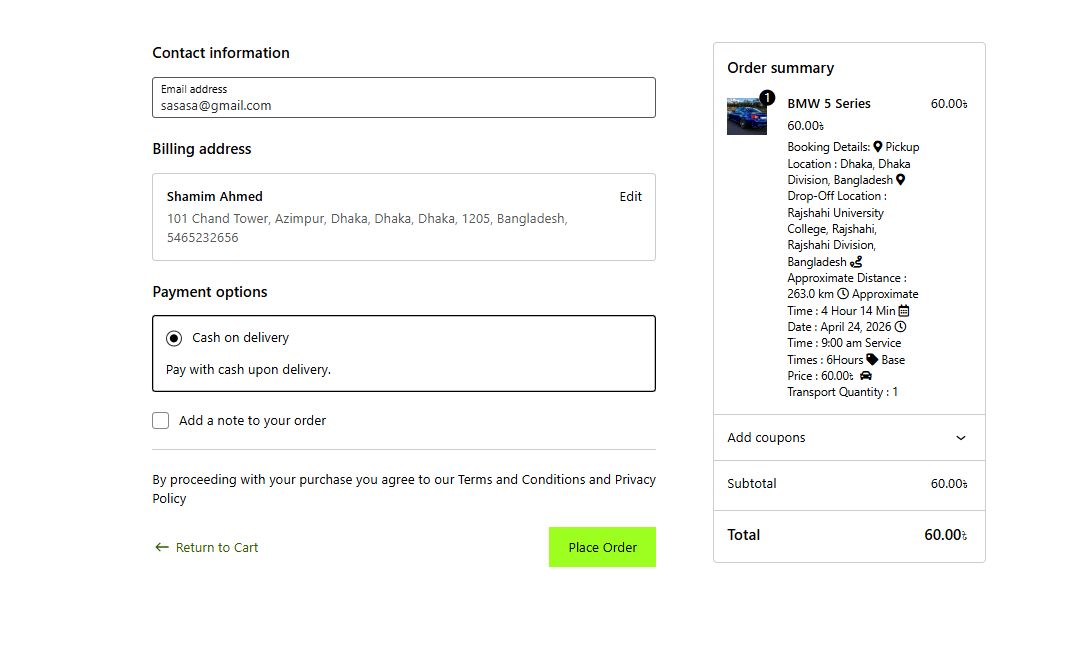
With Cash on Delivery they receive an order confirmation to pay after the service. Total bookings are visible in the analytics area of your dashboard.

After launch: turning the site into a business
A working booking form is the starting point, not the finish line. A few things are worth doing in the first weeks.
- Test every route type yourself. Place test orders for each pricing model, from mobile as well as desktop, and confirm the order appears correctly in WooCommerce.
- Write real location pages. A page per zone or route (“Airport transfers in Dhaka”, for instance) captures far more search traffic than one generic booking page.
- Set your cancellation and refund wording before you take your first payment, and link it from checkout.
- Watch your first few dozen orders for patterns — which vehicles are over-requested, which routes are priced too low.
- Consider surge or peak-hour pricing once you understand your demand curve. If that is on your roadmap, adding peak hour pricing to your taxi booking website explains how to structure it without alienating regular customers.
- Layer in the WooCommerce booking flow if you need additional add-ons, subscriptions or custom product logic — see how to hire a taxi with the WooCommerce taxi booking plugin.
For a quick visual walkthrough of the whole build, watch the video below.
Final thoughts
Learning how to make a taxi booking website in WordPress comes down to a repeatable sequence: install eCab, run the wizard, connect your maps API, configure transportation settings, add locations and vehicles, then pick the pricing model that matches how you actually sell rides. Distance-based pricing handles ad-hoc trips, fixed-location pricing keeps airport and intercity fares predictable, and hourly pricing covers city hire.
Because the plugin sits on WooCommerce, you inherit proven checkout, order management and payment handling rather than rebuilding them. Start on the free version, validate that your pricing and availability settings match reality, and upgrade only when email notifications, PDF tickets and reporting become genuinely useful to your operation.
