 Get Halloween 15% for Limited Time on Lifetime & Bundle Deal

Selling out is a good problem — until you realise how many people walked away because the “Register” button was greyed out. A waitlist turns that dead end into a queue you own: it captures everyone who missed the first release, lets you fill seats freed up by cancellations, and tells you which events deserve a second date. This guide shows you how to add a waitlist to your WordPress events and ticket selling website using WpEvently, WooCommerce and the WooCommerce Event Waitlist Addon — from installing the addon to sending your first waitlist email.
Why a Waitlist Belongs on Every Events Website
Capacity is fixed; demand is not. A waitlist is the cheapest way to stop losing the overflow of interest you have already paid to generate through marketing.
According to Grand View Research, waitlist and automated capacity management features have moved from a “nice to have” to a core requirement in event management software, driven by demand for real-time attendee data and the growth of hybrid and online events.
Here is what a waitlist actually does for a ticket-selling site:
- Keeps sold-out attendees engaged: instead of a hard “no”, visitors get a one-click way to stay in the loop, so frustration does not turn into an unsubscribed email address.
- Recovers last-minute cancellations: refunds, no-shows and dropped reservations free up seats. A waitlist means those seats get filled by someone who already raised their hand.
- Measures real demand: a waitlist that fills in an hour is a signal to add a second session, move to a larger venue, or raise tier pricing next time.
- Builds a warm list for future events: subscribers are self-selected fans of that event type — ideal for early-bird announcements.
What You Need Before You Start
- A current WordPress install. Update WordPress, your theme and all plugins first; waitlist logic depends on checkout and email, so an outdated stack is the usual cause of “it does not work” reports.
- An event management plugin. You need events with ticket types, capacity limits and a checkout. We use WpEvently, which handles events and tickets and integrates directly with WooCommerce.
- WooCommerce. Handles the order, payment and customer records. Tickets are sold as WooCommerce products.
- A waitlist add-on. The WooCommerce Event Waitlist Addon adds waitlist functionality to WpEvently events.
- An SMTP plugin. WordPress’s default mail function is unreliable. Any SMTP plugin will do, and it is required before waitlist emails will reach anyone.
Why Use the WooCommerce Event Waitlist Addon
The WooCommerce Event Waitlist Addon attaches waitlist functionality to your existing event pages rather than running a separate list. When tickets for an event sell out, the registration area switches to a waitlist signup form automatically. Organisers can then email those subscribers when capacity opens up.
Key features
- Automatic activation: the waitlist form appears only when an event is sold out, so it never competes with ticket sales.
- Subscriber management: view, filter and manage waitlisted people event by event from the dashboard.
- Email notifications: send a templated email to waitlist subscribers when tickets become available.
Once your waitlist is running, the next lever on the same dashboard is price. If you plan to reward waitlisted attendees or early bookers, see how to make coupons in WooCommerce and issue a limited-time code to that list.
How to Add a Waitlist to Your WordPress Events and Ticket Selling Website
Step 1: Install the plugins the waitlist depends on
Install and activate WpEvently and WooCommerce first. Create at least one event with a ticket type and a seat limit — the waitlist has nothing to attach to until an event exists.

If you are new to tying events to WooCommerce products, the setup walkthrough in using WooCommerce for event registration covers ticket creation, pricing and checkout configuration. Get that working before you add the waitlist add-on, otherwise you will be debugging two things at once.
Step 2: Install the WooCommerce Event Waitlist Addon
Purchase the add-on from the WooCommerce Event Waitlist Addon product page. Check current pricing and licence terms on that page, since bundles and renewal terms change.

Download the ZIP file from your purchase confirmation email, then go to Plugins → Add New → Upload Plugin in your WordPress dashboard and upload it.

Click Install Now, then Activate. The waitlist settings appear inside your existing event editing screens — there is no separate menu to configure from scratch.
Step 3: Choose the events that should offer a waitlist
Open any existing event and enable the waitlist option for it. Do this deliberately rather than globally: free community meetups and unlimited-capacity webinars rarely need a queue, while seated workshops, conferences and limited-seat trainings almost always do.
Step 4: Configure waitlist settings
With the waitlist switched on for an event, configure how it behaves.
First, confirm the event has a seat limit and that the sold-out state triggers correctly. Toggle the waitlist button on for the event.
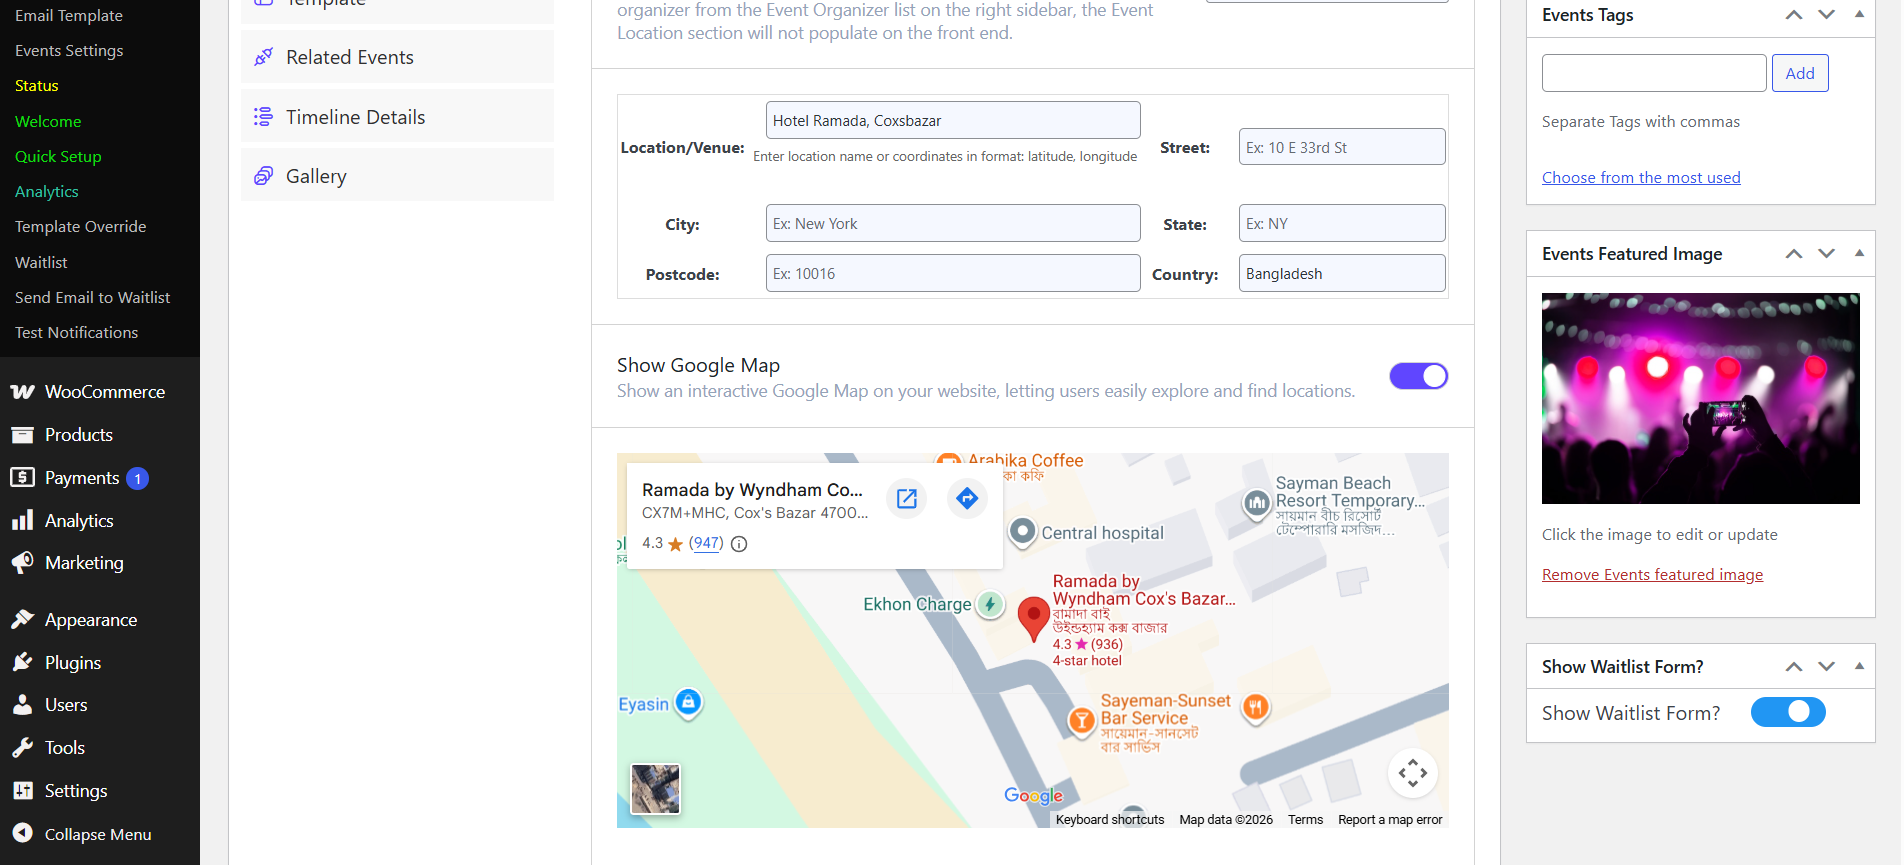
Next, connect SMTP so emails actually send after a waitlist submission or approval. Any SMTP plugin works — use your transactional email provider’s credentials.

Then go to the Events tab and open Email Template. This is the message waitlisted attendees receive by default, so it should answer the questions people ask when they are waiting: what they are waiting for, when they will hear back, and how long they have to act.
Click Add New Post to create the template.

Build the default format: a clear title, then the merge fields for name, email, event and date, wrapped in a short greeting.


Step 5: Test the waitlist from a visitor’s point of view
Testing is not optional, because a waitlist that silently fails is worse than no waitlist at all — people believe they are in the queue and they are not.
- Navigate to the event page where you enabled the waitlist.
- Note the remaining seats. With one seat left, only one ticket can be booked.
- Click Register For This Event and complete a test order — use a sandbox or test payment method, not a real customer’s details.
- Complete the order to close out the last seat.
- Now return to the same event and try to book again to simulate a second attendee.
- You should see a message saying no seats are available and prompting you to join the waitlist.
- Go to the event page and confirm the sold-out state.
- Fill in the waitlist form and submit it. You should get a confirmation telling you the organiser will be in touch.
Step 6: Manage the waitlist and send the email
Now check the waitlist from the backend. Open the waitlist list under the event — your test submission should be sitting there with the date and time the person joined.

To release a spot, open Send Email to Waitlist.
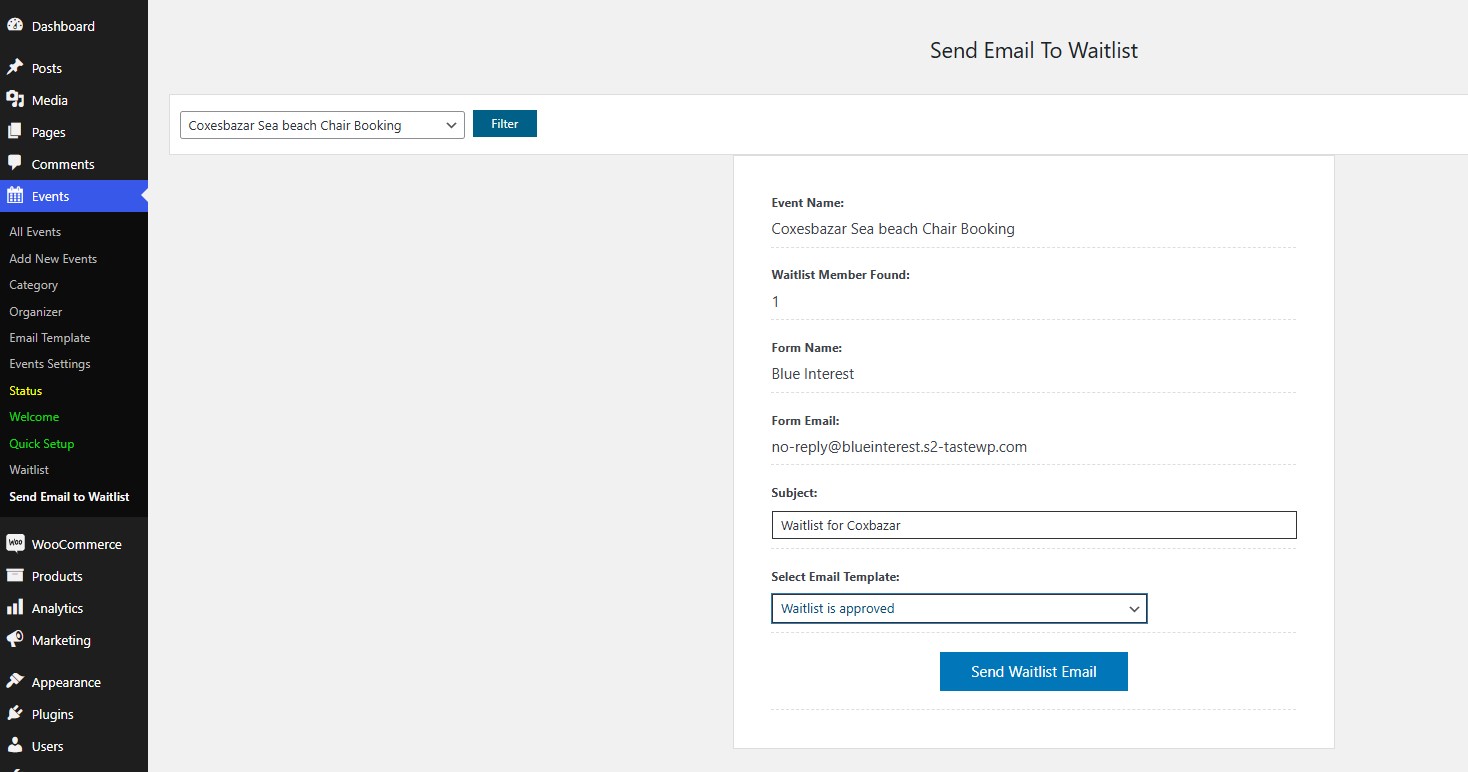
Use the filter to pick the specific event whose waitlist you want to contact, so you do not accidentally email everyone about the wrong date.
Then set the email subject, choose the template you created in Step 4, and click Send Waitlist Email.

The dashboard confirms the send — one email sent successfully in this test.
Finally, open the inbox you submitted from and verify the message arrived, rendered correctly and included the event details.

When it has, waitlisted attendees will get an email from the organiser once they apply — and again when you choose to release tickets.
A Short Note on Waitlist Etiquette
How you run the queue matters as much as having one.
- Be first-come, first-served, and say so. People accept a queue they understand far more readily than one that looks arbitrary.
- Give a deadline to claim. A short claim window (a day or two) keeps the queue moving; without one, seats sit reserved for people who have moved on.
- Do not oversell the queue. If you expect two seats to open, do not promise twenty people a ticket. Email in batches as capacity is confirmed.
- Tell people when the waitlist closes. A sentence in the confirmation email manages expectations and cuts support queries.
If your bottleneck is conversion rather than capacity — visitors reaching checkout and not finishing — the fixes live elsewhere. If you need to improve the path from page visit to paid ticket rather than manage demand after sell-out, see optimising your event ticket sales funnel in WordPress. And for a broader look at turning WordPress into a ticketing storefront, including seating and attendee records, see the full guide to selling event tickets from WordPress.
Conclusion
You now know how to add a waitlist to your WordPress events and ticket selling website: install WpEvently and WooCommerce, upload and activate the WooCommerce Event Waitlist Addon, enable the waitlist per event, connect SMTP, build your email template, then test the sold-out flow and release tickets by email from the backend.
The payoff is straightforward. Every sold-out event stops being a dead end and becomes a list of people who already want what you sell — cancellations get filled, no-shows get replaced, and your next event announcement lands in an inbox full of proven buyers. Start with your most in-demand event, run a full test order, and check the email actually arrives before you promote the waitlist publicly.
Frequently Asked Questions
How do people get on the waitlist?
Once tickets are gone, the registration button switches to a waitlist option. Visitors enter their name and email, and the submission is recorded with the time they joined the queue, which gives you a fair first-come, first-served order.
How do waitlisted people find out a spot opened up?
You send a notification email from the backend to the waitlist for that event. The email uses the template you configured, and you control when it goes out — typically as soon as a cancellation frees a seat.
Can I manage the waitlist manually?
Yes. The dashboard lets you review waitlist subscribers event by event, filter them, and decide who to contact. You can also prioritise someone manually if, for example, they had a payment fail on a previous attempt.
Does the waitlist collect payment when someone joins?
No. Joining a waitlist is a signup, not a purchase. Payment happens when you release a ticket and the person completes the normal checkout flow at your event’s price.
Will the waitlist form show before an event sells out?
Not by default — the add-on is designed to keep the waitlist form hidden while seats remain, so it never competes with live ticket sales. It appears once the event reaches its capacity limit.
