

Seat plan rotation in WpBusTicketly PRO lets you turn individual seats or whole rows on the visual seat map so the layout matches the real coach — rear-facing lounge seats, side-facing sleeper berths, or a driver-side layout that the default grid can’t express. This guide walks through the full setup: prerequisites, buying and activating PRO, building the bus entry, enabling rotation in the Seat Configure tab, and testing the rotated map on the frontend before you go live.
What Seat Plan Rotation Actually Does
Rotation changes the orientation of a seat on the booking map, not its position in the grid. Rows and columns still define where a seat sits; rotation defines which way it faces. That distinction matters, because it is what lets a single plugin render very different interiors:
- Standard coaches: every seat faces forward at 0°, exactly as the free version renders it.
- Lounge and sleeper layouts: rear or centre sections rotated 180° so passengers face each other.
- Side-facing berths: seats rotated 90° or 270° to mirror real sleeper cabin orientations.
- Airport-style transfers: a mix of forward and rear-facing seats around a table or aisle.
Because the rotation is stored per bus entry, one WordPress site can serve a forward-facing city fleet, a sleeper coach and a VIP lounge bus without any code changes.
Prerequisites Before You Enable Rotation
Rotation sits on top of a working booking setup, so confirm the foundation first. If your site can’t take a booking yet, sort that out before you touch the seat editor — the guide to creating a bus booking website on WordPress covers the full baseline configuration.
Step 1: Install the Free Core Plugin and WooCommerce
- Log in to your WordPress dashboard.
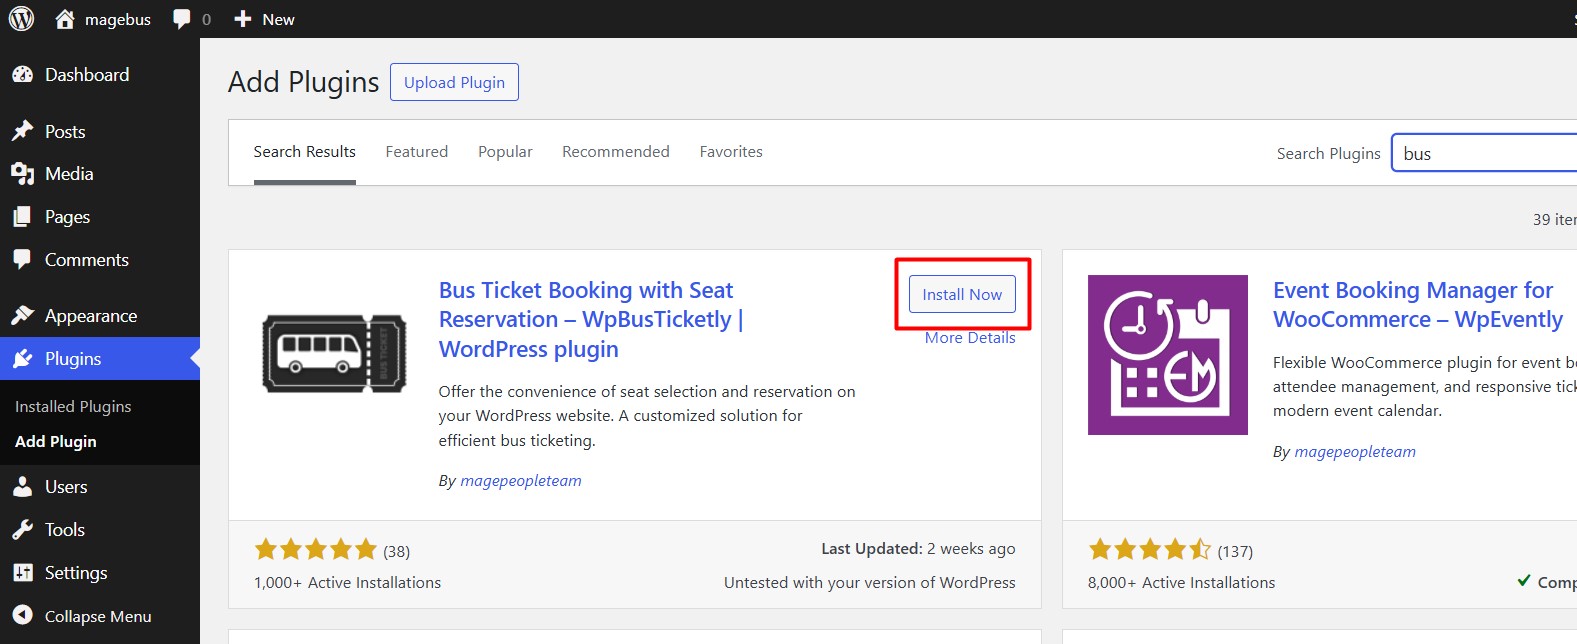
- Go to Plugins > Add New and search for Bus Ticket Booking with Seat Reservation (WpBusTicketly).
- Install and activate the free core plugin.
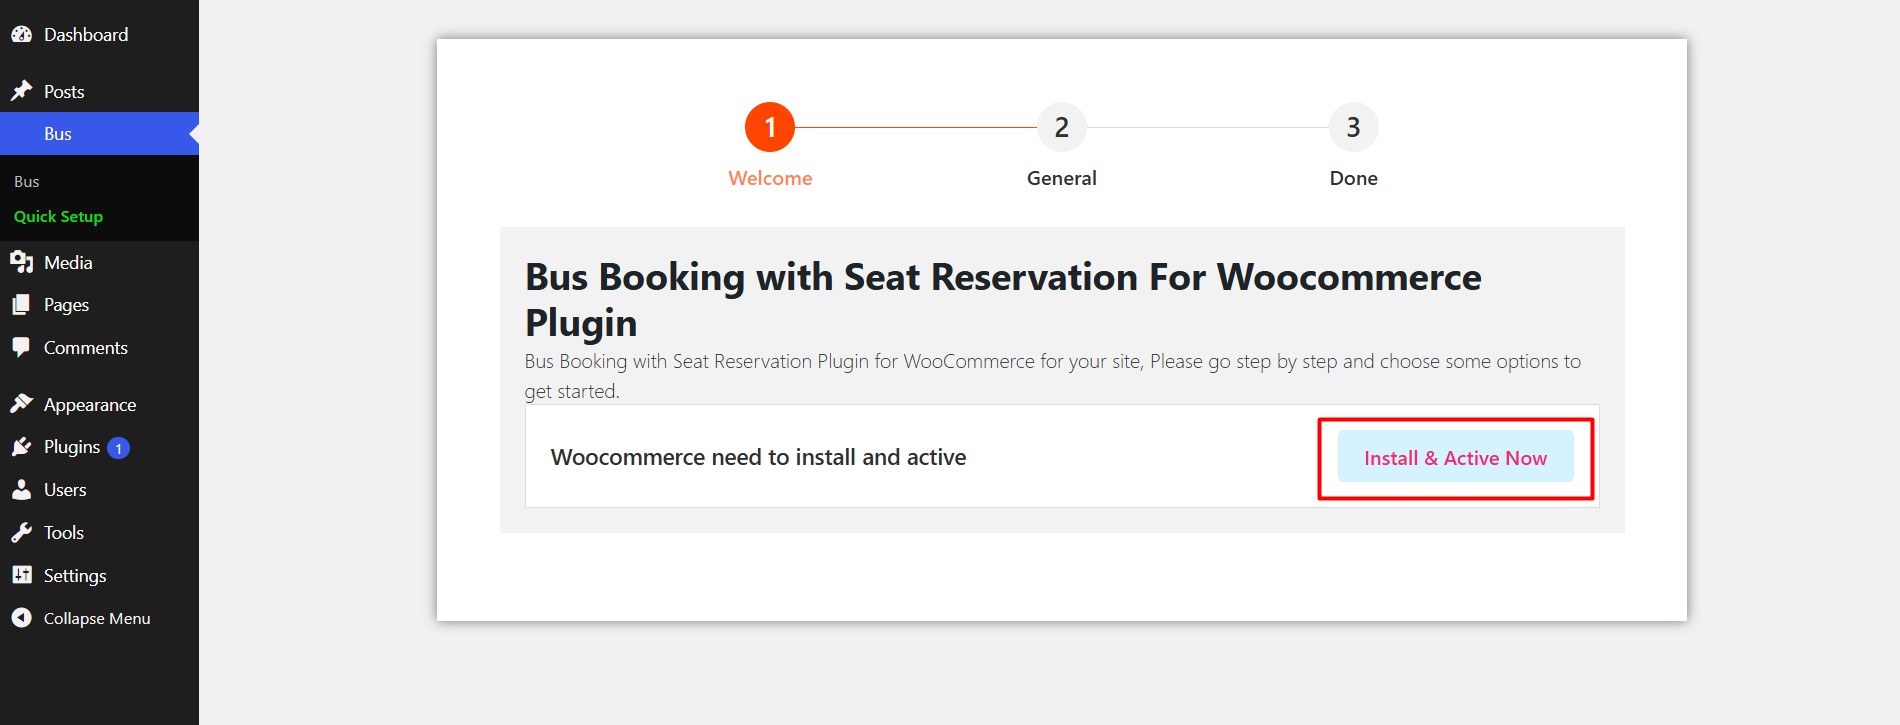
- Install and activate WooCommerce — every WpBusTicketly booking is processed as a WooCommerce order, so the plugin will not function without it.
- Complete the WooCommerce setup wizard: store address, currency, payment gateways and shipping/tax basics (you can disable shipping, since bus tickets aren’t shipped).
Step 2: Upgrade to WpBusTicketly PRO
Seat rotation is a PRO-exclusive feature. The free plugin builds seat grids from rows, columns and total seats, but the rotation toggle and the interactive seat editor ship only with the PRO addon.
- Open the official WpBusTicketly PRO addon page and pick the licence that matches how many sites you run.
- Purchase, then download the addon ZIP from your MagePeople account.
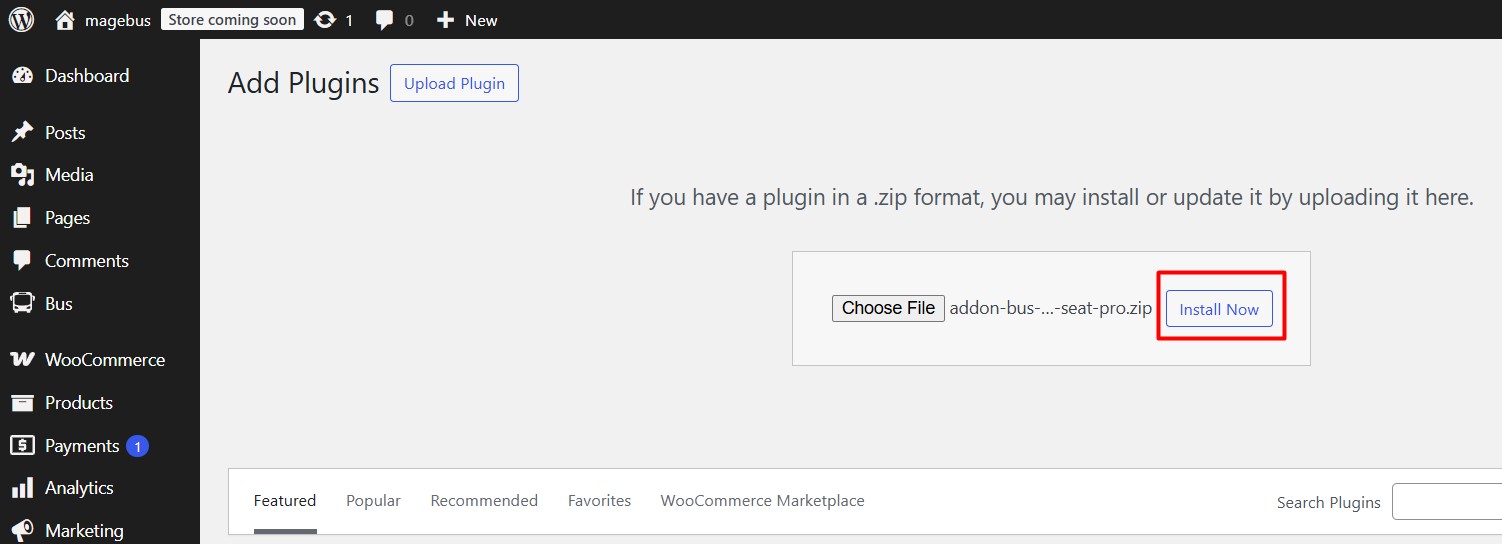
- In WordPress go to Plugins > Add New > Upload Plugin, choose the ZIP, and install and activate it.
- If prompted, also install the MagePeople PDF Support plugin — it powers PDF ticketing and QR features.
- Enter your licence key under WpBusTicketly > Settings to unlock PRO features. Your free-version data (buses, routes, bookings) is left untouched.
Licence pricing changes from time to time, so check current pricing on the PRO page before you quote a figure to a client. Whichever tier you buy, activate PRO on a staging copy of the site first — PRO extends the free plugin rather than overwriting it, so a staging test is the cheapest way to confirm rotation behaves as expected before real bookings exist.
Step 3: Create or Open a Bus Entry
- Go to Bus > Add New Bus (or open an existing bus you want to re-map).
- Add a title, featured image and basic details — bus ID, coach type (for example “Chair” or “Sleeper”) and seat type.
- Under Bus Information Settings > General Info, set the seat fundamentals: total seats, number of rows, columns per row and driver position.
If you are also adding offline or counter sales, the same bus entry feeds the complete bus booking setup walkthrough, which goes deeper into routes, pricing and pickup points.
Step 4: Enable Seat Rotation in the Seat Configure Tab
With PRO active, the Seat Configure tab becomes an interactive map editor rather than a set of number fields. Rotation is switched on here.
Open the visual seat editor
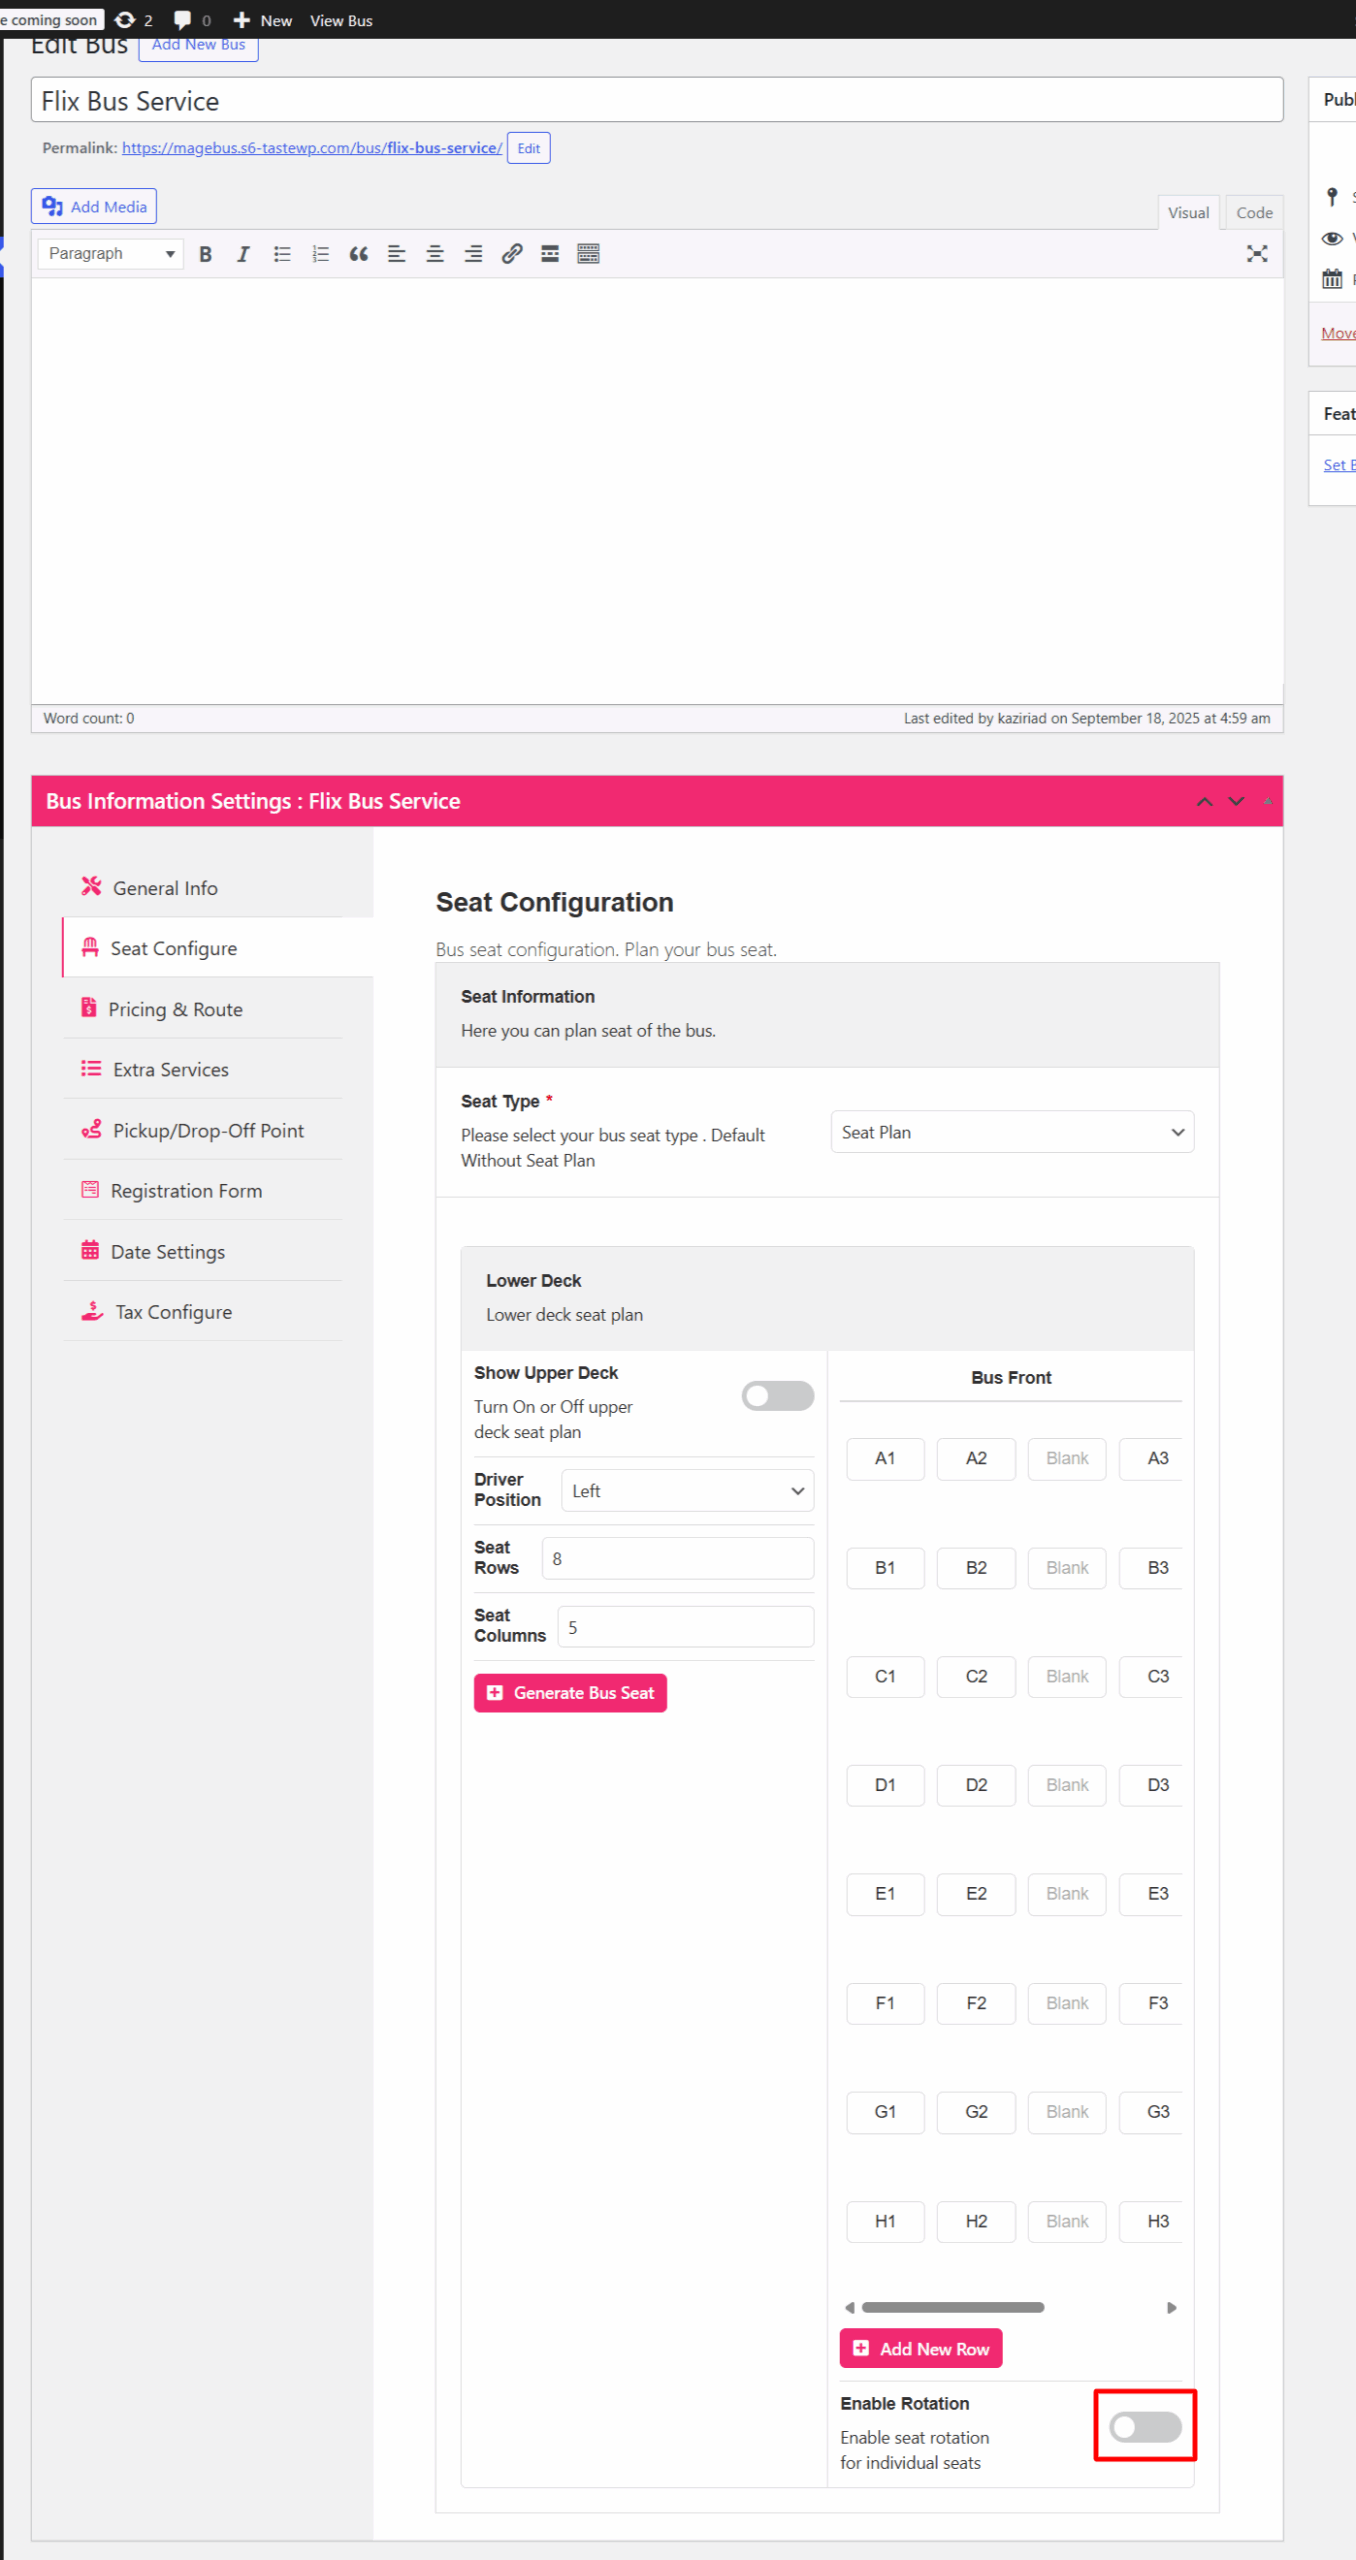
In the bus edit screen, scroll to Bus Information Settings > Seat Configure. Define the base layout first — rows, columns per row, aisle position, total seats and driver position — then save so the editor renders the grid you’ll be rotating.
Turn on the rotation toggle
- In the Seat Configure tab, find the Enable Seat Rotation toggle (the circular-arrow control in the seat toolbar). It appears only after PRO is active and licensed.
- Switch it on. The rotation handles and preset angle buttons become available on the grid.
- Save the bus so the enhanced editor reloads with rotation enabled.
If the toggle is missing, check three things in order: the PRO licence key is saved and showing as active, no caching layer is serving an old admin page, and the plugin is on a version that includes the rotation feature. Updating to the latest release and clearing the cache resolves most cases.
Rotate seats and rows
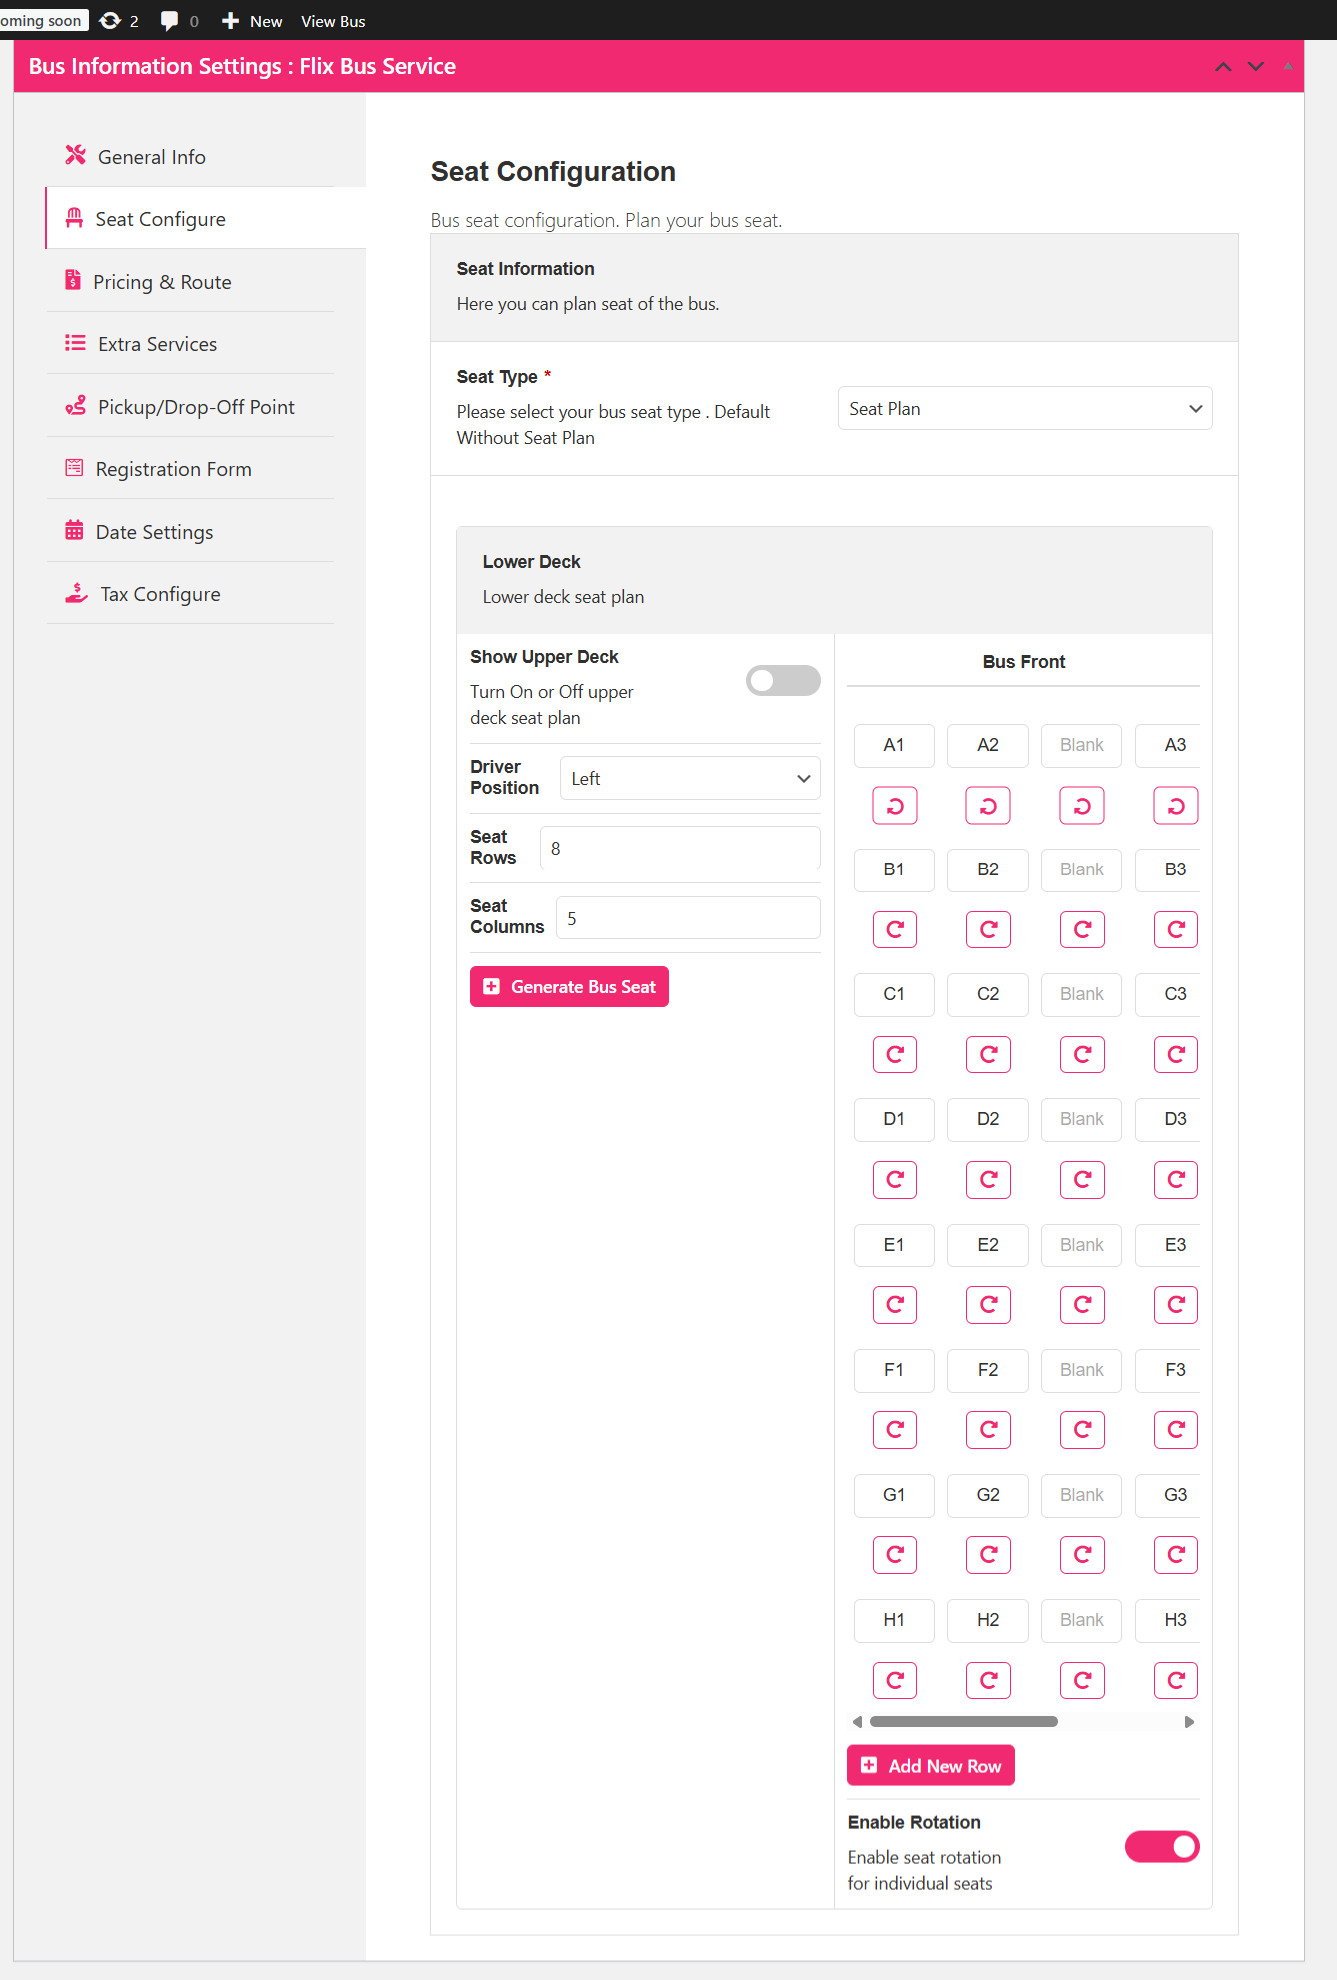
- Click any seat on the map to select it. A rotation handle appears on the seat.
- Drag the handle, or use the preset angle buttons (typically 90°, 180° and 270°) to orient the seat. The map updates live, so you can see the layout as a passenger will.
- To rotate a whole section — the rear two rows of a lounge coach, for example — select the seats one by one, or apply the same preset to each seat in the row. Working in consistent blocks keeps the finished map readable.
- Repeat per bus entry. Rotation is stored against that specific bus, so sleeper coaches and standard coaches each keep their own layout.
Rotate back to 0° when needed
Nothing is permanent. Select a rotated seat and apply the 0° preset to return it to a standard forward-facing position — useful when a seasonal service switches from a lounge configuration back to a conventional one. Save the bus after any reset.
Connect rotation to pricing and dates
Once the map is correct, complete the rest of the bus record so the rotated layout actually sells:
- Date settings: operating dates, off days and how far in advance customers can book.
- Pricing and route: stops, departure and arrival times, and per-seat pricing. Rotated seats can carry their own fare, which is how operators charge a premium for rear-facing lounge pairs or extra-legroom side-facing berths.
- Pickup points and the passenger form: the fields a traveller fills in when booking.
- Tax configuration: enable it if your region requires tax to be shown on the ticket.
Step 5: Publish and Test the Rotated Seat Plan
- Click Publish for a new bus, or Update for an existing one.
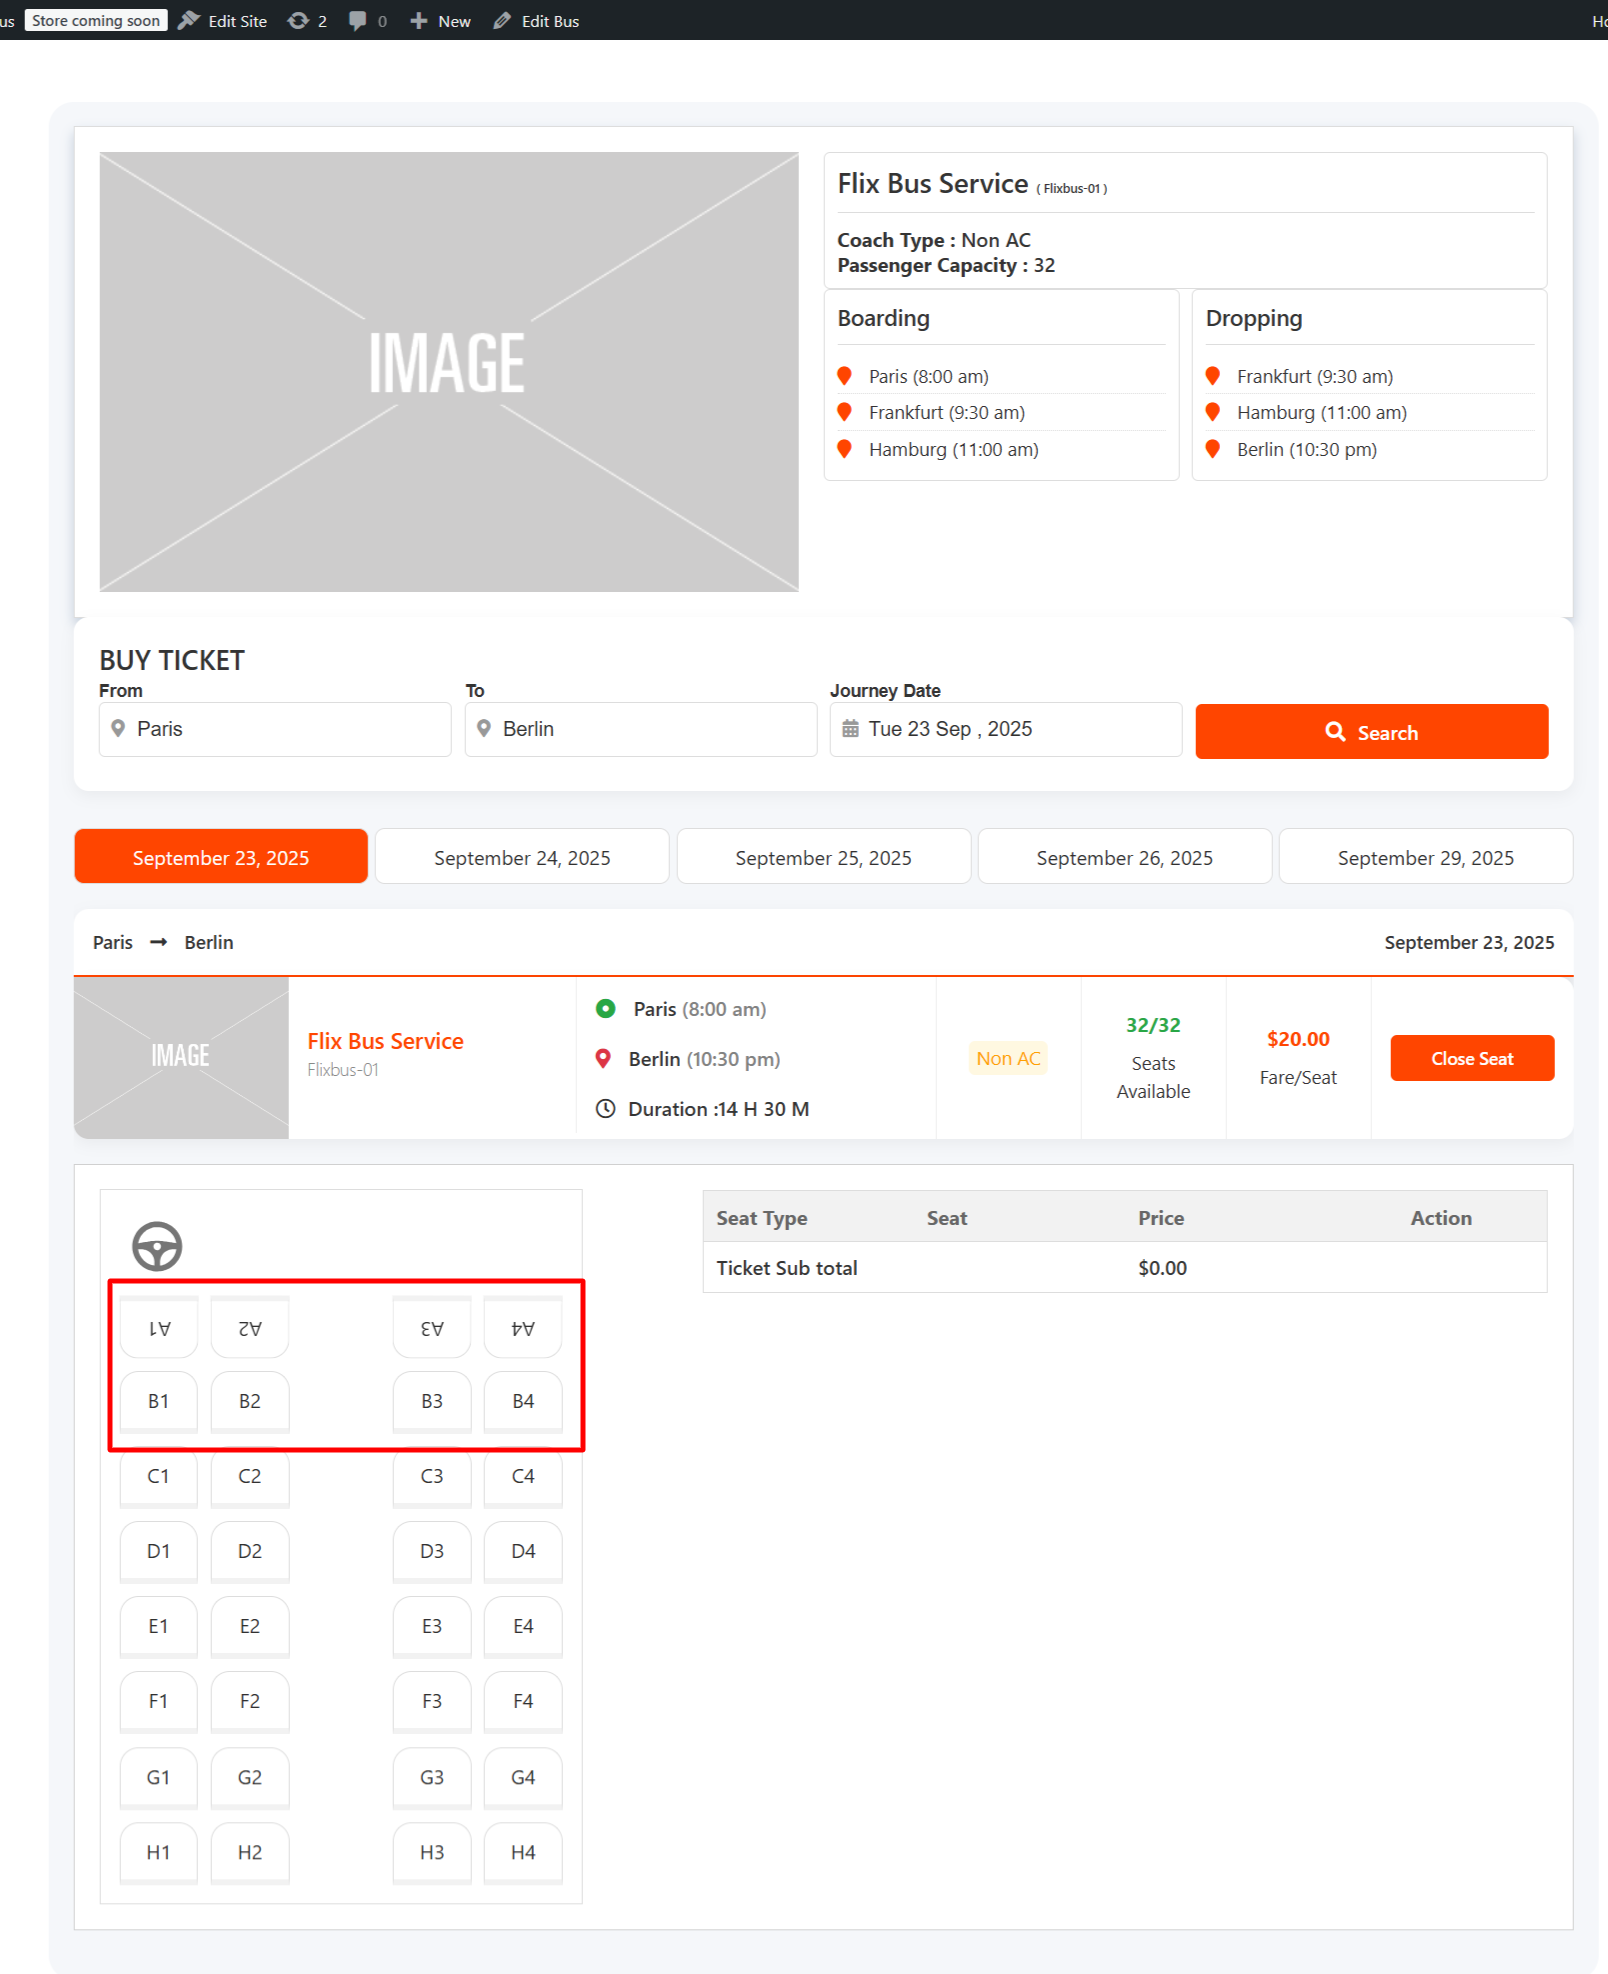
- Use the preview link to open the frontend booking page for that bus.
- Search a route and step through to the seat selection screen. Confirm every rotated seat displays at the angle you set, that seat numbers still match the physical coach, and that unavailable seats are greyed out correctly.
- Complete a test booking end to end. Check the confirmation email and PDF ticket show the right seat number and that the order total matches the per-seat price you configured.
- Cancel or refund the test order so it doesn’t sit in your reports.
Changing a seat map does not rewrite historical bookings, so past orders keep the seat numbers they were issued. Test on staging anyway — it is the only way to be sure a new orientation renders correctly before live customers see it.
Common Rotation Problems and Fixes
- Rotation toggle not visible: PRO isn’t activated, the licence key isn’t saved, or the admin page is cached. Verify, clear cache, reload.
- Rotated seats look wrong on mobile: check the map in the theme’s mobile view. Very heavy rotations on a narrow grid can make labels overlap; simplify the layout rather than shrinking the seat icons.
- Seat numbers don’t match the real coach: row and column order defines numbering, so re-check the grid before rotating rather than after. Renumbering a rotated map is harder than rebuilding it.
- Two buses of the same type show different layouts: rotation is per bus entry. If you want a shared template, configure one bus carefully, then duplicate the entry and adjust only what differs.
- Bookings overlapping after a map change: review the buffer and availability settings on the route, since a re-mapped bus with unchanged inventory rules can still double-sell a physical seat.
Frequently Asked Questions
Is seat rotation available in the free version of WpBusTicketly?
No. The free core plugin builds seat layouts from rows, columns and total seats. The rotation toggle and the interactive seat editor are exclusive to the PRO addon.
Do I need WooCommerce to use seat rotation?
Yes. WpBusTicketly processes every reservation as a WooCommerce order, so WooCommerce must be installed and active before any seat map — rotated or not — can take a booking.
Can I rotate seats on some buses but not others?
Yes. Rotation is saved per bus entry, so a sleeper coach can use a fully rotated layout while your city buses stay forward-facing. Create a separate bus entry for each distinct interior.
Will changing the seat plan break existing bookings?
Past bookings keep the seat data they were issued with. The risk is future bookings, so test the new map on staging and review your availability and buffer settings before publishing.
Can I charge a different price for rotated seats?
Yes. Per-seat pricing in the Pricing and Route section lets you set a premium for specific seats, which is how operators price lounge pairs or extra-legroom berths higher than standard seats.
How do customers see the rotated seats?
The seat selection step of the booking flow renders the same interactive map you built in the admin — orientation included. Passengers pick a seat and the resulting PDF ticket records the seat number.
How do I undo a rotation?
Open the bus, go to Seat Configure, select the rotated seat and apply the 0° preset. Save or update the bus and the seat returns to a standard forward-facing position.
Wrapping Up
Seat plan rotation is a small toggle with a large effect: it turns a generic grid into a map that looks like the coach your passengers are actually boarding. Enable PRO, open the Seat Configure tab, switch on rotation, then orient seats or entire rows until the map matches reality — and price the unusual seats accordingly.
Build one bus perfectly, duplicate it as a template for similar vehicles, and test each new layout on staging before it goes live. Do that and your seat map stops being a limitation and starts being a selling point. If you are still assembling the wider site, start with the core WordPress bus booking setup and layer rotation on afterwards.
